Hey Guest!

 Hey - did you know if you click on the title of a thread it will take you to the first unread post since you last visited that thread?
 but were afraid to ask:
  STOP!! Never post your email address in open forums. Bots can "harvest" your email! If you must share your email use a Private Message or use the
  smilie in place of the real @
 Pretty Please - add it to our Events forum(s) and add to the calendar! >>
PaulLongBl
Member
Offline
TR3A Seat Bottom Rebuild [Pics needed]
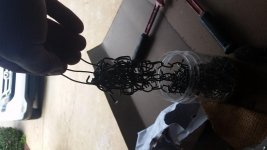
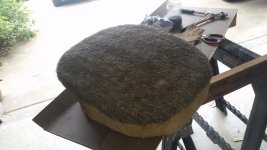
Does anyone have any step-by-step pictures on rebuilding the bottom seat portion using the Moss seat kit? Plenty of pictures of the back rebuild and completed shots but none on the reassembly/covering of the spring bottoms. I know it's not an overly complicated setup and that I'm making complicated then need be but I'd like to make sure I get it right before I cut anything. Reverse assembly sounds logical but the seats were redone at one time by using only a foam pad placed over the springs, then covered by the seat covering. Thanks in advance for any pics.
Does anyone have any step-by-step pictures on rebuilding the bottom seat portion using the Moss seat kit? Plenty of pictures of the back rebuild and completed shots but none on the reassembly/covering of the spring bottoms. I know it's not an overly complicated setup and that I'm making complicated then need be but I'd like to make sure I get it right before I cut anything. Reverse assembly sounds logical but the seats were redone at one time by using only a foam pad placed over the springs, then covered by the seat covering. Thanks in advance for any pics.
Last edited:


.jpg")
.jpg")
.jpg")
.jpg")
.jpg")
.jpg")
.jpg")
.jpg")
.jpg")
.jpg")
.jpg")
.jpg")
.jpg")