• Hi Guest!
    You can help ensure that British Car Forum (BCF) continues to provide a great place to engage in the British car hobby! If you find BCF a beneficial community, please consider supporting our efforts with a subscription.

    There are some perks with a member upgrade!
    **Upgrade Now**
    (PS: Subscribers don't see this gawd-aweful banner
Tips
Tips

TR2/3/3A TR3A Front Bumper Mount

71TR6

Jedi Hopeful
Country flag
Offline
I’m having a heck of a time getting the front bumper fitted to my TR3A. I bolted the brackets to the bumper and the mounting holes don’t match up with the holes on the front nose (32 1/2” separation). The holes on the brackets when mounted to the bumper are 33 3/4” separation.

Are there differences between the 3 and 3A nose, bumper and bumper brackets?

Ron
 
3's and 3A's/B's have different bumpers and brackets. See if this will help: Check what you have with the Moss Motors listing here: > Front Body Fittings TR2-3B <
 
Thanks Mickey,

I’ve got the right brackets for the TR3A. They fit the bumper I have but the slotted bracket holes in the center are too far apart to mount to the car.

I see there are two bumper bars- one for a tr3 and the other for a TR3A. I really can’t tell what the difference is between the bumpers so do you have any insight on this?
Ron
 
Sorry, Ron - been a long time since I messed with TR3's. Hopefully someone with more recent experience will chime in soon; we've several folks here who can help so stand by.
 
In the fit up, tighten NO bolts.Have a helper hold up one end and finesse the braces to see
which one may need to have a hole slotted to achieve fitment.
Do NOT forget to put tape on the fenders to save the new paint!!
If your braces are original they are likely bent a little. If AM do not be afraid to beat the heck
out of them to get them to fit.
All is fair in love and bumpers..
Mad dog
 
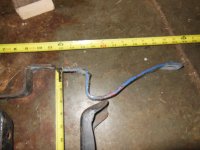
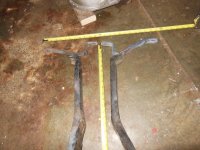
Yes the tr3a bumper is a difficult fit. The tr3 is easier to fit because the brackets hang under the apron and do not go through the apron.

The way to fit the tr3a is to let the brackets hang untighten at the beginning then go around and tighten in place after all the pieces are in place. The 2 inner brackets need to line up with the holes in the apron and need to slide kinda, so that the bolts can get started and not damage the apron, but they need wiggle room.

Do not try and tighten or snug up the inner brackets early because they will push and pull everything around too much.

The 2 inner brackets came with a threaded nut to accept the bolt that comes through the front of the apron. If you can get the inner brackets close to fitting at the holes in the apron, then the everything should work. If not, the apron might be too far out of line and need to filed and slotted some. The inner brackets are difficult to bend, but you can gain some room there also.

I worked at trying to get all 4 points of fitting perfect and found it very challenging, so I settled with getting close and tightening as a whole unit.

steve
 
I messed around with it yesterday trying to adjust the bumper brackets on the bumper to make up the 1 1/4" difference between the bracket holes and the apron holes and was unable to get it to fit. As far as I know, the brackets are original but weren't on the car when I purchased it so they may be bent out of shape. Since I noticed the location of the bumper bolts in the slots are not the same, I'll do some tweaking of the bracket bends today to try to eke out a little more adjustment.

I appreciate everyone's guidance and suggestions
 
I have worked it in reverse to diagnose the issue .Put the brackets on the car and take a tape to
the little bastards to see which is off and where.Think symmetry. center line to the first hole
should be like the other side ect.
Mad dog
 
I worked it in reverse and I think somebody was mucking around with the brackets for some reason. I shifted them shifted outboard as far as possible and am still 3/4” off on each side when I drop lines to the floor. You can see the location of the mounting hole sketched on the floor relative to the bumper hole location designated by the line.
IMG_0675.jpeg

I also scaled the photo in the Rimmer catalog to see what the dimensions should be. Using the outer holes as a reference (measured 49.25 on my bumper) since they appear to be in the same location on TR3 and TR3As. I measured the distance between the overrider mounting holes at 28”. I then measured and scaled the distance from the Rimmer photo and calculated 28.38 which confirms I have a TR3A bumper.
IMG_0676.jpeg

This tells me something is seriously out of whack with the brackets.
Does anyone have any TR3A brackets that they wouldn’t mind using to create a dimensions and angles sketch or, at a minimum, snap a picture for me so I can at least check angles?
Thanks!
 
I took some pictures of some brackets if that helps? Tell me again what exact number you need, and I will get it. I have a tr3a and tr3 here.

steve
 

Attachments

  • DSCN1689.JPG
    DSCN1689.JPG
    3.4 MB · Views: 57
  • DSCN1688.JPG
    DSCN1688.JPG
    3.3 MB · Views: 72
Well, I ended up ordering TR3A brackets off Ebay and they arrived late last week. They are the same as the DSCN1689.jpg picture that Steve provided (thanks!). The TR3A bracket I received is on the left in the image below, the mystery bracket that came with the car is shown on the right.
Brackets.JPG


I have no idea which car the right bracket fits so they're going in the scrap bin.

Thanks for everyone's help and guidance!

Ron
 
Back
Top