• Hi Guest!
    You can help ensure that British Car Forum (BCF) continues to provide a great place to engage in the British car hobby! If you find BCF a beneficial community, please consider supporting our efforts with a subscription.

    There are some perks with a member upgrade!
    **Upgrade Now**
    (PS: Subscribers don't see this gawd-aweful banner
Tips
Tips

TR2/3/3A TR3A engine bay

NutmegCT

Great Pumpkin
Bronze
Offline
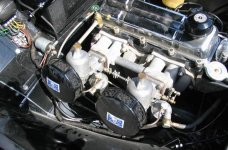
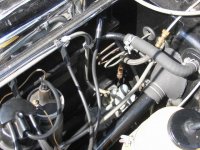
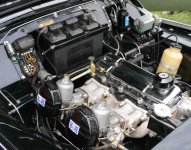
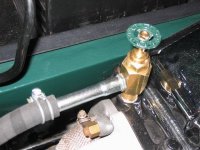
Is there a good online source of pictures of an original (or fully restored) TR3A engine bay that looks like it's fresh from the factory?

As the Piggott Original book is out of print, I'd like a primary source as reference to bringing mine to "original look". It's already got so much going for it, but there are a few things that have weathered and/or been altered.

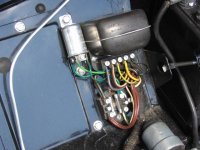
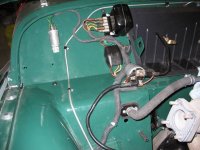
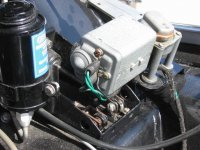
Wiring runs and colors, peripherals placement, colors of valve cover, radiator, engine, starter, master cylinder, solenoid, etc.?

Brosky's TR6 restoration site is excellent. I'm looking for something similar for my TR3A.

Thanks all.
Tom
 
Don Elliot would probably post some photos, if he hasn't already.
 
I have lots of photos of original details but I need to know how to post photos. I used to be able to before Basil changed the system.
 
Click Reply on the bottom of post

Scroll down to file mgr

browse

add etc

Patrick
 
Here are a few. My bolts are stainless. They should be body colour.
 

Attachments

  • 4713-CarbsandEngine.jpg
    4713-CarbsandEngine.jpg
    56.7 KB · Views: 181
  • 4714-Engine-Dist.Side.JPG
    4714-Engine-Dist.Side.JPG
    58.8 KB · Views: 182
  • 4715-OttawaBritishCarDay2005EngineJPGs.jpg
    4715-OttawaBritishCarDay2005EngineJPGs.jpg
    168.9 KB · Views: 193
  • 4716-HeaterTap.JPG
    4716-HeaterTap.JPG
    47.6 KB · Views: 113
I hope that this fits properly. It's from a show that I expect to see you at later this year.

mini-blw06%20150.jpg
 
Tom - You will notice a difference in my photo (TS 27489 LO) and the one from Paul who has a later TR3A especially around the voltage regulator. At a certain point S-T stopped putting in the separate bolt-in panel that was used on RHD TRs for the master cylinders. I can also tell that Paul's is later than mine by the outlets on his brake master cylinder. On mine the outlet pipes come straight up. On Paul's, they come out at a forward incline. Both are correct.

You will also notice that Paul has two brass number plates above his battery, whereas on mine (black), the upper one is painted body colour. It came that way and has always been that way. This upper brass plate was put on by Mulliners who built and then painted the bodies. Later, when S-T assembled the rest of the car, they put on the second lower plate and naturally this one stays brass as all the painting had been done earlier.

As with mine, both show stainless or clear zinc plated bolts. According to the judging standards from TRA, they should be painted body colour. Mine were during its first life, but I like the idea of the shiny stainless bolt heads. And the TRA judges always dock me a point for this.
What I enjoy is driving my TR. It's mine and I like it this way. At TRA, last June in Ohio I got 89 points and second in class out of 5 in the judging - and that was with 94,000 miles since I finished my restoration in 1990.

In short, it's your car, do it the way you like. I don't mind when judges dock me a point for washers under a nut where there should be no washer. Also when they dock me a point because I am missing washers where they should have been originally. You can't let these judges drive you crazy. We're all here for a short time, let's not make it a hard time.
 
Tom I found a few more.
 

Attachments

  • 4718-BodyPlates&Battery.JPG
    4718-BodyPlates&Battery.JPG
    50.1 KB · Views: 149
  • 4719-ControlBox-EarlyTR3A.JPG
    4719-ControlBox-EarlyTR3A.JPG
    42.6 KB · Views: 105
  • 4720-ControlBox-LateTR3A.JPG
    4720-ControlBox-LateTR3A.JPG
    42.8 KB · Views: 142
  • 4721-Wiper-Early-Screw-onTerms..JPG
    4721-Wiper-Early-Screw-onTerms..JPG
    51.1 KB · Views: 124
That should keep him busy. I was over to Tom's garage to try to help him out with the starter late Tuesday and his car is very nice. It does need some under hood detailing and that's why these pictures will be a big help.

I say that not as a critic, but only because Tom told me it was his next project, after the starter.
 
These photos are incredibly helpful. And very interesting to me when I note there are some relatively substantial variances (like the vertical versus horizontal voltage regulator, and flasher placements).

While I wait for the starter shims to arrive I'm peeking and poking around under the bonnet, seeing what might be done in the near future. I feel *very* fortunate that so much of my car is original - even the engine, which was a complete surprise.

I'm still puzzled by the "coating" over the original paint in the engine bay. In some small areas it isn't tight, and peels away something like cardboard. As you've seen from my other pictures, that coating is a dull black in color. As I can't afford to empty the engine bay and repaint it, I wonder if I'll just have to live with the "sooty black" finish.

https://www.mgexperience.net/journal/pictures/view/1596


Thank you guys for the pictures and suggestions!
Tom
PS - I've seen several "battery box protectors" in some of the pics. Is that a recommended addition?
 
Tom, go to your local hardware store and buy some Krud Kutter, but if you can, get the Graffitti Remover version. It should take all of that old crappy paint away. If they don't have the extra strength version, try the regular. You may be pleasantly surprised at the results with a little elbow grease applied.
 
Tom - Your oil filler cap is one that might have been on a TR which was shipped to Canada. Cars to Australia also had thesem oil filler caps. The cards to USA had a similar cap but with 3 indents like for your thumb and 2 fingers. I still lose points at TRA for having an "unknown" or "not original" oil filler cap. They won't accept mine even toug I bought my TR brand new and that's the cap it always had. "Sorry Don, it's the wrong cap and that's all !" say the TRA judges.
 

Attachments

  • 4729-OilCap-Canada.JPG
    4729-OilCap-Canada.JPG
    44.7 KB · Views: 140
  • 4730-OilCap-USA.JPG
    4730-OilCap-USA.JPG
    51.2 KB · Views: 133
Don,

I still like the O.D. switch controversy the best! How did that go... Is it switched up for O.D. engaged or down for O.D. engaged? I would have just said, "It works doesn't it?"
 
Mine is up for on. It's quicker when you need it. When shifting out of overdrive, you need less delay time as you are usually slowing down. Did you ever go into a room and flick "on" the light switch where you had to flick it down ? Also it's the driver who is sitting in the car (or a friend for the first time in the driver's seat) who needs to be able to read the word "OVERDRIVE" on the body of the switch. It's no good to have the word visible from the outside of the car.

There was also the controversy in 1992 of the windscreen washer button location, which I underdtand after 10 years, TRA have altered the judging standards to be a bit more liberal because it was a dealer installed option.
 
Tom, FYI, Moss sells a fabric wrap that should go on and off easily, just to protect all that wiring in the meantime. Or, you could go the corrugated plastic tubing found at electronic stores. I'd hate to have all the wiring exposed like that...
I don't think I've ever seen a '3 without a battery box; these days, not so inexpensive protection. Someone on the list suggested a boat/marine store as a less expensive source; I've yet to check that out for my '6, but I will.
 
Back
Top