• Hi Guest!
    You can help ensure that British Car Forum (BCF) continues to provide a great place to engage in the British car hobby! If you find BCF a beneficial community, please consider supporting our efforts with a subscription.

    There are some perks with a member upgrade!
    **Upgrade Now**
    (PS: Subscribers don't see this gawd-aweful banner
Tips
Tips

TR2/3/3A TR3A Drive shaft cork seal

71TR6

Jedi Hopeful
Country flag
Offline
I'm refurbishing the drive shaft for the TR3A and when I pulled apart the spline, the cork seal fell out in pieces.

I checked all the major British car suppliers and was not able to find a replacement. Of course when this happens, the inclination is to turn to the internet where I came across a number of posts on various techniques to make these. I went ahead and ordered a bunch of cork in different thicknesses, some gasket punches (I've been wanting to get a set anyway so this was a good excuse), and scrounged some pipe in various diameters in order to punch out my own gasket.

For some reason, I decided to do another search and ran across Spicer drive shaft dust seals on Amazon. After a little more research and referencing a Spicer catalog, it looks like Spicer PN D2C (cork, metal threaded collar, and split washer) is an exact fit.... so $10.22 and a couple days later my drive shaft is reassembled.
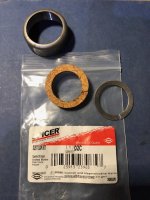
TR3 Driveshaft Dust Cap+SpicerD2C.jpg

I figure that this information would probably be helpful to post in case anyone else is looking for the cork seal. It might bypass some unneeded efforts to order a bunch of cork, new tools, and also spend a bunch of time.

Ron
 
I did not know that part existed. I bought a drive line off Craigslist and I cannot get the floating end to move. The guy I bought it from said he tried also. Now, I am thinking that the lock wash might be jammed in there or something. Do they use that lock washer or was that for a different application.
 
The splines are a larger diameter than the shaft where the seal goes. The split washer and split seal allow fitting. There were on the shafts originally. I don't see any way the washer could jam the slip joint. My guess would be corrosion. I'd try some penetrating oil or grease although you might not be able to force the grease in.
Tom
 
It isn't really a lock washer. It is a split washer that doesn't really lock into anything and just keeps the cork from getting munged up when tightening the nut. The splines might be gummed up so some penetrating oil may be in order.

Ron
 
SP53:
Heat and physical punishment will likely solve this problem. Another issue is that, without lube, the male spline can wear into the female spline, causing a mechanical steel-on-steel lockup. Only rotation of the splines relative to each other will solve this, but with lots of corrosion it just ain't easy. There also may be a plug at the end of the sliding yoke that you can remove for better access to the splines.


Bob
 
Funny story...or rather not so funny?!? When I first dismantled a drive shaft I pulled the shaft apart and the cork seal got gouged into the splines, making a spline shape. The splines were so perfectly cut in the old seal that I spent an hour duplicating the spline shape in CAD so I could cut a fresh cork gasket. It came out beautiful on the laser cutter with a perfect spline in the cork. Then I went to assemble it...only to find that the spline shape was not needed. In other words, I spent an extra hour making a pretty spline, when the seal is supposed to be just round. Round would have taken 2 minutes to design and cut. Oh well.
 
If it makes you feel better, I did something similar in restoring my MG TD. The seat back, a large expanse of 1/2" plywood, had two cutouts near the opening for the drive-shaft tunnel. I dutifully reproduced them, but later realized that a PO had just cut them out, probably because the wood was dry rotted. Rather than waste a big piece of nice plywood, I just made new pieces and glued and clamped them in place. But I did feel a little silly.

As for the cork seal, thanks to Ron for posting this info. I ran into the same problem when I did my 4A drive shaft; I just cut a new seal out of 1/4" thick cork. It's not a critical seal, so it needn't be absolutely perfect.
 
Anybody have a picture or drawing anywhere showing where this goes? It's not shown on the drawing on the Moss website. I had my driveshaft apart last year and didn't see anything like it. No idea this even existed.
 
I'm going from memory, so someone correct me if I'm off, but I am pretty sure the drives shaft goes together like this:

The male splines are just a bit larger OD than the shaft they are on, so you have to install the screw locking sleeve first, then the seal, then there is a split washer that has to be spread to fit over the larger splines. The seal is slid inside the locking sleeve, and the split washer follows it , and has the job of keeping it flat and straight. Then the male spline can be slid into the female spline. Finally the locking sleeve is screwed into the female shaft. Since the split washer can not be spread to clear the larger OD male spline once everything is together, it keeps the joint from being pulled apart.

If you removed the sleeve, the seal and split washer likely remained seated deep in the locking sleeve. It still should have been difficult to remove the locking sleeve from the male shaft unless the washer and/or seal were missing. My first shaft I am pretty sure I just manhandled the sleeve off...which twerked the washer and cut the spline slots into the seal. Like you noted...there are no diagrams in the TR3 manuals, but I think the later manuals had a diagram.

If the seal is buried in the female sleeve, wouldn't that defeat the purpose? I'm assuming the point of the seal is to keep crud out of the splines (and keep the grease in). If that's the case, the cap, seal, and retainer should be placed on the male side, then the female sleeve put on, then the cap pressed on to the female sleeve.

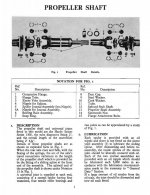
I found a pic in the workshop manual (thanks Randall, RIP!) of the driveshaft disassembled showing the sleeve.

0001.jpg
 
John's right, the cap goes on first, over the male splines followed by the retainer and washer. The seal and washer go inside the cap which is large enough to go over the splines but the washer and seal are not, so they are split to fit.
It makes sense when you do it. I'll post a picture if there is still confusion.
Tom
 
Back
Top