-
 Hi Guest!
If you appreciate British Car Forum and our 25 years of supporting British car enthusiasts with technical and anicdotal information, collected from our thousands of great members, please support us with a low-cost subscription. You can become a supporting member for less than the dues of most car clubs.
There are some perks with a member upgrade!**Upgrade Now**
(PS: Subscribers don't see this gawd-aweful banner

Tips
- We have a special forum called "Member Articles" where you can submit actual articles for consideration for publication. Learn More
- Don't have an Avatar? If not, your avatar will default to the 1st character in your username. Go into "Account Details" to change your Avatar.
- Some basic forum navigation info: click
Hey - did you know if you click on the title of a thread it will take you to the first unread post since you last visited that thread?
- Hey Guest - Is your British Car Club in our Clubs database? If not, send me a PM - Basil

- Looking for a local club? Click the "Clubs" tab above and browse hundreds of clubs world-wide.
- Add Android or iPhone APP: click
- Did you know - any picture or video you add in your posts in any marque-specific forum will also get added to the Media Gallery automatically.
- A few more tips about posting and replying: click
- Hey there Guest - be sure to keep your profile page up to date with interesting info about yourself: learn more
- More tips and tricks on Posting and Replying: click
 STOP!! Never post your email address in open forums. Bots can "harvest" your email! If you must share your email use a Private Message or use the
  smilie in place of the real @
- Want to mention another member in a post & get their attention? WATCH THIS

- So, you created a "Group" here at BCF and would like to invite other members to join? Watch this!
- Hey Guest - A post a day keeps Basil from visiting you in the small hours and putting a bat up your nightdress!
- Hey Guest - do you know of an upcoming British car event?
 Pretty Please - add it to our Events forum(s) and add to the calendar! >> Here's How <<
- Hey Guest - you be stylin'
Change the look and feel of the forum to fit your taste. Check it out
- If you run across an inappropriate post, for example a post that breaks our rules or looks like it might be spam, you can report the post to the moderators: Learn More
- If you would like to try some different "looks" or styles for the site, scroll to the very bottom, on the left and click the Style Selector.
You are using an out of date browser. It may not display this or other websites correctly.
You should upgrade or use an alternative browser.
You should upgrade or use an alternative browser.
TR2/3/3A TR3 throttle linkage bell crank.
- Thread starter DavidApp
- Start date
Frank Canale
Jedi Warrior
Offline
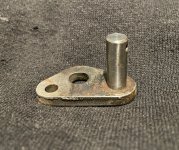
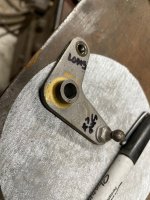
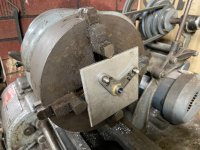
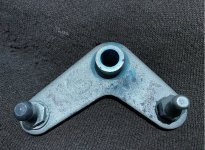
I had put this project off till I got an old Atlas lathe from the shop I worked in during high school. Yes some 40 years later I had the lathe that I had played with many years ago. The lathe has had many years of abuse but I felt it would suit my needs. I decided after some precise measurements it would be better to machine a new pin to match the original after I removed it. Heating the joint to melt the silver solder and a gentle twist the pin was out and could be reproduced, yes on my old lathe. The new pin was silver soldered back in the mounting plate including a detail that would only matter to me. The cotter pin hole is orientated the same as the original. I doubt any two were ever done the same but a fun detail to take note of. Now the pin is back to original size, the next task is to put a bronze bushing in the bell crank. I located a 5/16 OD 1/4 ID bushing at a local industrial supply store. The original pin size measured above the cotter pin where there is no wear was a few thousands under 1/4. Knowing this I could know how much to machine the bell crank undersize so when I pressed the bushing in it would shrink the ID so I was able to achieve an exact .001 clearance Pin to bushing and now have a buttery smooth bell crank. I added shim washers above and below so there is minor room for the bell crank to move up and down on the shaft. This was a fun project to test the old lathe out. I know this is way over kill but it keeps me interested in my project as I still have a long way to go. Frank
Attachments
Frank Canale
Jedi Warrior
Offline
Hi David,Your new bell cranks look great. I actually used an oilite bushing. I don’t believe there will be enough heat in the bell crank to hurt the oilite bushing. One thing I will start looking for is replacement pins that the linkage snap over. Mine have wear spots in them and need replacing. Frank
Frank Canale
Jedi Warrior
Offline
Once you have one, all the things you need to fix have a new path to completion. Some times you get to make an excuse to use the lathe, it does make some things a lot easier to do. Frank
What size was that oilite bushing?Hi David,Your new bell cranks look great. I actually used an oilite bushing. I don’t believe there will be enough heat in the bell crank to hurt the oilite bushing. One thing I will start looking for is replacement pins that the linkage snap over. Mine have wear spots in them and need replacing. Frank
Frank Canale
Jedi Warrior
Offline
I have to apologize about some details that I am mistaken about. I went off my memory rather than look back at my notes. I used a 5/16" x 1/2" x 5/8" bronze bushing. The plastic bag that the bushing came in list it as
Bronze bushing "FEB" SS-10-16-10. This is a SAE 841 sintered bronze oil impregnated bushing. I used a 3/8" 4 flute end mill to bore the bell crank, this makes for a very round hole for the bushing. I turned a mandrel to hold the bushing so I could turn the OD of the bushing. The pin that the bushing rotates on has a diameter of .310" , same as the original. The ID of the bushing is roughly .003" to large so I turned the OD of the bushing to .377" so it has a .002" press fit and shrinks the ID of the bushing to leave .001" clearance.The height is roughly 9/16 and this was accomplished by filing the bushing after it was pressed in. I will be truthful that I did not get this fit on the first try. It took 2 tries because I then knew how the bushing would shrink. Sorry to bore you with the math to get the fit I was looking for. I did this exercise just to see if the old lathe could still hold tight tolerances. It can but it is slow, no digital readouts mostly you have to sneak up on the measurement you are shooting for. Frank
Bronze bushing "FEB" SS-10-16-10. This is a SAE 841 sintered bronze oil impregnated bushing. I used a 3/8" 4 flute end mill to bore the bell crank, this makes for a very round hole for the bushing. I turned a mandrel to hold the bushing so I could turn the OD of the bushing. The pin that the bushing rotates on has a diameter of .310" , same as the original. The ID of the bushing is roughly .003" to large so I turned the OD of the bushing to .377" so it has a .002" press fit and shrinks the ID of the bushing to leave .001" clearance.The height is roughly 9/16 and this was accomplished by filing the bushing after it was pressed in. I will be truthful that I did not get this fit on the first try. It took 2 tries because I then knew how the bushing would shrink. Sorry to bore you with the math to get the fit I was looking for. I did this exercise just to see if the old lathe could still hold tight tolerances. It can but it is slow, no digital readouts mostly you have to sneak up on the measurement you are shooting for. Frank
I recently refurbished my original bell crank with a quick and cheap repair. Most of the wear was in the bell crank itself so I just drilled the hole to 3/8" and pressed in a 1/4" x 3/8" oil impregnated bronze bearing purchased from Lowe's for $4. They didn't have a 5/16" x 3/8" so I had to drill the bearing to 5/16" after install. I'm not sure if the drilling operation will affect the lubricating properties of the bearing, but hopefully the repair will last long-term. There is almost no slop in the assembly now and it took less than an hour.
Frank Canale
Jedi Warrior
Offline
This is why I shrank the bushing to keep from having to do any sizing to the ID of the bushing. In this case it won't make any difference as the bell crank only moves a small amount. The drilling, machining on a lathe, reaming of the bushing ID will most of the time smear bronze over the lubrication pores and limit the lubrication process. I tend to way overthink the repairs, improvements to my parts as the repairs are so much better than original and will outlast me if I ever get my car finished. Frank
RichB4493
Senior Member
Offline
Hi David.RichB
I think you may have your bellcrank mounted backwards. I think the wider boss should be on the outside away from the engine. That puts the longer leg at 6.00 clock and the shorter leg at 2.30.
David
Per your advice I tried flipping over the crank as you suggested. I know why I did it. It ran into the head of pivot mounting bolt when I did it as suggested. Is that bolt special with a thinner head? I ground down the head of the bolt for more clearance and mounted with the thin boss to the engine and the little arm towards the radiator. It still wobbles a bit even with some washers but seems better than before.
Rich
My apologies.
Looks like I had a senior moment.
At some point I managed to flip my assemblies over. Looking at the linkage on my TR the long leg is horizontal and short is vertical with the thicker boss towards the manifold. That will allow a standard bolt head to clear.
The heat shield makes it very difficult to see so I mounted one to a spare manifold.
David
RichB4493
Senior Member
Offline
Sheize!!! I shaved it down already. No real harm just a thinner bolt head. Well it all fits. I can mount up my spare the correct way with the long arm to 3 o’clock. I’ve played with a thin wrap of steel foil to shim the post and that seems to work. … until it doesn’t. But it won’t be any worse than the current play.


