• Hey Guest!
    British Car Forum has been supporting enthusiasts for over 25 years by providing a great place to share our love for British cars. You can support our efforts by upgrading your membership for less than the dues of most car clubs. There are some perks with a member upgrade!

    **Upgrade Now**
    (PS: Upgraded members don't see this banner, nor will you see the Google ads that appear on the site.)
Tips
Tips

TR2/3/3A tr3 resto questions

emmett1010

Jedi Hopeful
Country flag
Offline
I'm trying to reassemble TS 16951L, and I have several puzzles to sort out!
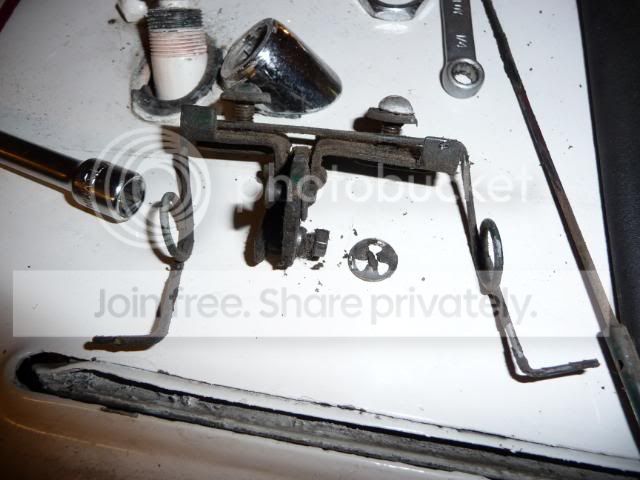
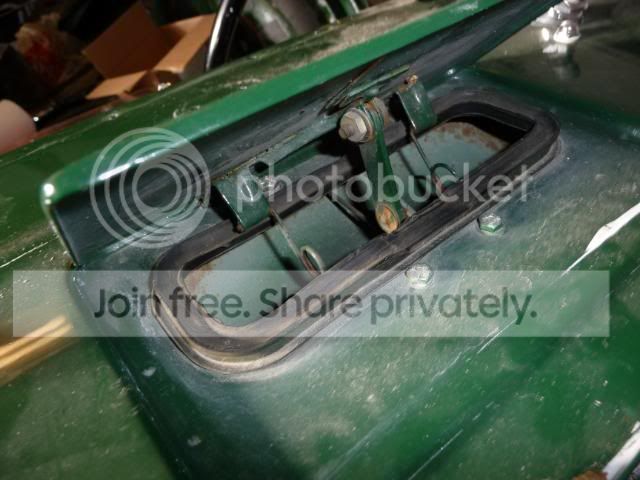
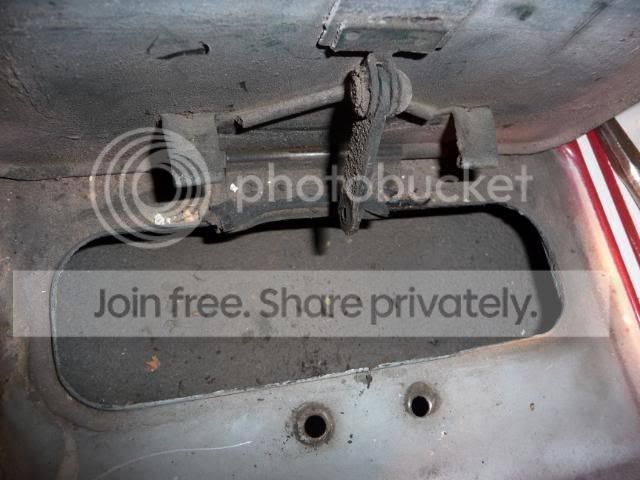
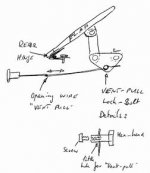
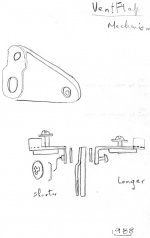
1) Is there a available picture of how the scuttle vent is to be assembled?
2) When installing the trunk and the spare tire lid gasket, does the gasket protrusion face inwards, or outwards?
3) I've discoverd that my front bumper is from a tr3a.
Does anyone offer the brackets from the frame to the bumper itself. The support brackets are still on the bumper.
Any and all help is greatly appreciated,
Emmett, 15 months and counting
 
I don't know of any vent photos, but perhaps I can take some in a few weeks when I put it back together on TS13571L.

I believe the gasket protrusion should be inward for both places.

The 3A front bumper and brackets are not going to fit well with a TR3 front apron. The TR3 brackets are quite different than the 3A versions. The TR3 had two brackets on each side from the blade all the way back to the frame, which loop downward to miss the lower edge of the apron and back up to the frame. The 3A system has a smaller bracket behind the bumper blade, which bolts through the apron to the single bracket that runs back to the frame; all entirely above the lower edge of the apron.

I'm not sure offhand how different the bumper blades are, but the bolt holes where they attach to the brackets are in different locations. The TR3 bolts are over 12" apart on each side; while the 3A are only 8 or 10" apart. ISTR the blades are different shapes as well.

To use the 3A brackets, I think you'll have to massage the front apron, plus drill two big holes where the bolts go through. Kind of a shame, as unmolested early aprons are getting scarce.
 
TR3driver said:
I'm not sure offhand how different the bumper blades are...
Below are 2,000 words worth of pictures:

1955_triumph_tr3_20_m.jpg
-- TR3A style (left)

1954%20Triumph%20TR2.jpg
-- TR2/3 style (below)

Note that the earlier bumper is much "flatter" in profile.
 
OK
Thanks Randall;
No I have an extremely nice front apron, complete with surround.
I'm not going to drill holes in it!
The tr3a bumper is nice so it should fetch a decent price towards the correct bumper.
Any suggestions/recomendations as to locating a new/used tr3 front bumper? Are the new ones listed on ebay any good?

Surely someone knows of a picture/sketch of the scuttle vent?
Thanks again, Emmett
15 months and counting
 
Below is a pic of the scuttle vent assembled. The fulcrum mechansim attaches with the screws shown in front of the gasket. It also holds in place the spring. The opposite ends of the spring slide into the vent lid. I'm pretty sure that I put in the fulcrum assembly first and attached the pull rod, along with the spring kinda hanging down. Then I screwed on the lid and slipped in the springs ends and then attached the fulcrum end to the lid.

The first time you do it should drive you nuts. :jester:
 

Attachments

  • 16183.jpg
    16183.jpg
    35.9 KB · Views: 352
Emmett,

I have a complete set of early brackets and bumper I got off ebay. My apron is the type needing the thru-bolt brackets (which I have) and the newer style 'non-symetrical' bumper (which I have) so I will not be using these earlier parts. The bumper is not perfect (tho not bad) and has been straightened out -I was told it was original, but I don't know. These parts are available new from Moss but I'll consider an offer if you'd like to take mine off my hands.

Jerry

PS Here's a picture I took that was suppposed to help me remember how to put the vent back in.
 
Emmett,

I am looking for a bumper for a 3A if you are interested in selling it.

Cheers,

M. Pied Lourd
 
Last time I installed the vent; I took out the clevis pin that connects the linkage to the lid, and disconnected the spring from the lid. Fastened the linkage to the body in front of the hole, with the spring trapped by the linkage. Installed the pull rod and tightened the screw that locks it to the linkage. Then screwed the lid to the body with the lid held vertical to give access to the screws. Lower the lid to about 45 degrees to insert the spring ends into the lid, then lower it further, to maybe 30 degrees to insert the clevis pin and it's cotter pin.

Then I decided the pull rod wasn't quite right, and had to remove the clevis pin again, to access the set screw that locks the pull rod to the linkage. 2nd time was perfect.

I plan to eventually convert TS13571L back to a TR3 apron & bumper (DPO installed the later parts before I got the car), so I am also interested in the early brackets if anyone has some they'd like to part with. Need a blade too, I think. Doesn't need to be show quality, but I would rather that it not be too mangled either.
 
Emmett,

Don't know if they will help, here are a few shots from my TR3's during disassembly.

P1040127.jpg


P1040123.jpg


P1030158.jpg


P1040129.jpg


P1040130.jpg


Cheers,
M. Pied Lourd
 
Here's another sketch I found whick I drew in 1988 while I was taking my 1958 TR3A apart for the full restoration.
 

Attachments

  • 16205.jpg
    16205.jpg
    46.9 KB · Views: 183
Back
Top