• Hey Guest!
    British Car Forum has been supporting enthusiasts for over 25 years by providing a great place to share our love for British cars. You can support our efforts by upgrading your membership for less than the dues of most car clubs. There are some perks with a member upgrade!

    **Upgrade Now**
    (PS: Upgraded members don't see this banner, nor will you see the Google ads that appear on the site.)
Tips
Tips

TR2/3/3A TR3 new main bearings

HJR

Freshman Member
Offline
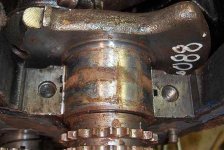
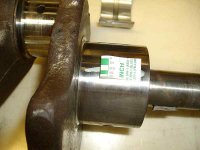
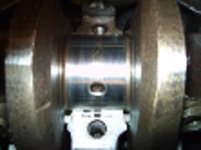
I am in the process of installing new main and rod bearings in my 1959 TR3A engine. With the timing chain disconnected, all rods disconnected and the front main and rear main installed with bolts per spec torque with engine assembly grease on the bearings the torque to turn the crank shaft is about 5 ft-lb. Is that ok? When I install the center main bearing with grease and with the bolts to spec torque the torque to turn the crankshaft rises to about 25 ft-lb. The crank shaft end float and thrust washers have been adjusted so end float is .005. Is 25 ft-lb too much? Should I emery cloth with very very fine grit at high spots as revealed by lack of assembly grease at spots on the center bearings? The crank shaft journals appear to be very mirror smooth. The new bearings were from VB and are silver color vs yellow color on the old rod bearings.
 
Sounds too stiff to me. And no, I wouldn't try to sand down the crank. You may have a bent crankshaft (they can be straightened), or the block may be warped (it can be line-bored). Or it could just be that the bearings you got are not the right size.

Find the problem and fix it right. This isn't a Model T.
 
NAPA sells a product called "Plastigage" It's just a wax string that you lay on the journal when you install the cap. You then remove the cap and look how widely the gage got squashed. There is a scale to determine the bearing clearance based on the width of the squash.

For the crank straightness, you will need a dial indicator. Lay the crank in the block with only the front and rear bearing shells in place. Do not install any caps. Then use the dial indicator on the middle journals to read the "bend" in the crank as you turn it. 0" would be perfect, but that almost never happens. More than .005" is cause for concern, and more than about .010" would be my absolute limit.

With these 2 checks you will get a feel for what is going on. Tight clearances means you have the wrong bearing size for the crank grind. Bend is actually straightened by tappng in the right location with a hammer and dull chisel. It takes a very competent shop to know where to tap, though!

John
 
Thanks for the good helps!
I just measured the old bearing thickness versus the new bearing thicknesses. The old bearings measure .0705 and the new ones also measure .0705 but the old bearings seem to have a finish on them that is almost black while the new ones are bright silver. Maybe I should put the old bearings back in? Were the old bearings originally silver and acquired a black coating through 50+ years and 170,000 miles of non-detergent oil or were they originally coated with some sort of slick coating? Also I see that the TR2 Service manual (with TR3 supplement) says that there should be .0010 to .0025 between the journal and bearing diameters. It also specifies ovality and taper of less than .002 for journals.
I will use the dial indicator and see what that reveals.

I see this is going to be a bigger project than I originally thought!
HJR
 
If you do use the plastigage to verify bearing clearance make sure the crank, bearing shells and block/rod bearing recesses are completely clean and dry. Having oil or assembly lube on them will make the results look tighter than they really are. Also, when torquing down the caps do not rotate the crank or it will smear.
 
Original bearing shells were "tri-metal" construction, meaning they had a (relatively soft) steel backing, then a layer of copper, then a layer of a very soft alloy (commonly known as "Babbitt metal"). The babbitt was originally a silvery color, but may have darkened over time.

But there is a good chance the bearings have already been changed once, and some replacements are made differently. Last I heard, the tri-metal ones were NLA.

Long time ago, I built an engine that was maybe just a bit stiffer than that (I didn't try to measure it, but I could not turn the crankshaft by hand without some sort of lever). Several people told me "it will wear in", so I went ahead with the job. It started and ran OK ... until about a mile into the first test drive. Then it threw a rod through the side of the block!
 
Just for information--I have owned and driven this TR3 since I bought it new in 1959 except that it was in storage from 1982 until 2000. I never did change the main bearings. Back about 1980 I did change to the larger pistons and sleeves and installed new rod bearings but I did not change the main bearings then. The rod bearings I put in then now have a yellow colour to them and have about 700 miles on them without any problems. At the time I replaced the rod bearings I paid no attention to the crank shaft torque. The whole job was done in less than a week with the engine/transmission on the frame. All replacement bearings I have received so far were ordered to be "std" size, at least that is what it says on the packaging.

HJR
 
Certainly wouldn't be the first time that the wrong size bearing came out of a sealed package! But I doubt that is your problem, since bearings normally only come in .010" steps and that would lock the crank solid.

Are you sure the shells and bores were absolutely spotless, and the locating keys went into their matching slots? I like to scoot them back and forth a bit, to make sure they are properly seated. And I've still found one or two that had a spot of dirt trapped behind the shell.

Is there clearance at the thrust washers?

I've been told that cranks will sometimes warp just from being stored on their sides without being properly supported. ("Always store crankshafts standing on end.") Might be the same thing could happen just because the bearings were unevenly worn? I dunno, just throwing out ideas.

FWIW, I've found several inexplicable machining errors in my last 2 TR3 motors. Inexplicable in the sense that I had no end of problems with them, but at one time they must have run OK. In my case, it was the liner seats not being square to the block surface (or vice versa); but maybe yours wasn't line bored properly? Again, just a thought.
 
I wiped out the seats for the main bearings with clean cotton shop towels. I will do that again and look carefully with a trouble light for any carbon globs, etc.

I just checked the thrust washer clearance again. As far as I can get the feeler gauge to go around the journal it measures .005 with a snug fit at both the front and back when I push the crank shaft one way or the other. Kind of surprising to me that it has not worn more after 170,000 miles with original thrust washers. Spec is .004 to .006.


I have to wait 2 days now on the dial indicator that I will order tomorrow.
Have a happy weekend and Mother's Day.
HJR
 
Some more questions: Since the original tri-metal main bearings are not available should the available one metal main bearings be set with the same journal to bearing clearances as the original? Also should the clearance change since the oil has changed from non-detergent 10W30 to Castrol GTX 10W50 with added trace amounts of zinc? Maybe that is a question for the oil vendor? This is for normal city driving and interstate driving at up to 75 or so miles per hour(i.e. not racing). I bought some "Plastigage" and will try that while I wait for the dial gauge.

HJR
 
Just fyi, but King sells tri-metal bearings that are considered equivalent, or certainly very good replacements similar to Vandervell bearings. I don't believe you should change any of the recommended clearances regardless of bearing make or oil type. Hope you can sort it out easily - one easy thing to test is to perhaps torque up all caps but without the thrustwashers - at least you can take them out of the puzzle if you see similar resistance.
 
I will try removing the thrust washers. Thanks for the tip.

This PM I measured with the "Plastigage" at the centre main bearing. It measured a little less than .002 at the cap with the shaft laying directly on the bottom bearing and torque to 85 ft-lb. That is about right with no clearance at the bottom bearing. Spec is .0015 to .0025. Getting the "Plastigage" off afterwards took some scrubbing with an alcohol dampened rag.

Hopefully, the dial gauge will resolve the whole situation.

HJR
 
I'd say give Ken Gillanders a call at British Frame & Engine, but it looks like he removed his phone number from the website. He does have an e-mail however. I bought my engine parts from him when I restored the TR, and he knows what's out there and what's good and what's not.
 
Just a quick question...are you dealing with a fresh machined undersized crank or one with an original finish on the bearing journals? If it is machined undersized, it is best to check every journal, as mistakes in machining are common. If original, it's still a good idea to check all journals, but not as likely to find a mistake, unless the bearing shells are mis-marked.

The easiest way to get the wax off is using your fingernail. Your nail will scrape the wax of without damaging the bearing or journal. Since it is a wax, any trace will also melt away within seconds of the initial engine start too.

I second not changing clearances for the bearing or oil type.

John
 
John,
The crank shaft is original and has not been machined. I will check all the journals with the gauge as soon as I get it.

Next time I will try the fingernail.

Art,

I will try asking Ken if VB, Moss, TRF, and Revington all get their bearings from the same source. I did notice that Revington recommends used bearings for replacement standard bearings.

HJR
 
HJR-

Not sure if you are in the market for bearings, but I've had good dealings with British Parts Northwest. They sell the King Tri-metal bearings. Likely the other big vendors do too, but they may not state the brand.

Randy
 
Well, I'm no expert, but I know a few FOGs. My engine was under 20' of salt water so the debris on my crank may not be exactly normal, but I'd guess it's not unusual to have some carbon build up that will be difficult to remove with a cotton swab. I don't think you can sand the crank, because of how hard it is -though you don't want to scratch it either. I used fine sand paper to clean the stuff off the crank before I could get Mike to mic it. It was my version of crank polishing. Here are pictures of how dirty it was, and how it cleaned up prior to using the plastic guage.

If it is that hard to turn over, and the bearings are properly sized, you may have some crud that needs cleaned off.

The motor is running at this point, but only has a few hours on it -never actually moving the parts that will be a TR3.
 

Attachments

  • 28548.jpg
    28548.jpg
    66.3 KB · Views: 246
  • 28549.jpg
    28549.jpg
    63.8 KB · Views: 232
Here is a pic of the centre main journal. There is a discoloured black streak on the journal where the oil comes in. There are two very narrow streaks at the edges of the journal all the way round. Is it necessary to remove all this. The bearing does not even touch the journal in the centre where the oil slot is.
HJR
 

Attachments

  • 28550.jpg
    28550.jpg
    57.4 KB · Views: 213
Back
Top