• Hi Guest!
    You can help ensure that British Car Forum (BCF) continues to provide a great place to engage in the British car hobby! If you find BCF a beneficial community, please consider supporting our efforts with a subscription.

    There are some perks with a member upgrade!
    **Upgrade Now**
    (PS: Subscribers don't see this gawd-aweful banner
Tips
Tips

TR2/3/3A TR3 blown head gasket?

Ditto on the motor oil. Technically, it may be over-torquing just slightly; the book doesn't specify lubed or not. But for sure the inner nuts will be oily when you retorque them (since they live in an oil bath) so I figure it must be OK. And I've only had distorted studs when I deliberately went over the suggested torque. (Thought it might help with the blown head gaskets, but it didn't.)

Here's the torque sequence

 
Understood. Thanks
The new ARP stud set came with a graphite grease... I used it.
Pretty much the sequence pattern I used.
I must be getting weak. Torquing the studs made me sweat.:frown-new:
Russ
 
I am currently in the midst of rebuilding my TR motor and was a bit surprised by the "settling" I saw from my figure of 8 gaskets. I had steel figure 8 gaskets supplied with my kit. I used permatex copper spray dressing on both the fig8 and head gasket. I installed the fig8 and piston/liner assemblies. I then put the head on with no gasket and torqued to 10 ft-lbs. Let this sit overnight. The next morning the torque was considerable less than the 10. I re-torqued to 10 and let it sit for several hours. I then pulled the head off and install the head gasket and head. Torqued to 15 ft-lbs and let that sit over a long night. It had settled a bit the next morning. I finished the torquing in steps: 15;40;75;105 ft-lbs.

I am putting the motor in and starting it this weekend. I am seriously thinking about re-torquing before I install it.

What do you guys think?

Tim

btw, I measured my head to block clearance when torqued at 10 ft-lbs without a gasket. I measured 6mils on the left and 4mils on the right.
 
I'd go ahead and wait for the 500 mile service interval; get a few heat cycles on it. But I don't suppose it would hurt anything to retorque before installation, if you really want to.
 
Very little movement to get back to 105. Very uniform. Each of the 10 nuts turn roughly the same amount.
Sounds like you know this, but in case someone else doesn't: When retorquing, you should back off each nut slightly before turning it back to the specified torque. Doesn't have to be very far, but enough to ensure that the nut is turning when you get the torque reading.

The reason is an effect known as "static friction" or "stiction" for short. Basically the coefficient of friction is higher when the threads aren't moving, than when they are moving. For the same reason, you should turn smoothly to the final torque and try to avoid stopping just short of it.

https://en.wikipedia.org/wiki/Stiction
 
Last edited:
Good to know Russ! I re-torqued this morning. Very little movement to get back to 105. Very uniform. Each of the 10 nuts turn roughly the same amount. I installed today and hope to start up tomorrow..wish me luck...:smile:
Tim

Yeah man, good luck. Nothing like bring life back to motor.

I put mine back together with the new stud set (ARP). Nice studs, especially the hex hole in the top... keeps me from slicing my thumb and forefinger on sharp threads. The twelve points nuts are nice too. Smaller socket let me get the back nut on without removing the heater valve.
I think I made a mistake when I pulled the carbs off of the manifold at disassembly. I'm having a little trouble getting the idle and mixture reset. I can't for the life of me understand why lifting the piston 1/32" (and needle, therefore adding fuel), indicates a rich mixture if the RPMs go up. Seems backwards to me. Maybe someone can beat the explanation through my thick skull?
Also, I was surprised at the valve settings. After putting the valve train back on the head, all of my valves were too tight. Maybe I pulled the pedestals down closer than they were previously? Anyway, I had to adjust them all.

Good luck tomorrow.
And go 49er's
Russ
 
I can't for the life of me understand why lifting the piston 1/32" (and needle, therefore adding fuel), indicates a rich mixture if the RPMs go up. Seems backwards to me. Maybe someone can beat the explanation through my thick skull?
The venturi effect (which is what pulls fuel through the jet) is very dependent on air velocity through the venturi opening (the small gap below the piston). When you lift the piston, it increases the size of the air opening, which cuts the velocity. The result is less fuel pulled through the jet even though the jet opening is very slightly larger.

For the valves, my guess would be that your new head gasket crushed a bit more than the old one did (or perhaps is made with thinner copper). Maybe the old one wasn't clamped as hard as it should be; which might explain why it started leaking. At any rate, I wouldn't worry about it, just reset the valves and go on.
 
Randall, I think your dead on concerning the valves.

I see your point about raising the piston decreasing velocity and "suction", therefore leaning the mixture. My thought was the increase in the cross section of the venturi wasn't as great as the increase in fuel delivery thru the raised needle setting, therefore richening the mixture. I'm sure you're right but I'll still ponder the situation.

Russ
 
Russ,
I bought ARP for my rebuild as well. LOVE the allen drive in the top! I pulled my intake manifold as assembly. Ken(poolboy) or Randall can answer the valve lift question far better than I.

My next project is to re-bush the carb bodies. The throttle shafts have too much play. I think it affects my idle. I got mine all hooked up and started tonight. She battled me on each hookup! Took 3x longer than it should have! The re-start went great! Verified my timing with a timing light and then put some gas in the tank and primed the carbs. Fired right up. Ran for ~15 minutes at 2500. No leaks (so far). No bubbling in the coolant. No blow-by out the vent pipe. The oil pressure after 15 minutes was 45# at idle. Above idle it went to 75# and the bypass kicked in. Very happy. I have up loaded some videos and pics to the TR4 link in my signature. I am running Valvoline VR1 10-30.
Tim
45lbs oil at 750 rpm hot idle.jpg
45# at idle...much better!
 
I just received a Lucas head gasket and it is marked with the name Lucas on the folded side of the gasket. I assume that this side will be going up towards the head. Is that correct? Also, would I solder the copper wire on the underside of the gasket, which would be towards the block? What type of solder have you used successfully? I have electrical lead free silver bearing solder that I have used on copper water pipes. Would that work? I would appreciate the help.
BTW, Russ, while you've got the head off, try spinning a new 1/2-20 nut down each of the head studs. If it binds about 2/3 of the way down, the threads on that stud are probably distorted and the stud should be replaced. Running a die down them to clean up the threads is not a good idea.

Also make sure the hardened flat washers under the head nuts are present and in good shape. People sometimes substitute common hardware store washers, which can crush under the load and cause the studs to lose tension. And even the original factory washers wear down after enough on/off cycles.

I like to install the head gasket smooth side down, as mentioned in the early editions of the owner's manual. But I'm not convinced it actually makes any difference; that information does not appear in the later manuals and the gasket was modified to allow installing it either way. Just seems to me that the folded edges of the gasket might be more secure against the larger surface of the head.

I hesitate to mention this, as it's strictly a kludge and perhaps not appropriate for you since all your liners stand up as they should. But on my TR3 engines where the liners don't stand up far enough, I've been tack soldering a ring of 26 AWG "half hard" bare copper wire around each cylinder, just outside of the folded edge of the head gasket.


I have not had a single head gasket problem since I've started doing this, even on the engine in my (now wrecked) TR3A that used to always start leaking within 3 months of a new gasket. I even reused one of the gaskets, and it still held the second time. YMMV

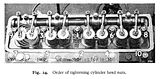
PS, don't forget to follow the tightening sequence in the manual, and tighten the nuts down in stages. I like to go to about 50-60 ftlb the first time, then about 85, then the final 100 ftlb.
 
Lucas brand head gaskets! Whoda thunk!

I used rosin core lead-tin "electronic" solder, but I don't think it matters. (Other than I find the unleaded stuff hard to work with.) Some folks even use super glue. I put the wire on the "folded" side and then installed with the folded side up. But again, I don't think it makes any difference, that's just what I did. Using the "folded" side made for an easy guide as to where to place the wire, so it was roughly centered over the edges of the liners.
 
I tried practicing the soldering with my old gasket and the new 26 gauge copper wire. I had trouble getting the right temperature, so I utilized the crazy glue to hold the wire in place. I put four or five spots of glue per cylinder to hold it in place. My question now is what did you do at the two ends where the wire meets? I just butted them and crazy glued them. Should I have overlapped them or twisted them together? I have not installed it yet. I'm hoping to install it this weekend. Thanks
 
Right, overlapped and soldered. I actually went back after that photo and redid that one, that's obviously not a very good solder joint. Unfortunately I neglected to take a new photo.
 
Back
Top