• Hi Guest!
    You can help ensure that British Car Forum (BCF) continues to provide a great place to engage in the British car hobby! If you find BCF a beneficial community, please consider supporting our efforts with a subscription.

    There are some perks with a member upgrade!
    **Upgrade Now**
    (PS: Subscribers don't see this gawd-aweful banner
Tips
Tips

TR2/3/3A TR2 Wing Beading

CJD

Yoda
Country flag
Offline
Looking ahead, I see that the body color plastic wing beading is NLA for the TR2. What is available has to be painted to match. I just wanted to touch base with the other TR2 owners to see how they handled the beading. Paint first, then install...paint the body and beading together...or some other way? I notice a lot of owners switched to the stainless beading, but I'd like to keep it as original as possible.
 
Hello John

Along the same lines do you plan to paint the wings, doors and other parts on the car or separate from the car. If you plan to loosely assemble the wings you could leave the plastic wing beading sticking a bit proud of the body.

David
 
On the TR3 I did each panel separately. That gives a better than new paint job. I think this time around I will do more like the factory. I'll prime the panels separately, but plan to assemble the body and paint it as a whole. The beading becomes problematic, though. The factory had color matching beading that was installed after painting. The current beading has to be painted. If painted installed, then removing the apron for mx would cause cracking of the paint where the bead separates. If painted separately, it's going to require a really good plasticizer to keep it flexible or the paint will crack on installation.

Your idea of a partial installation for painting may be a good option...!
 
John, be sure to check the profile of the beading, which should be a "D" profile rather than a round bead. I have been wondering about how to paint something plastic that needs to flex, so if you do decide to use some sort of plasticizer please share the product. Thanks!

Dan
 
John: Could you use the stainless beading and paint that? It would certainly be a lot easier to work with than plastic beading.

Matt
 
John: Could you use the stainless beading and paint that? It would certainly be a lot easier to work with than plastic beading.

Matt
You could but, IMO, the stainless beading is not all that easy to work with and has a different profile. Tom
 
They do make paint for the bumpers of new cars that is a bit more flexable then tradional paint, or do you have an extra set of fenders? You could install the beading onto it loosely and paint them, and carefully move them over to your car after the paint has dried.
 
The body shop supply store here has paint to match and then put into a rattle can. I have used it before and they get real close. Will that paint without the hardener be more flexible?
 
Thanks...some good ideas!

Dan, I had to sit and think about that a bit...then it sunk in. Definitely don't want round beading!

Matt, painting the SS beading was an option I was toying with. The only down side I came up with is that the TR2 has no beading along the sides of the bonnet, so I would have to cut the beading there, and figure out a way to cover the cut edges. It may be workable, but I need to figure out the details of using that option.

For Rub and Steve, I have used plasticizers before. They keep the paint softer, which prevents cracking, but also makes it a bit less durable. That could be a problem when buffing out the final paint. So far I think painting the beading separate with plasticizers seems the easiest option, but I'm still not committed. I have to work out how to hold 23 feet of beading while it gets painted. David's idea may be a good way...just leave it sticking out and paint it with the body. I like the rattle can idea...if not for this, then just to have an easy touch up paint for later. I'll have to ask about it at the local paint supplies!
 
I will probable paint the panels off the car as I think with my limited painting experience I will find that more manageable. Will decide after I have done the tub.

Paying work is getting in the way of TR work.

David
 
Most of the restored 2s that I am aware of all sourced the wing beading from an outfit in England named "Woolies" and used their part number 274. Woolies is at www.woolies-trim.co.uk Once at the site click on trimmings then to wing beading. The beading comes in white or black only so if your color is light order white - if dark order black. As I remember the shipping was more expensive than the beading. I ordered seven meters which is more than needed but I would rather be a foot too long then two inches too short! My painter cut the individual strips, hung them and painted before applying to the car. This was done now thirteen years ago and still no cracking, peeling or fading.

Lou Metelko
Auburn, Indiana
54 TR2LD
 
There are two ways to skin this cat, I like to trim up the stainless to fit as OE then paint it off the car.
It must be etched,primed first. The soft vinyl can be had from a VW outlet(after mkt) and painted as
the plastic it is
MD
 
How bad wrong is the TR2 piping sold by Moss? I've got an old post saved that claimed it was the correct cross-section, just needed to be painted.

The photo I've been given of the original beading doesn't look much like the stainless bead, and even less like VW beading.
tr2_beading_profile_1.jpg~original
 
Sorry, I lost track of this thread with everything going on. Thanks to all for the responses! Randall, that is how I remember the beading that came off...even the green I need. I'll be ordering tonight, as I'm reaching the point when it needs to be painted. I'll report back with how it looks...
 
Whenever painting plastic parts, consider using a product called "adhesion promoter" on the plastic. It softens the surface and allows for a better chemical bond between the plastic and the first coat of paint. It is nearly universally used by body shops for the plastic bumpers on so many cars. It comes in rattle cans and quarts and sprays on prior to that first coat of paint. It can be used in conjunction with the additives you can put in your paint so the paint will withstand panel flexing. My understanding of the flex additives is that they give you a longer window to flex the part but they do not remain flexible indefinitely. So that is not a long term solution for flexibility but it might give you time to assemble the car after painting beading.

John, when you do any panel cut and buff, you'll want to put masking tape over any edges and certainly over the beading and not run a buffer over those high areas. It will bite into those areas and the paint will come off so quickly you won't know what happened. I can't imagine how one would buff over the beading successfully. I've seen the edge taping technique on lots of buffing videos.

My local paint store will put many custom paints into rattle cans now. You can buy (two part) activated epoxy and clear in rattle cans too (although your spray window is short and then you dump the can). They claim that some folks do minor repairs now with just cans and not spray guns. This might work fine for solvent-based basecoats but wouldn't be a good solution if you are using an activated basecoat.

I'm really enjoying this thread John. Thanks

Pat
 
I Like that idea, Pat. Taping should protect the beading during the buffing stage. I ordered the black beading from Woolies last night, and got notification that it shipped this morning. The beading was $19 for 10 meters, which will give me quite a bit extra to play with (shipping $21!). With the dark Jag Racing Green being so close to black, it won't take much paint to cover the black beading.

I'll definitely use the adhesion promoter before spraying the beading...still trying to decide about the flex agent. I may wait and just paint the bead after the car, but right before installing it. That way it'll still be flexible without any agents.

Anyway...I'll take a pic and post once the Woolies package arrives. (Sounds kinda dirty!?!)
 
1/13
John
The method I plan to use on my TR2 when the time comes is to obtain a 2 x 8" X 6' plank and rip several horizontal groves in it about 1/2" deep, cut the "D" (Moss has) bead to proper length (after measuring) and place into the groves with the "D" profile and about 3/8" of the tang showing then spray with the body color with plasticizers added. I plan to paint the exterior with all bolt on body panels loosely mounted and after all are dry (and buffed as necessary) install the bead into the gaps and snug up the panels.
 
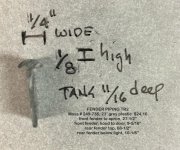
fullsizeoutput_36cb.jpg Guys---here is photo of the Moss fender piping I recently purchased with dim. Paid $21.16 thru local Moss supplier, Little British Car Co.
poor photo, but gives the general idea. I do have a early '55 TR2 in the shed with original piping that once it warms up a bit I will see if I can get a sample.
Dan C.
 
Back
Top