Hey Guest!


 Hey - did you know if you click on the title of a thread it will take you to the first unread post since you last visited that thread?
 but were afraid to ask:
  STOP!! Never post your email address in open forums. Bots can "harvest" your email! If you must share your email use a Private Message or use the
  smilie in place of the real @
 Pretty Please - add it to our Events forum(s) and add to the calendar! >>
eschneider
Jedi Warrior
Offline
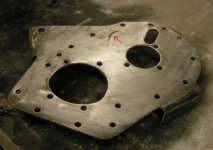
I ve seen 3 front mounting plates with a groove worn by the tensioner now.
This one seems to have been caused by the front of the timing chain cover being smashed inwards.
Question #1 - is it just my luck, or are they all like this? I've been filling the grooves with hard bearing solder and filing them flat.
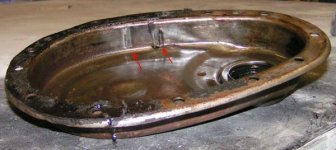
Question #2 - no photo, but the inside of the timing chain covers are always worn where the tensioner rides. Does anyone do anything to repair these? I've been simply smoothing any sharp edges and re-installing.....
This one seems to have been caused by the front of the timing chain cover being smashed inwards.
Question #1 - is it just my luck, or are they all like this? I've been filling the grooves with hard bearing solder and filing them flat.
Question #2 - no photo, but the inside of the timing chain covers are always worn where the tensioner rides. Does anyone do anything to repair these? I've been simply smoothing any sharp edges and re-installing.....