-
 Hi Guest!
You can help ensure that British Car Forum (BCF) continues to provide a great place to engage in the British car hobby! If you find BCF a beneficial community, please consider supporting our efforts with a subscription.
There are some perks with a member upgrade!**Upgrade Now**
(PS: Subscribers don't see this gawd-aweful banner

Tips
- We have a special forum called "Member Articles" where you can submit actual articles for consideration for publication. Learn More
- Don't have an Avatar? If not, your avatar will default to the 1st character in your username. Go into "Account Details" to change your Avatar.
- Some basic forum navigation info: click
 Hey - did you know if you click on the title of a thread it will take you to the first unread post since you last visited that thread?
- Hey Guest - Is your British Car Club in our Clubs database? If not, send me a PM - Basil

- Looking for a local club? Click the "Clubs" tab above and browse hundreds of clubs world-wide.
- Add Android or iPhone APP: click
- Did you know - any picture or video you add in your posts in any marque-specific forum will also get added to the Media Gallery automatically.
- A few more tips about posting and replying: click
- Hey there Guest - be sure to keep your profile page up to date with interesting info about yourself: learn more
- More tips and tricks on Posting and Replying: click
 but were afraid to ask:
  STOP!! Never post your email address in open forums. Bots can "harvest" your email! If you must share your email use a Private Message or use the
  smilie in place of the real @
- Want to mention another member in a post & get their attention? WATCH THIS

- So, you created a "Group" here at BCF and would like to invite other members to join? Watch this!
- Hey Guest - A post a day keeps Basil from visiting you in the small hours and putting a bat up your nightdress!
- Hey Guest - do you know of an upcoming British car event?
 Pretty Please - add it to our Events forum(s) and add to the calendar! >> Here's How <<
- Hey Guest - you be stylin' Change the look and feel of the forum to fit your taste. Check it out
- If you run across an inappropriate post, for example a post that breaks our rules or looks like it might be spam, you can report the post to the moderators: Learn More
- If you would like to try some different "looks" or styles for the site, scroll to the very bottom, on the left and click the Style Selector.
You are using an out of date browser. It may not display this or other websites correctly.
You should upgrade or use an alternative browser.
You should upgrade or use an alternative browser.
TR2/3/3A tr-3a Voltage Regulator
- Thread starter midnight
- Start date
angelfj1
Yoda
Offline
dklawson said:Most of the new ones are shipped with a protective coating on the contacts. Did you clean the contacts inside the new unit before installation?
Really? Didn't know that. Is there a sticker telling the user to clean the coating off of the contacts?
M
Member 10617
Guest
Guest
Offline
The shop that works on my car had to go through three new regulators before they found one that worked!
dklawson
Yoda
Offline
angelfj said:Really? Didn't know that. Is there a sticker telling the user to clean the coating off of the contacts?
I am basing my comments on the later regulators with spade lugs as opposed to the screw terminal type that are probably correct for a TR3. Some of the new spade lug regulators I have seen do have a warning label to clean the points. However, I cannot say that all of them have had that label.
I did find some information about this on another board. You may want to read some of the posts in the link below:
https://www.tr-register.co.uk/forums/index.php?showtopic=13144
angelfj1
Yoda
Offline
midnight said:Is it possible to find a new Lucas voltage regulator that actually works - I purchased a new one from Victoria British - it's worthless - I got out my original, 50 years old, cleaned it up - it works fine - Miles
Miles, I can't say, because I am also using my original unit, which works very well. There is anecdotal evidence that "new" units have been unpredictable. One option you have is to go with a solid state conversion.
Read about it here: Solid State Voltage Regulator
sail
Darth Vader
Offline
angelfj said:Really? Didn't know that. Is there a sticker telling the user to clean the coating off of the contacts?
Yep, at least there is on my untested replacement from TRF.
TR3driver
Great Pumpkin - R.I.P
Offline
Did you try to find the problem? Clean the contacts, perhaps? Even "back when", new units typically needed to be cleaned and adjusted.midnight said:I purchased a new one ... it's worthless
MGTF1250Dave
Jedi Knight
Offline
Aloha Miles,
As Frank suggested, you can always convert your existing Lucas regulator to a solid state unit. Wilton Auto Electric offers this service for about $80 (US) plus shipping and handling. I've had the one in my TR3A converted and it has worked fine for about two years now in my daily driver. Here is a link to the company website:
https://www.wiltonae.com/home/index.aspx
Moss Motors offers two TR3 voltage regulator (screw connections), one for $60 (pre-cleaned, tested and adjusted) and the same unit for $40 that they note you need to clean and adjust. Here is a link to their website that explains cleaning contacts and making the adjustments:
https://www.mossmotors.com/graphics/products/PDF/142-000_542-100.pdf
I would recommend you try the describe procedure on your new regulator to see that might fix it.
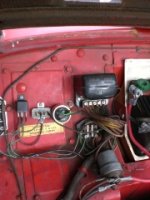
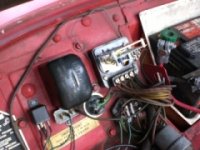
This is what the solid state unit installed in my car looks like:
As Frank suggested, you can always convert your existing Lucas regulator to a solid state unit. Wilton Auto Electric offers this service for about $80 (US) plus shipping and handling. I've had the one in my TR3A converted and it has worked fine for about two years now in my daily driver. Here is a link to the company website:
https://www.wiltonae.com/home/index.aspx
Moss Motors offers two TR3 voltage regulator (screw connections), one for $60 (pre-cleaned, tested and adjusted) and the same unit for $40 that they note you need to clean and adjust. Here is a link to their website that explains cleaning contacts and making the adjustments:
https://www.mossmotors.com/graphics/products/PDF/142-000_542-100.pdf
I would recommend you try the describe procedure on your new regulator to see that might fix it.
This is what the solid state unit installed in my car looks like:
Attachments
M
Member 10617
Guest
Guest
Offline
Even with the pre-cleaned, tested, and adjusted voltage regulator, is there a polarity issue that has to be addressed? I don't know and am just asking because when my shop people installed my regulator, they touched two ends of a wire to some of the posts and did something with the polarity of the regulator (or so it appeared to me).
Sorry this is so vague, but I am not aware of what specifically the did, but they did something along these lines.
Sorry this is so vague, but I am not aware of what specifically the did, but they did something along these lines.
TR3driver
Great Pumpkin - R.I.P
Offline
Interesting. I wonder if Moss actually believes that bit about not following the Lucas method for adjusting the regulator?MGTF1250Dave said:Here is a link to their website that explains cleaning contacts and making the adjustments:
https://www.mossmotors.com/graphics/products/PDF/142-000_542-100.pdf
The reason Lucas said to do it their way is that the regulator actually regulates both current AND voltage, not just voltage alone. If you leave the current winding in-circuit (as the Moss instructions imply but do not state) then the result of your effort will depend greatly on how much current the generator is producing. Personally, I think the Lucas instructions (which specify to temporarily block the current winding by sticking a bit of paper in the cutout contacts) work much better.
Also, unless your "fine sandpaper" is a lot thinner than mine, there is no way that two thicknesses of it will fit into the normal point gap. To clean them properly, you have to back off the adjustable contact, do the cleaning, then readjust it to get the prescribed .015" gap. I much prefer using a "contact burnishing tool" rather than sandpaper, as the sandpaper leaves a rough surface that promotes oxidation and "dirty contact" problems in the future.
TR3driver
Great Pumpkin - R.I.P
Offline
Yes, sometimes. If you have changed the battery polarity, or removed/installed the generator, you need to "polarize" the generator, which just means exposing it to the battery polarity that it is expected to produce.LexTR3 said:Even with the pre-cleaned, tested, and adjusted voltage regulator, is there a polarity issue that has to be addressed?
If you have the Lucar terminals on the control box, then an easy method is to pull the wire off the 'F' terminal and momentarily brush it against the 'A' (or 'A1') terminal. A small spark is normal. Then reconnect the wire and go on. If you have the screw terminals (or don't want to pull the wire off), you can just connect a jumper momentarily between 'D' and 'A'.
This really has nothing to do with the voltage regulator, it will happily work on either polarity. But when you first start the engine, it is the residual magnetism left in the generator housing that gets the generator started at first and turns out the dash light. If the housing is demagnetized (as can happen if it got dropped while it was removed), the light may not go out.
M
Member 10617
Guest
Guest
Offline
Ah, ha, Randall. That's it. When the shop put in my new regulator, they also were installing a new generator that the old ("new") regulator -- which failed for some reason -- had cooked.
All this leads me to the following question. If I have a voltage regulator that has been cleaned, tested, and properly adjusted, and I have not changed the battery polarity or installed a new generator, can the regulator be installed in the car (replacing a defective one) without any doing anything else to the electrical system?
All this leads me to the following question. If I have a voltage regulator that has been cleaned, tested, and properly adjusted, and I have not changed the battery polarity or installed a new generator, can the regulator be installed in the car (replacing a defective one) without any doing anything else to the electrical system?
MGTF1250Dave
Jedi Knight
Offline
Back in the day, most good shops wanted to test the generator and voltage regulator together see if they both worked correctly as a team.
TR3driver
Great Pumpkin - R.I.P
Offline
Should work, if the generator & the wires to it are in good shape.LexTR3 said:If I have a voltage regulator that has been cleaned, tested, and properly adjusted, and I have not changed the battery polarity or installed a new generator, can the regulator be installed in the car (replacing a defective one) without any doing anything else to the electrical system?
But my preference would be to do as Dave suggests, and do the final regulator adjustment on the car. There is a very fine balance between overcharging the battery with the headlights off, and undercharging it with them on. Proper adjustment gives you just a little of each, rather than too much of one or the other.
M
Member 10617
Guest
Guest
Offline
Randall and Dave,
Sounds like a good and prudent plan, although I have to admit that I would have to leave the regulator adjustment to professions who have the knowledge and proper equipment. At least I now know what to expect and what to ask for. Many thanks.
Sounds like a good and prudent plan, although I have to admit that I would have to leave the regulator adjustment to professions who have the knowledge and proper equipment. At least I now know what to expect and what to ask for. Many thanks.
TR3driver
Great Pumpkin - R.I.P
Offline
It's really easy Ed, and the "proper equipment" costs very little. The only obscure tool would be the BA wrench for the adjustment locknut on the early control boxes, and with a little care you can just use a small adjustable wrench there.
Even a cheap DMM will do eg https://www.harborfreight.com/7-function-digital-multimeter-90899.html and is pretty much required equipment for owners of 50+ year old cars IMO. I literally carry one in the door pocket as part of my on-board tool kit.
Add the price of dinner, and you can get a significantly nicer model eg https://www.harborfreight.com/ac-dc-digital-multimeter-37772.html
It's also handy to have a couple of "clip leads" eg https://www.harborfreight.com/18-inch-low-voltage-multi-colored-test-leads-66717.html
To adjust the regulator, you'll also need a small flat-blade screwdriver, a .015" feeler gauge and a very sophisticated tool known as a clean piece of paper.
Take the cover off the control box (engine stopped) and first set the gap of the regulator contacts to .015". Also loosen the locknut on the regulator tension adjustment if there is one (later boxes have a spring instead of a locknut). Stick the paper between the cutout contacts and secure it there in some fashion; last time I used a piece of index card and tore it so it would fit behind the plate to hold it in place. But you can also just fold it a few times until it's a snug fit.
Start the engine, and leave the choke out enough to get a moderately high idle (1500 rpm is good). Set the DMM to a scale that covers 20 volts DC, and measure the voltage between the 'D' and 'E' terminals of the control box. Adjust the tension screw (if necessary) until the voltage matches this chart (plus or minus 0.3 volts):
32F = 16.5 volts
50F = 16.2 volts
68F = 15.9 volts
86F = 15.6 volts
Shut off the engine, tighten the locknut on the tension screw while holding the screw from turning (again only if you have a locknut), remove the piece of paper and put the cover back on. That's it.
This isn't quite the same procedure described in the workshop manual, but it will work just as well.
M
Member 10617
Guest
Guest
Offline
Randall. Many thanks for the instructions. I have a decent fused multimeter, so I'll give this a try.
Before trying that, however, please explain your chart to me. I'm not sure what 42F, 50F, 68F, and 86F indicate.
And what size of a BA wrench would you recommend?
Before trying that, however, please explain your chart to me. I'm not sure what 42F, 50F, 68F, and 86F indicate.
And what size of a BA wrench would you recommend?
TR3driver
Great Pumpkin - R.I.P
Offline
42F, etc are the ambient temperature in degrees Fahrenheit. The voltage required to charge a lead-acid battery goes up as the temperature goes down, so the regulator has to hold a higher voltage in cold weather.
Sorry, I don't know the wrench size offhand. There might even be an SAE size that would fit, I just grabbed a couple of ignition wrenches out of my Whitworth drawer and used the one that fit. 4 BA is close enough to 1/4" and that might be it.
Sorry, I don't know the wrench size offhand. There might even be an SAE size that would fit, I just grabbed a couple of ignition wrenches out of my Whitworth drawer and used the one that fit. 4 BA is close enough to 1/4" and that might be it.
M
Member 10617
Guest
Guest
Offline
Randall,
I guess I'm still missing something. Do you mean the chart is based on degrees Fahrenheit of the ambient temperature of the environment? Or the ambient temperature of the battery? If so, is there some reason for the precise numbers you have given? And if so, does this mean that with temperatures hereabouts in the high 20s and low 30s, that I shouldn't try to perform this operation.
It's pretty cold here in Virginia at this time of the year.