• Hi Guest!
    You can help ensure that British Car Forum (BCF) continues to provide a great place to engage in the British car hobby! If you find BCF a beneficial community, please consider supporting our efforts with a subscription.

    There are some perks with a member upgrade!
    **Upgrade Now**
    (PS: Subscribers don't see this gawd-aweful banner
Tips
Tips

The start of something big. Frame off restoration

GBRandy said:

Aye, that's how I got in contact with Mr. Thomas Wiegand in the first place, someone pointed out his ebay auction for the molds on the 6-pack.org website. I mentioned how it looked great and that I'd love to get one but that he was just selling the molds. What I had missed in his original ebay add was that he had 2 basic body kits he had produced (one of which was up for sale on ebay at that time) and one original Vintage Motor Works kit. The kit I'm buying is the original VMW kit, which he had purchased some years after having bought the molds so as to have an original kit.
 
So, it's been a long time. Shipping was delayed for a bit while the owner was having a foundry make duplicate castings of the original front grille for someone who is interested in buying the original GRP molds. This last week payment was sent, and the crate has been delivered to the shippers. It should, in theory, be in the US by the end of the week, and then it has to clear customs. My hope is that in 2 weeks time I'll be assembling my new Hathaway Hunter roadster.

In the mean time, I've got a TON (and I mean that quite literally) of triumph parts, new, new old stock, refurbished/repaired original, etc that I have purchased over the years towards my project, which I will now no longer be using or needing.

Some of the things for sale are 2 hard tops (original factory steel, and an original Parish Plastics) tons of new sheet metal including a new old stock rear valance, lots of BMH reproduction parts, and several high quality other replacement parts. I will no longer need any of the interior pieces either, such as seats, AMCO center console, carpet set, etc.

I am still just starting this week to organize and photograph what I have, but I have started a webpage to keep track of it all, with high quality photos.

https://www.tharkis.com/images/tr6/forsale/forsale.html
 
Wow, mega response to the stuff I put for sale, means I need to dig through my things and seriously take good photos and catalog all that I've got for sale since I no longer need it. I've got lots of things that I had ordered and paid for literally days before I made the swap, like my LED tail lights and new front side markers, my rebuilt and powder-coated break servo, etc.

In the mean time, I've sent an email to Advanced Auto Wire to look into buying a new wiring harness, and I've started hunting around for a shop to fabricate a fuel tank for me. This is the image that I've been sending with my inquiries. I don't know where the best place for the outlet, return line inlet, and vapor canister inlet are (well that last one goes anywhere on top really) but I think it would probably work best if the outlet and inlet were in the rear of the tank at the bottom in the center, to help prevent fuel starvation on hard cornering. I'm not sure what sort of baffling should be in the tank either.

Hopefully some of the 4 places that I contacted can get back to me soon.

HathawayTank.jpg
 
It's in the air!

Dear Pantrace user,

You have subscribed to the tracking of shipment HAJ-058856 .
We're glad to inform you that this shipment just has been updated with following information :

Departed from FRA to BOS on 2012-05-08 12:50

On a sad note, I've more or less confirmed that I will not be able to re-use the dashboard that I spent so much time and effort re-doing with that gorgeous burl wood. Since I did some customization to the dash, removing rheostat and the lights underneath it, moving the ignition switch to where the washer switch was and moving the washer and hazard switches to the center plinth, and moving the spedo cable reset to where the hazard switch was, it'll probably be hard to sell to another tr6 enthusiast unless they happen to like exactly the same modifications that I like.

I don't really want to go through the work that I've already gone through yet again, so does anyone have a recommendation for a good maker of custom dashboards with a good selection of woods and finishes? Is Prestige Autowood still the best?


I also spoke with Allan at A&E Auto Body, and he told me to wait until I got the body on-hand and then he'd make a trip up to my place to look the project over with me.

I also got a few packages today. From MOSS I got my new rear-view mirror (from an MG-TD) and the bar hold-downs that I asked about above. From ATP Instruments almost all of my gauges came. The speedometer is on back order, but should be here in a few weeks. I've been directed to contact Prestige Autowood about having a new dash made if I want the best quality. My template/pattern dash in plywood should be in the box, but if I'm having one custom made, I may move some things around a little bit outside of the standard TR6 pattern that most of them used. This would be more so that I can put a radio in the center of the dash, but have it hidden, with a pull down door to cover it up when not in use, rather than hiding it in the glove box.

I need to find a local shop that can make me a short cable to go from my toyota 5 speed transmission to the cable driven pulse generator that I got for the electronic speedometer that I have coming. Heck, Ideally I'd be able to mount the pulse generator directly to the transmission with only a cable just long enough to screw both ends into.

newgauges.jpg


I've also got a tracking number for my custom fuel tank from Boyd Welding down in Florida, they were the most responsive, helpful and also the least expensive quote that I received, a rare combination. I sent them down my new fuel sender unit to have installed in the tank.
 
Today I got great news. My body has cleared customs and should be delivered within the next 1 to 3 business days!!

Also today some important things arrived. First and foremost was my custom gas tank from Boyd Welding.

gastank1.jpg

gastank2.jpg


The other thing, which can be seen above, was from Rimmer Bros and is a stainless coolant return line for the European PI models of the TR6. This is important because the hathaway does not have a heater box. I've debated retrofitting the heaterbox from a jaguar xk140 into the vehicle, but after finding how much one of those in good shape costs, I'm just going to stick with seat heaters.

This tank is great the construction looks very well done. I've had it constructed with 2 outlet/inlet bungs in the rear bottom and it uses the stock TR6 / smiths sending unit, which my new gauges uses. The extra bung is for a future return line for conversion to TBI. It was easier to have it put in now when the tank was being made than to retrofit an extra bung in later. In the top is also a bung for a vent line / carbon canister.
 
Well, today has been an adventure! My morning started off great, 30 minutes after I started work, the doorbell rang and it was UPS with my new wiring harness from Advanced AutoWire. This is the new format block that's a more compact footprint at 7x7 ( than the original 10 by 6 )

DSCN0564.JPG


About 20 minutes later I got a call from Panalpina saying that my crate was going to be delivered to my house this afternoon! YAY!
...
10 minutes later I get another call from Panalpina, they wanted to confirm that as listed in the shipping documents, I did not have a loading dock. I confirmed with them that, no, I did not have a loading dock as I lived in a residential area, as I had discussed with them earlier.
...
45 minutes later, nearing 11 AM I get another call. The truck driver from Horizon said the crate wont fit on his lift gate, will you be able to have something there to help unload it? I replied that I had an engine hoist that could lift one end and lower it while the gate held the other end. The fellow from panalpina also said "and if that doesn't work would you be able to unload the parts from within the crate there if they're small enough?" which I said most definitely, everything in the crate is movable by one person.
...
Another 45 minutes go by and I get another call, "Horizon refuses to deliver the crate, and I cant find another trucking company to move the crate"

To make a long story short, I had to go out on no notice and rent a U-Haul trailer to tow behind my pickup (thank god I have a pickup with a trailer hitch) and drive to East Boston to the Horizon freight warehouse and pick up the crate myself.

IMG_1312.JPG


So 4 hours later, I made it home to my house with the crate.


DSCN0559.JPG


DSCN0560.JPG


To get the crate off the truck I was first going to lift one end out with my engine hoist and then slide the other end onto a set of dollies. Instead I got my roommate to come down stairs and we pushed the crate onto the rails of the engine hoist and used that as a dolly instead.

IMG_1314.JPG


DSCN0561.JPG


Now came the moment of truth... the un-crating!!

DSCN0562.JPG


DSCN0565.JPG


Coming up in next post. The parts coming out of the box!
 
Thomas wrapped everything up and padded the sides of the box in the tight locations with carpeting to prevent scraping and bumping around.

DSCN0567.JPG


I pulled out everything that I could just lift out of the top first. Wrapped in the yellow blanket were the two top sections of the hood and the back shelf/ top-cover.

IMG_1316.JPG


Next I had to take a side off to get access to the parts.

DSCN0569.JPG


Out came a fender first, and a ton of bags with interior parts.
IMG_1317.JPG

IMG_1318.JPG

IMG_1319.JPG

This one is a little dark, but parts were packed very tight and efficiently in the crate with very little shifting around
IMG_1320.JPG


Packed up in the front, still in the original 30 year old packaging is the wind screen.
DSCN0570.JPG

DSCN0571.JPG
 
In the battery box hole, you can see the front grille as well as a lot more plastic bags. The bags I have yet to sort through all the plastic bags, as I'll be doing that tonight, but inside one I saw the side-screens, and in another I saw a completely new old stock mint soft top. Good stuff!

DSCN0573.JPG

DSCN0574.JPG


This is the rear shelf, I've got to figure out how to fit a sound system back here that'll be hidden away and not show =)

DSCN0575.JPG


The doors will need a lot of clean up before paint, but so will many parts of the kit, as it's still in the raw-from manufacture state with any joined seems unfinished.

DSCN0577.JPG


At first I could only find one rear fender, but the other turns out to have been very well hidden between the front and rear sections

DSCN0578.JPG

It was hidden under the back side where i had not yet taken off the opposite panel.
DSCN0579.JPG


The windscreen was cleverly held up by supporting it from all sides and then being clamped to the front section.
DSCN0580.JPG


Here are the other pieces that were hidden between the sides. The lower sections of the hood and some more pieces for trim to wrap around.
DSCN0582.JPG
 
I finally got everything unpacked and the crate dragged out into the yard. I roughly laid the pieces together for the body in my garage. As can be seen holes need to be drilled, supports and braces put on, and a lot of other things, as well as a very thorough cleaning.

DSCN0581.JPG


DSCN0583.JPG


The floors of the original kit are VERY thick, probably 3/4 of an inch of fiberglass and very heavy duty. I know that some of the 'later' made kits from the mold have thin floors and are backed with metal plating under the floors, but there's no need with this original kit to do so. I need to check now and make sure that the seats that I'm planning on using will fit in here. As you can see the width of the inside is very very skinny.

DSCN0584.JPG
 
Too Cool!
 
Congratulations! that looks great, looks like it'll be a really fun project.

Your experience must be SOP for freight companies. It sounds a lot like the experience I had with the company that delivered the body shell for my Jag that I got from the UK.

I got a call at about 4:30PM on the Wednesday night before Thanksgiving. They called to say they had a large crate to deliver for me and wanted to verify I had a loading dock. Same as you, I told them I didn't it was being delivered to my house. The guy snapped "Well how do you think your going to get it off the truck?". I asked do you have a tilt bed truck? "No, all we have are box trucks, we'll be there at 11 on Friday morning, figure something out." *click*. No contact info, no phone number, nothing. I ended up getting a flatbed from a tow company at my house, we backed it up to the back of the truck. My brothers and I slid it onto the flatbed. He backed into my drive way, tilted up the back and we slid the crate off onto the driveway.
 
The last few days has been cleaning parts, and sorting through parts. Today I drove down to Factory Five Racing to pick up some parts. Rather than using the TR3 rear bumperettes used on most Hathaway Hunters, I instead decided that I like the rounder look of the Cobra bumperettes instead. In addition Factory Five had the best price on the door latches, better than the Big 3 by far, for the same latch.

The kit came with a nice mahogany dashboard. The only issue that I have is that the large gauge holes are 120mm and my gauges are 100mm. I'm looking into creating some sort of decorative surround that will fill in the extra space and not look bad in the dash. In the two holes at the top I think I will put a pull/push light switch and the emergency blinker switch.

DSCN0589.JPG


The kit also came with the windshield and surround, but not the mounting pillars. From talking with others, the mounting pillars from a MK1/2 Austin Healey Sprite work, so I ordered a pair from Moss. One very nice thing that it came with is the soft top frame and a brand new old stock soft top. In addition it came with a fiberboard radiator shroud as well, although I'm not sure if I will be using it.

DSCN0590.JPG


From factory five the big reason I drove down however was to pick up some seats. I talked on the phone with a rep to determine if the seats would fit and from all measurements I got, it sounded like they would.

The seats are very nice quality, and extremely comfortable to sit in. They are however a bit tight with the door right at the edge. They widen out a bit. I will still be able to fit them, but the door will press against the seat when closed. I think they will look perfect in the finished car. They are also low enough that I can put seat rails under them and still have clearance to create a tonneau cover for the car that wont need humps for the seats.

IMG_1336.JPG

IMG_1337.JPG

IMG_1345.JPG


The kit also came with a complete interior kit in tan vinyl and tan carpet. However after 30 years the cardboard backing has become mildewed and warped. I plan on using the current kit as a template to create new panels using acrylic plastic backing which wont warp or rot, and I plan to get some marine vinyl to match the seats and some black carpet which I will trim and fit up with the existing carpet set, which is in 'ok' condition but has had a few mice nibbling at it over the years, and smells very musty having been kept with the mildewing cardboard backed interior.

DSCN0592.JPG


The one thing that the kit was missing that I need to find a few replacements for still however is some of the hardware. All the chrome stuff I've been able to source and order from Moss, TRF or, in the case of the headlights, a VW Bug store. What I need to find is a set of door hinges that will work. MGTD ones look like they'd work fine, but run over 200$ for a set of them, which I don't really want to spend at this point just for hinges. I also need to get a whole lot of stainless hardware for bolting together the fiberglass after I drill the holes to align everything. The last thing I need to find is some pins and sockets to mount the side-screens that it came with. Brand new heavy acrylic side-screens, but without the mounting hardware or the channels to attach the sliding windows. I'll probably manufacture my own channels from lexan, but I'd like a professional looking mounting hardware for the side-screens.
 
My first real "uthoh!" moment of the fitting has occured. It is something that I was worried about to begin with, but which I figured that I would deal with when the time came and I had the body in hand.

It turns out that the front carb on a triple ZS175 intake will not clear the hood on a hathaway, and that's even if you take the air filter right off. I'm talking with a fellow selling a 1971 stock intake that's been cleaned and ceramic coated and then never reinstalled. Unfortunately it doesn't look like there's any way to fit the triple stromberg intake under this hood.

IMG_1351.JPG


I 'test fit' the gas tank as well, lining up the front and rear body sections (without any of the support braces in-place yet to make sure the tank looked right under there, and it looks perfect.

IMG_1349.JPG

IMG_1350.JPG
 
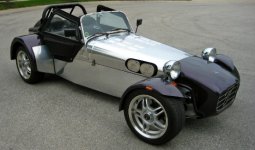
You might be able to still use the triple ZS's by putting a cut out in the hood like they do on Lotus 7 to clear the air filters:
 

Attachments

  • 28557.jpg
    28557.jpg
    75 KB · Views: 453
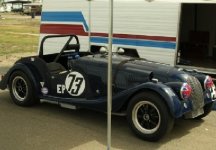
If the exposed air filters don't look good, maybe cover them like I've seen done on some vintage race prepped cars with a side hood scoop like this '59 Morgan has:
 

Attachments

  • 28558.jpg
    28558.jpg
    81.2 KB · Views: 463
Unfortunately it's not just the bonnet that doesnt clear, it runs right into the fender, so making a hump wont work =( I've got a line on a 1971 intake manifold that will clear the hood properly.
 
Back
Top