• The Roadster Factory Recovery Fund - Friends, as you may have heard, The Roadster Factory, a respected British Car Parts business in PA, suffered a total loss in a fire on Christmas Day. Read about it, discuss or ask questions >> HERE. The Triumph Register of America is sponsoring a fund raiser to help TRF get back on their feet. If you can help, vist >> their GoFundMe page.
  • Hey there Guest!
    If you enjoy BCF and find our forum a useful resource, if you appreciate not having ads pop up all over the place and you want to ensure we can stay online - Please consider supporting with an "optional" low-cost annual subscription.
    **Upgrade Now**
    (PS: Subscribers don't see this UGLY banner)
Tips
Tips

SU Rebuilding Questions

Moseso

Jedi Knight
Country flag
Offline
Long ago, thinking I was ordering something else, I got a throttle shaft kit from TRF -- two shafts + four bushings. Recently, I have decided that the installation of, at least, the new shafts would be beneficial.

Q #1: concerns the two little screws holding the butterfly in shaft. They are split and spread to prevent them falling out. I don't worry about wrecking the old shafts. Does one just back them out of their holes, expecting them to squeeze-up as they are removed? Or, does one attempt to squeeze them a bit, with pliers or the like, before backing them out.

Q #2: Are those screws reusable, or is that just asking for one-or-more of them to fail with disastrous consequences?

Q #3: The bushings, should I decide that the new shafts aren't an adequate solution to my slop problem...
I have read the Enco reamer method of SU Carb re-bushing. It looks pretty straightforward. It also looks as though the reamer protrudes plenty far enough through the carb body to get a drill motor onto the shank of the reamer. Is there a good reason that I should NOT attempt to power the reamer in this way? The nut, with the setscrews just seems so Mickey Mouse...
 

tomgt6

Jedi Warrior
Offline
Moseso said:
Long ago, thinking I was ordering something else, I got a throttle shaft kit from TRF -- two shafts + four bushings. Recently, I have decided that the installation of, at least, the new shafts would be beneficial.

Q #1: concerns the two little screws holding the butterfly in shaft. They are split and spread to prevent them falling out. I don't worry about wrecking the old shafts. Does one just back them out of their holes, expecting them to squeeze-up as they are removed? Or, does one attempt to squeeze them a bit, with pliers or the like, before backing them out.

I just backed my screws out. I was careful and took my time but they seemed to squeeze back together.

Q #2: Are those screws reusable, or is that just asking for one-or-more of them to fail with disastrous consequences?

They can be reused but I ordered new ones just to be safe.


Q #3: The bushings, should I decide that the new shafts aren't an adequate solution to my slop problem...
I have read the Enco reamer method of SU Carb re-bushing. It looks pretty straightforward. It also looks as though the reamer protrudes plenty far enough through the carb body to get a drill motor onto the shank of the reamer. Is there a good reason that I should NOT attempt to power the reamer in this way? The nut, with the setscrews just seems so Mickey Mouse...

I can't help you on this one.
 

tomgt6

Jedi Warrior
Offline
Sorry my answers are stuck after each of your questions.
 

TR3driver

Great Pumpkin - R.I.P
Offline
I squeezed mine back together a bit, before trying to back them out. One actually broke, so I would not try to reuse them after they have been spread. But don't spread the new ones until you are absolutely certain you are happy with the new shafts, the throttle plate centering, etc. A dab of Loctite will hold well enough for some test driving (if you want).

Oh, and don't forget that the throttle plates have a front & back. It's not obvious, but the edges are slightly tapered and the engine won't idle properly if the plates are backwards.

IMO, you really want the level of control that you get with hand reaming. You don't have to mess with the nut if you don't want to; for example you can grind flats on the reamer shaft and grab it with a tap handle (or just clamp it in the bench vise). Tony Rhodes wrote a nice article showing the use of a tap handle, which might be on his web site.

But the carb bodies are soft (as metals go) and you are trying to remove rather more metal than is usually taken with a reamer, plus the new cutting edges may not be just right. Turning it by hand means you can stop if the reamer starts to dig in and bind.
 

dklawson

Yoda
Offline
Like Randall, I squeezed the screws together a bit (using pliers) prior to backing them out. I re-used the screws. However, I cleaned them on a wire wheel to expose shiny metal and I soldered the heads to the throttle shaft after tightening them. You need a big soldering iron and it is almost permanent, but it does work. The solder was not my idea but something I remember reading (probably in a Vizard A-series book) about how to secure the butterfly to throttle shafts that have been narrowed down.
 

Got_All_4

Luke Skywalker
Country flag
Offline
The faster you turn that reamer the more material it will remove and a good chance to oversize the hole. Us it at the proper speed it was designed to be used at and use plenty of cutting oil.
 
OP
Moseso

Moseso

Jedi Knight
Country flag
Offline
Thanks for all the insights, guys. The reamer should arrive in a couple of days. I still haven't pulled the carbs off the car yet. This weekend looks good for that -- and then the fun begins...
 
OP
Moseso

Moseso

Jedi Knight
Country flag
Offline
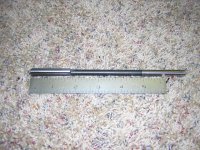
Got my Enco #331-1124 reamer just now. It's rather disappointing. They've changed the spec, or the manufacturer, or something. The shank is no longer fully machined. This is not going to do the job...

Edit: Update: Customer service at Enco is very good. I called and told them that the reamer is not as pictured on the web site and, hence, unsuitable for my, admittedly off-label, use for it. The CS lady got a tech on the phone, and the three of us discussed the problem. Someone is now being dispatched to the warehouse, with a mic, to see if the other 3/8" reamer they sell (329-1124 the slightly more expensive USA made one) is 1) machined along the entire length of the shank and 2) 5/16" shank diameter. Further, she credited me the purchase price of the one I didn't like.
She is going to call me when mic-man returns from the warehouse...
That's takin' care of business!
 

Attachments

  • 25612.jpg
    25612.jpg
    78.1 KB · Views: 248
OP
Moseso

Moseso

Jedi Knight
Country flag
Offline
Mic-man says, the other one, 329-1124, is just what I want. It's on the way...
 

TR3driver

Great Pumpkin - R.I.P
Offline
Thanks for the heads-up, Moses. I guess Enco's Chinese supplier found a way to make the product even cheaper, as the "import" reamers I've gotten from them in the past have all had fully-machined shanks (as the web site shows).
 

billspit

Jedi Knight
Country flag
Offline
I ordered the reamer from Enco by the part number. There was an option for a cheaper one (like 2 dollars),which I didn't go for. I had a little problem in that the carb I needed to repair had already been reamed for oversize shafts. The reamer wobbled a little bit.
 
OP
Moseso

Moseso

Jedi Knight
Country flag
Offline
TR3driver said:
Thanks for the heads-up, Moses. I guess Enco's Chinese supplier found a way to make the product even cheaper, as the "import" reamers I've gotten from them in the past have all had fully-machined shanks (as the web site shows).
Mine came labeled "India."
I guess it's cheaper, but not in a way that most reamer users would care about. This using the shank as the pilot, and drawing it through the work backwards, is definitely not that for which they are designed.
But, yeah... The import model is no longer the way to go. Hopefully, the USA version is...
 
Similar threads
Thread starter Title Forum Replies Date
Lukens TR2/3/3A More questions about rebuilding my steering box Triumph 20
L 1966 BJ8 frame rebuilding questions Austin Healey 1
I Hyraulics rebuilding questions Triumph 2
davidk TR6 Rebuilding TR-6 Engine - Questions, Questions... Triumph 14
S TR2/3/3A Rebuilding a cylinder head Triumph 10
S TR2/3/3A Rebuilding a tr3 transmission and second gear, Triumph 57
S TR2/3/3A when rebuilding a differential Triumph 9
M TR2/3/3A Rebuilding suspension Triumph 29
G Rebuilding Front Seats Austin Healey 4
E TR6 Rebuilding Distributor Triumph 2
JMACENGINESHOP BJ7 Engine Rebuilding Austin Healey 23
S TR2/3/3A Engine Rebuilding. Triumph 14
L MGB Rebuilding a 1977 MGB MG 1
S TR2/3/3A Rebuilding the early tr3 starter Triumph 5
Joel Lester TR2/3/3A What type of valve to use when rebuilding the head? Triumph 10
KVH General Tech Rebuilding the Engine Triumph 5
K TR2/3/3A Rebuilding an Engine?..New Cam Sprocket & Gear...1/2 Price Triumph 0
drooartz Rebuilding rear axle Spridgets 19
T Rebuilding a 1275 for a BE Spridgets 8
pkmh Rebuilding Armstrong Lever Shocks on a BJ8 Austin Healey 28
steveg Steering rocker shaft - chemical rebuilding Austin Healey 3
steveg Rebuilding roadster windshield Austin Healey 24
A Rebuilding Tiger window regulator question Sunbeam (Rootes) 3
S TR2/3/3A Rebuilding Dr2 Lucas wiper motor Triumph 16
S TR2/3/3A rebuilding bomb nose starter Triumph 9
W Looking for engine rebuilding 100-6 Austin Healey 12
KVH General Tech Rebuilding the Engine--a few practice pointers [for me] Triumph 11
R TR2/3/3A Rebuilding H4 carbs Triumph 8
S TR2/3/3A rebuilding door panels Triumph 15
Rut TR4/4A Seat rebuilding Triumph 3
steveg Rebuilding the Dip Switch Austin Healey 9
Tinkerman TR2/3/3A Rebuilding SU carbs 1960 TR3A Triumph 3
Rut TR4/4A Seat rebuilding Triumph 6
CZ_Dave MGB Is it worth doing the Shock Conversion Kit or Rebuilding Exsisting shocks? MG 16
JFeher TR2/3/3A Rebuilding A type OD I Need advise / measurements Triumph 14
KVH TR4/4A Engine rebuilding Triumph 17
gbtr6 TR6 Rebuilding TR6 Engine, Tips? Triumph 7
pbraun Anyone have a 1275 core for rebuilding? Spridgets 8
Got_All_4 TR2/3/3A Continually Rebuilding of my J Type Gear Box Triumph 2
drooartz MGB-GT Rebuilding the seats MG 28
Gray_Cat MGB Rebuilding MGB Overdrive MG 4
S TR2/3/3A rebuilding a tr3 water pump Triumph 22
Lin Rebuilding a master cylinder for BT7 Austin Healey 3
PatGalvin TR2/3/3A Guide for SU Rebuilding Triumph 8
H TR4/4A 4A convertible top rebuilding sequence Triumph 8
sim Rebuilding Front Suspension 58 sprite spring question Spridgets 6
charleyf TR4/4A Hs6 carb rebuilding Triumph 8
S TR2/3/3A Transmission Rebuilding Triumph 29
djackson Rebuilding 100/6 Transmission Austin Healey 6
bighealeysource Rebuilding BN2 generator Austin Healey 5

Similar threads

Top