Hey - did you know if you click on the title of a thread it will take you to the first unread post since you last visited that thread?
 but were afraid to ask:
  STOP!! Never post your email address in open forums. Bots can "harvest" your email! If you must share your email use a Private Message or use the
  smilie in place of the real @
 Pretty Please - add it to our Events forum(s) and add to the calendar! >>
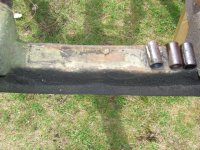
Well I am looking for advice on what to do with the metal sleeves that go on the lower wishbone on the backside where the nylon bushing rides. One of them came right off, but the other three are stuck pretty well. I heated it up and tried to turn it with a pipe wrench, but it would not budge. I seem to remember a post where someone had a very difficult time with those. I had a real good grip with a nice pipe wrench and basically stop pulling because I thought something was going to break or tear up so badly that I would be fixing that next. I am thinking about leaving the old ones on and calling it good. I will clean up the scarring done by the pipe wrench and leave it. However, if someone has figured out a way to cut them or pry them off I would appreciate hearing about the method.

-
 Hey Guest!
British Car Forum has been supporting enthusiasts for over 25 years by providing a great place to share our love for British cars. You can support our efforts by upgrading your membership for less than the dues of most car clubs. There are some perks with a member upgrade!**Upgrade Now**
(PS: Upgraded members don't see this banner, nor will you see the Google ads that appear on the site.)

TR2/3/3A sleeves that go on the lower wishbone
- Thread starter sp53
- Start date