
-
 Hey Guest!
British Car Forum has been supporting enthusiasts for over 25 years by providing a great place to share our love for British cars. You can support our efforts by upgrading your membership for less than the dues of most car clubs. There are some perks with a member upgrade!**Upgrade Now**
(PS: Upgraded members don't see this banner, nor will you see the Google ads that appear on the site.)

Tips
- We have a special forum called "Member Articles" where you can submit actual articles for consideration for publication. Learn More
- Don't have an Avatar? If not, your avatar will default to the 1st character in your username. Go into "Account Details" to change your Avatar.
- Some basic forum navigation info: click
 Hey - did you know if you click on the title of a thread it will take you to the first unread post since you last visited that thread?
- Hey Guest - Is your British Car Club in our Clubs database? If not, send me a PM - Basil

- Looking for a local club? Click the "Clubs" tab above and browse hundreds of clubs world-wide.
- Add Android or iPhone APP: click
- Did you know - any picture or video you add in your posts in any marque-specific forum will also get added to the Media Gallery automatically.
- A few more tips about posting and replying: click
- Hey there Guest - be sure to keep your profile page up to date with interesting info about yourself: learn more
- More tips and tricks on Posting and Replying: click
 but were afraid to ask:
  STOP!! Never post your email address in open forums. Bots can "harvest" your email! If you must share your email use a Private Message or use the
  smilie in place of the real @
- Want to mention another member in a post & get their attention? WATCH THIS

- So, you created a "Group" here at BCF and would like to invite other members to join? Watch this!
- Hey Guest - A post a day keeps Basil from visiting you in the small hours and putting a bat up your nightdress!
- Hey Guest - do you know of an upcoming British car event?
 Pretty Please - add it to our Events forum(s) and add to the calendar! >> Here's How <<
- Hey Guest - you be stylin' Change the look and feel of the forum to fit your taste. Check it out
- If you run across an inappropriate post, for example a post that breaks our rules or looks like it might be spam, you can report the post to the moderators: Learn More
- If you would like to try some different "looks" or styles for the site, scroll to the very bottom, on the left and click the Style Selector.
You are using an out of date browser. It may not display this or other websites correctly.
You should upgrade or use an alternative browser.
You should upgrade or use an alternative browser.
Sheared Bolt - Sway Bar Bush Strap to Chassis
- Thread starter pkmh
- Start date
richberman
Jedi Warrior
Offline
Elrey,
Metric....sounds like the bolts on my toyota trans...and new Trophy exhaust. Now I'll have to carry a set of metric tools in the boot too.
https://picasaweb.google.com/110087349657726745747/57AustinHealey#5715779128651097538
rich
Metric....sounds like the bolts on my toyota trans...and new Trophy exhaust. Now I'll have to carry a set of metric tools in the boot too.
https://picasaweb.google.com/110087349657726745747/57AustinHealey#5715779128651097538
rich
Randy Forbes
Yoda
Offline
Left hand (spiral) drill bits: best easy-outs there are. If they bite into the stub and back it out (friction creates heat) you're home free. If they don't, you still wind up back to the tap-drill size, and can run a tap to restore the original threads.
OP
pkmh
Jedi Warrior
Offline
My bad about the metric. Sorry!
I could or in fact, I will, modify the bolt head to match my old one. There is even a method I could use to salvage the coding on the head of the old and fix to the new.
Gives me a chance to throw everyone off once in a while and I certainly have no need or desire to carry an extra tool kit in the car.
Paul
elrey said:pkmh, glad you succeeded. But METRIC?... Good going none the less!
Arched eyebrow, sure, but no stones thrown.

Legal Bill
Jedi Knight
Offline
FWIW, I don't bother to even try to get them our with an easy out. I just keep drilling the hole bigger and bigger until the remaining wall of the bolt is so thin I can fold it in on itself like foil.
OP
pkmh
Jedi Warrior
Offline
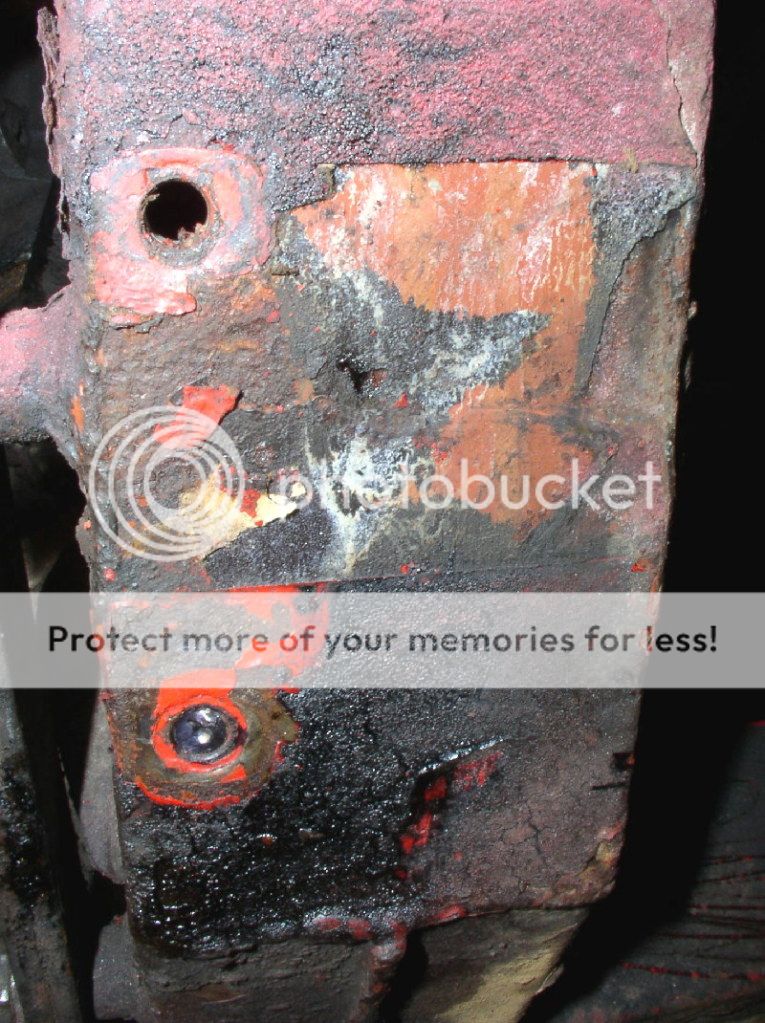
Finally posting photos as I wanted to and mentioned from my earlier post.
First photo shows the pilot mark I made before drilling in succession using various bits as also shown.
One photo not shown is how I decided to cut (actually grind)into not one, but two sides including the screwthreads. After all that plus applying flame and ice, the sheared remains of the stud still wouldn't come loose. That's when I drilled a 10mm opening (that's right, you heard me).
The last photo shows the modified 10mm hex bolt [head] compared to the standard 5/16" on the right. Both hex head dimensions are the same so only one tool kit is still needed (ha, ha).
Maybe one day I'll go back and cut out a section of the chassis flange like Randy Forbes displayed, but only if experiencing the same amount of corrosion.
But it seems my chassis is holding up (sorry, I had to clean and paint over--couldn't take seeing all that grime anymore).