• Hi Guest!
    If you appreciate British Car Forum and our 25 years of supporting British car enthusiasts with technical and anicdotal information, collected from our thousands of great members, please support us with a low-cost subscription. You can become a supporting member for less than the dues of most car clubs.

    There are some perks with a member upgrade!
    **Upgrade Now**
    (PS: Subscribers don't see this gawd-aweful banner
Tips
Tips

Seam Sealer/Caulking - Any Tips on When, Where, and What to Apply?

blueskies

Jedi Warrior
Country flag
Offline
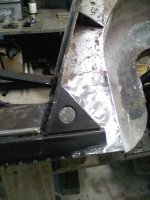
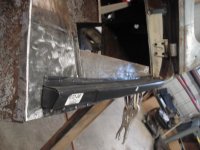
The BN4 frame and inner body is pretty much ready for primer and color coat. In looking through the forum, I have noticed that some people apply seam sealer or caulking prior to or after painting.

Can anyone offer advice on what seams or joints to caulk, when to caulk (before or after primer, before or after color coat, etc), and what type of caulking to use?

Any help much appreciated!
 
Thanks for the reply and the links, Bob.

Can anyone tell me whether I am correct in thinking that the primer should go on before seam sealer? My reason for thinking that is that priming first would ensure that all areas receive at least a coat of paint.

Instructions for the primer I'm using say that one can apply the color coat over the primer within an hour or two of spraying the primer. If one waits more than eight hours to spray the color coat, one should lightly sand the primer. Given the number of nooks and crannies on these cars, I would prefer not to have to sand the primer before applying the color coat. So, I would like to do this in one day.

It seems to me that if the seam sealer is applied within a few hours of spraying the primer, and if the seam sealer is a quick dry seam sealer, one could apply the seam sealer over the primer and then follow an hour or two later with the color coat. Does this make sense? Or is there a better way?
 
Primer > seam-sealer > top-coat(s).

You got it!

I'm partial to the "brushable" type of seam-sealer, and I actually prefer the quarts available from Eastwood Company over the (stiffer) 3M variety; I received a quart of it today in fact.

I don't know what/where are the "correct" places on a Healey to apply the seam-sealer, but I guess that depends on your intentions__concours or longevity__but I'd slather the stuff any place where water/moisture might otherwise get in. Don't be too neat about it either, as the chaps in Old Blighty weren't out to get any presentation awards...

An example of applying seam-sealer years after the initial chassis painting:

IMG_6530.jpg


IMG_6529.jpg


IMG_6532.jpg


IMG_6542.jpg


IMG_6551.jpg
 
Great idea on the 'Hub not tight' tape reminder. How many times ...

Just occurred to me to use Post-It notes as reminders on smaller tasks left undone with 'Oh, I would NEVER forget to tighten THAT!'
 
As to the caulk or primer first question, I held off until someone more knowledgeable weighed in, but I think it matters what type of primer you're going to use. I think most people now use a two-part epoxy, which supposedly does a better job of sealing against moisture than the older, one-part primer. If you were going to use the one-part--which has to be top-coated ASAP after application because moisture can permeate it--I'd put the seam sealer on first, else you might trap some moisture under the sealer.
 
Great idea on the 'Hub not tight' tape reminder. How many times ...

Just occurred to me to use Post-It notes as reminders on smaller tasks left undone with 'Oh, I would NEVER forget to tighten THAT!'
I don't think "Stik-it" notes are big enough for me (and they really don't stick that well__at least for long) and I go through a lot of 2" tape. Not just trusting myself that I'll see/read the note, the tape often goes across the driver's door opening, or in the line of sight on the windshield__glass is an especially better place for the tape to stick on highly waxed cars...

IMG_6599.jpg


IMG_7009.jpg


I've NEVER had a wheel come off a car__either my own or one I worked on__but I must certainly have a fear of it happening, as this is the most frequently taped message I'll put on a car!
 
Nice idea on the tape Randy. And you can tear it off when a job's done and leave the rest.
Yes, look, another one! I wonder if I mumble in my sleep, don't forget to tighten the axle nuts...?

IMG_1589.jpg


But yes, they can be amended, as needed.

IMG_2178.jpg


IMG_2302.jpg


IMG_2458.jpg


IMG_2471.jpg


IMG_2493.jpg


While this guy's car was a local one, most are shipped to me, so I have a zero tolerance for anything that could generate a comeback, especially if it could be caused by an intermittent memory loss on my part!
 
Today was the day - for primer, seam sealing, and paint. Since this car came from the factory in Colorado Red, I wanted to stick with the original color. I expected that Colorado Red would have an orange tone to it, and it certainly does. I guess that is what they call red in Colorado; maybe it's named after the red rocks that they have in Colorado?? Google turns up numerous Healeys painted Colorado Red; many seem to have more or less the same orange hue, so maybe this is right??? Thoughts.

caulking pass comp.jpgunderside colorado orange.jpg
 
Good job! Looks like 3M Fast-n-Firm Seam Sealer...

attachment.php


That's a mighty good feeling, isn't it?!?! Looks great!


attachment.php
 
Thanks, Randy. It does feel good to have that done. And thanks for the full size pics. Most areas turned out good, although I want to touch up the engine compartment some time, maybe when its time to spray body panels. With the fluorescent lights off in the paint room, leaving only incandescent lights on, the color looks more red and less orange. It likely will be quite some time before the car is outside to know how it will look under natural light.

Here are three pics - the first one under fluorescent light and the second and third under incandescent light. (sorry for the small pics, the image hosting service I usually use isn't working for me)

light fluorescent small.jpglight incandescant small.jpglight incandescent  1 small.jpg

The place where I bought the seam sealer sold ProForm seam sealer; they didn't have the 3M product. The color coat paint is Sherwin Williams Dimension Acrylic Urethane Enamel. I'm thinking of using the same paint on the body panels and not using a clear coat. The paint shop says that one can clear coat over the Acrylic Urethane Enamel, if desired, but to leave out the activator from the color coat if doing that. I suppose that using the single stage system will come closer to replicating the original finish on these cars than a shiny base-clear finish. Lots of time to decide on that. The parts arrived to make this into a roller. And the shrouds - especially the front shroud - need a lot of work. Time to practice up on mig welding aluminum . . .
 
Looks good, but it appears that your shut pillar is missing its triangle box and gusset...
 
Looks good, but it appears that your shut pillar is missing its triangle box and gusset...

Thanks for pointing that out. Since I'm not the one that took this car apart, I have to admit that a bit of guesswork is involved. In looking at the Moss site, I see the parts that you refer to. They may be in the pile of parts; I will look. Can you tell we what the triangle box does? Is it there to hold the nuts captive?
 
The triangle box is the primary structure that reinforces the shut pillar.
 
Yeah, that's a bummer. The triangle box fits behind and strengthens the door strike. The gusset attaches the pillar to the rocker panel.
 
Yes adds a good bit of diagonal strength in that area. The end of the rocker should be boxed also.
 

Attachments

  • 0121101731-00.jpg
    0121101731-00.jpg
    38.9 KB · Views: 173
  • healey 074.jpg
    healey 074.jpg
    55.6 KB · Views: 182
Looks a bit more orangeish in some of the photos, but looks good. My BJ8 came from the factory in CR, but it's been resprayed a couple times--first with a metallic bronze (yuck)--then a red which appears to be close to CR but a paint supplier determined is a GM color known as 'Peking Red' (they used a colorimeter).
 
Thanks everyone. I went out and looked through the parts pile and found two newly fabricated triangle boxes and several fairly decent looking used gussets that I can either clean up or use as a pattern to fabricate new ones. I also dug out the old, rusty shut pillars with the old triangle boxes and gussets still attached. Obviously, I should have paid more attention sooner. But it's not a big deal at this point; a few hours of light grinding, welding, and touch up painting should look after this.:rolleyes2:

One thing I notice on the old shut pillars and the adjacent sheet metal is that the shut pillars are not at right angles to the inner fender and other body line. The outer edges of the shut pillars sweep to the rear a bit - maybe half an inch or so. Does anyone here know the correct measurement or angle (degrees) for this? This is one area where I used guesswork, based on what seemed to work with trial fitting of the door and rear quarter.
 
After searching this forum and the internet, I'm not having much luck finding more information about the shut pillar/triangle box/gusset alignment and spacing between the shut pillar and rear edge of the door. Of course, placement is complicated by the fact that the aluminum shut pillar facing piece, the door latch parts, and the edge of the rear quarter all need to fit into that gap later on in the assembly process. I test fitted a loose rear quarter, but that still leaves room for error. Before welding in the triangle box and gusset, it would be nice to know more about this. Any pictures or measurements would be most helpful. Although I would prefer to do this at this point, another option might be to hold off on adding the triangle box and gusset until the time comes to do a final install of the rear quarters.
 
Back
Top