
-
 Hey Guest!
British Car Forum has been supporting enthusiasts for over 25 years by providing a great place to share our love for British cars. You can support our efforts by upgrading your membership for less than the dues of most car clubs. There are some perks with a member upgrade!**Upgrade Now**
(PS: Upgraded members don't see this banner, nor will you see the Google ads that appear on the site.)

Tips
- We have a special forum called "Member Articles" where you can submit actual articles for consideration for publication. Learn More
- Don't have an Avatar? If not, your avatar will default to the 1st character in your username. Go into "Account Details" to change your Avatar.
- Some basic forum navigation info: click
 Hey - did you know if you click on the title of a thread it will take you to the first unread post since you last visited that thread?
- Hey Guest - Is your British Car Club in our Clubs database? If not, send me a PM - Basil

- Looking for a local club? Click the "Clubs" tab above and browse hundreds of clubs world-wide.
- Add Android or iPhone APP: click
- Did you know - any picture or video you add in your posts in any marque-specific forum will also get added to the Media Gallery automatically.
- A few more tips about posting and replying: click
- Hey there Guest - be sure to keep your profile page up to date with interesting info about yourself: learn more
- More tips and tricks on Posting and Replying: click
 but were afraid to ask:
  STOP!! Never post your email address in open forums. Bots can "harvest" your email! If you must share your email use a Private Message or use the
  smilie in place of the real @
- Want to mention another member in a post & get their attention? WATCH THIS

- So, you created a "Group" here at BCF and would like to invite other members to join? Watch this!
- Hey Guest - A post a day keeps Basil from visiting you in the small hours and putting a bat up your nightdress!
- Hey Guest - do you know of an upcoming British car event?
 Pretty Please - add it to our Events forum(s) and add to the calendar! >> Here's How <<
- Hey Guest - you be stylin' Change the look and feel of the forum to fit your taste. Check it out
- If you run across an inappropriate post, for example a post that breaks our rules or looks like it might be spam, you can report the post to the moderators: Learn More
- If you would like to try some different "looks" or styles for the site, scroll to the very bottom, on the left and click the Style Selector.
You are using an out of date browser. It may not display this or other websites correctly.
You should upgrade or use an alternative browser.
You should upgrade or use an alternative browser.
SaxMan's Winter 2014/15 Project Thread
- Thread starter SaxMan
- Start date
Boy, JP, you weren't kidding! My daughter and I bundled up and took the car out...top down. It was in the mid-40s. To be honest, it was no worse for me than riding a bike in similar conditions. And, yes, we got more honks and waves on a relatively short loop than I have on far longer drives in the summer.
The car drove well. I think the mixture is a bit off again, but that's probably a weather-related issue. Also when I turned on the headlights, they went direct to high-beam, and pulling back on the high beam stalk did nothing. I'm pretty sure that's a case of getting my wires scrambled on the headlight switch. Other than that, I was very happy with how the car performed. Again, with the vacuum line from distributor to carb replaced (and not leaking), the car's idle was smoother than I've ever had it before.
EDIT: When I went to go troubleshoot tonight, the high beams worked properly. I think the car was on low beams, but sometimes during the day, it's tough to tell. Sometimes I feel like the Randy Quaid character in Christmas Vacation "Gets kicked in the head, eyes crossed. Gets kicked in the head again, eyes uncrossed. Go figure."
Last edited:
Offline
Boy, JP, you weren't kidding! My daughter and I bundled up and took the car out...top down. It was in the mid-40s. To be honest, it was no worse for me than riding a bike in similar conditions. And, yes, we got more honks and waves on a relatively short loop than I have on far longer drives in the summer.
woo hoo! an LBC in its natural habitat! any pics?
No pics, unfortunately. I wanted to, but it started to precipitate, so I figured I'd make a beeline for home.
Started working on the other rust spot tonight just behind the right front wheel. When I began sanding, and grinding, I tripped across an old Bondo fix, which exposed some smallish holes in the metal. It was a bit disappointing, but certainly not surprising. So...old Bondo out, new Bondo in. I actually learned how to work with Bondo while restoring the TBM Avenger, as we were trying to smooth out some of the divots in the plane's skin, particularly on the wings and tail surfaces, without having to resort to reskinning...but I digress. I put the "mud" on and worked it in. I figured I'd go ahead and let it harden completely overnight before I start sanding and smoothing it out. I completely forgot how much this stuff smells! Worse than paint!
Started working on the other rust spot tonight just behind the right front wheel. When I began sanding, and grinding, I tripped across an old Bondo fix, which exposed some smallish holes in the metal. It was a bit disappointing, but certainly not surprising. So...old Bondo out, new Bondo in. I actually learned how to work with Bondo while restoring the TBM Avenger, as we were trying to smooth out some of the divots in the plane's skin, particularly on the wings and tail surfaces, without having to resort to reskinning...but I digress. I put the "mud" on and worked it in. I figured I'd go ahead and let it harden completely overnight before I start sanding and smoothing it out. I completely forgot how much this stuff smells! Worse than paint!
Trevor Jessie
Yoda
Offline
Good to see your making excellent progress. However, the problem with bondo is that it absorbs moisture. If you are covering holes in the metal, then the back side of the repair must be sealed with paint as well. Otherwise, the bondo causes the metal to rust faster than an open hole.
Some more pics of the exterior repairs:
The cursed rust bubbles "in bloom" on the left rear wheel arch
 DSC_1801 by onyxsax, on Flickr
Rust bubbles behind right front wheel:
 DSC_1806 by onyxsax, on Flickr
Rust grinded off. I learned that rust bubbles also burrow into the metal. On this repair, I didn't fill the holes.
 DSC_1808 by onyxsax, on Flickr
Masked, primed and painted:
 DSC_1818 by onyxsax, on Flickr
While waiting between coats, I was doing a more thorough detailing of the interior:
 DSC_1830 by onyxsax, on Flickr
The cursed rust bubbles "in bloom" on the left rear wheel arch
DSC_1801 by onyxsax, on FlickrRust bubbles behind right front wheel:
DSC_1806 by onyxsax, on FlickrRust grinded off. I learned that rust bubbles also burrow into the metal. On this repair, I didn't fill the holes.
DSC_1808 by onyxsax, on FlickrMasked, primed and painted:
DSC_1818 by onyxsax, on FlickrWhile waiting between coats, I was doing a more thorough detailing of the interior:
DSC_1830 by onyxsax, on FlickrInterior from passenger side:
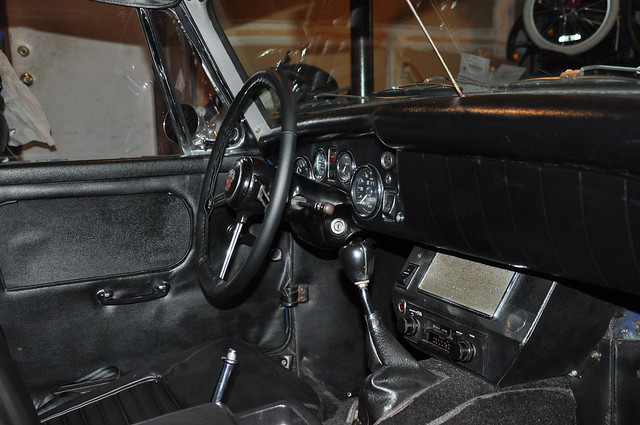 DSC_1832 by onyxsax, on Flickr
Masking off the area on behind the right front wheel:
 DSC_1836 by onyxsax, on Flickr
The old bondo repair covered the holes near the "V" of the tape mask.
 DSC_1838 by onyxsax, on Flickr
New bondo slopped on. I learned a valuable lesson -- remove the masking BEFORE the bondo hardens.
 DSC_1841 by onyxsax, on Flickr
Left wheel repair clear coated. I still have to hit it with some polishing compound to smooth it out. It's not a perfect match, and up close it is undoubtedly an amateur repair. I'm not too pressed, as there is definitely a learning curve with body work. I'll live with it for this season and redo it next winter.
 DSC_1842 by onyxsax, on Flickr
DSC_1832 by onyxsax, on FlickrMasking off the area on behind the right front wheel:
DSC_1836 by onyxsax, on FlickrThe old bondo repair covered the holes near the "V" of the tape mask.
DSC_1838 by onyxsax, on FlickrNew bondo slopped on. I learned a valuable lesson -- remove the masking BEFORE the bondo hardens.
DSC_1841 by onyxsax, on FlickrLeft wheel repair clear coated. I still have to hit it with some polishing compound to smooth it out. It's not a perfect match, and up close it is undoubtedly an amateur repair. I'm not too pressed, as there is definitely a learning curve with body work. I'll live with it for this season and redo it next winter.
DSC_1842 by onyxsax, on FlickrFinished the rust repair on the right side. I learned that trying to cover an area more than a couple of square inches with just a touch up brush is a futile gesture. I'll probably have to go back and hit it with a rattlecan when the weather gets warmer. I need to do some rust remediation in the trunk, so I'll probably hit the area again when I do that work.
Home stretch: Time for a wash, hit the car with polishing compound and then a coat of wax.
Home stretch: Time for a wash, hit the car with polishing compound and then a coat of wax.


Offline
This should help:
Thanks, Rick for the tip. I'm probably going to leave it as is for now, but will change it if I have to replace again. It's perfectly comfortable for my hands.
The headrests came back from the upholstery shop. They did one heck of a job with them. Better than original if I must say.
The headrests came back from the upholstery shop. They did one heck of a job with them. Better than original if I must say.
Offline
Rick, would there be two or three open thread holes where the spokes attach to the wheel? Not sure where the thread comes back up form behing\d the wheel
Been a long time since I did this one, so the memory is a little hazy. There are two open thread holes around the spokes on the front. At the rear, the thread runs with the rim in order to get around the spoke. There may have been a way to run the thread around the front if having the holes in the front were a concern:


I installed the headrests tonight, and other than some minor tweaking and tuning, the winter project has drawn to a close. I got a pretty fair amount done:
Reconditioned seat frames and hardware
Installed new foams
Installed new upholstery covers
Upgraded dashboard lighting to LED
Installed new choke cable
Recovered steering wheel
Installed new plug for U-Joint Access (and greased U-Joint)
Replaced brake pedal and clutch pedal pads
Replaced heater core return line
Replaced fuel tank
Change all fluids
Compression and leakdown testing of all four cylinders
Replace valve cover gasket
Adjust Valves
Replace vacuum line from distributor to carbs
Replace spark plug wires
Replace cap and rotor
Install new spark plugs
Oil & Filter Change
Added damper oil to carb dashpots
Rotate tires
Rust repairs on left rear wheel arch and right front fender
Touch up other chips and scratches
Detail interior
Exterior detailing including polishing compound and waxing
It took me a total of 62 man hours spread out over 47 separate nights in the garage to do all of this, not including time spent ordering parts. I did all the labor except for recovering the headrests, which were farmed out. Hard to believe that it's only been about 18 months since I first started on the LBC adventure. Thanks for all of your support during the process!

Aw, shucks, JP.
The garage is my sanctuary. I go there to get away from the stresses of everyday life. There's something (usually) relaxing about taking things apart and putting them back together again (and hopefully putting them back together better than when they were first taken apart!). With the car basically done, now it's time to tend to the bicycles.
The garage is my sanctuary. I go there to get away from the stresses of everyday life. There's something (usually) relaxing about taking things apart and putting them back together again (and hopefully putting them back together better than when they were first taken apart!). With the car basically done, now it's time to tend to the bicycles.
Offline
The garage is my sanctuary. I go there to get away from the stresses of everyday life. There's something (usually) relaxing about taking things apart and putting them back together again (and hopefully putting them back together better than when they were first taken apart!). With the car basically done, now it's time to tend to the bicycles.
I feel the same way - I put on the radio and just putter. Wish the garage was a little warmer, but, my little heater mostly does the job. That said, still an impressive list!
One of the "odds and ends" that I took care of tonight was replacing the accelerator pedal. Like the seats, it was bolted through the bottom of the car, so to loosen the bolts took quite a bit of contorting my body -- impact wrench up top, crescent wrench below. But, I did get the pedal off and discovered the hinge was so dry and rusty that the pedal wasn't moving freely. Replacing the pedal took the same amount of contorting. The end result was another "wow". The new pedal feels so much better and responsive. I still have to watch my right foot when going to the brake to make sure I don't accelerate at the same time, but by now, I've learned how to do the "Spridget Shuffle" with my feet. Out of habit, I now work the pedals the same way in my Jetta, even though I have a lot more clearance between the pedals.
One of the other habits I have as a cyclist who uses clipless pedals is that sometimes I try to "unclip" my foot from the accelerator pedal, even though my shoes do not have the cleat, nor does the pedal engage like a bicycle.
One of the other habits I have as a cyclist who uses clipless pedals is that sometimes I try to "unclip" my foot from the accelerator pedal, even though my shoes do not have the cleat, nor does the pedal engage like a bicycle.