• Hi Guest!
    You can help ensure that British Car Forum (BCF) continues to provide a great place to engage in the British car hobby! If you find BCF a beneficial community, please consider supporting our efforts with a subscription.

    There are some perks with a member upgrade!
    **Upgrade Now**
    (PS: Subscribers don't see this gawd-aweful banner
Tips
Tips

SaxMan's Cylinder Head Overhaul / Head Gasket Replacement Thread

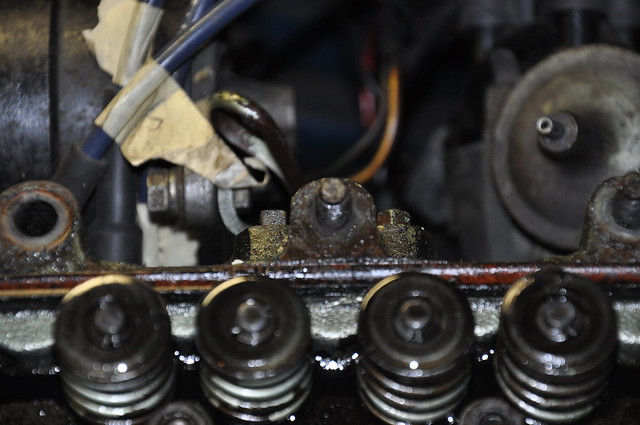
Did anyone else notice all the bearing/metal residue on the on the head? Or ... are the photos misleading?
 
Trevor, I think your screen is glittery!:friendly_wink: Hope that's all it is!


Looks to me like he may have a major rust problem on those outside stud's and, because of that I think I would only try the plugs back, crank it over route for now.

Take a piece of a cardboard, punch 8 holes in it and mark one end either front or back so you can keep track of the placement of your push rod's. Remove the push rods by pushing them firmly to the side as you pull them out. That will help them release from the lifters and you should be able to feel when they are free or the lifter is coming up too.

Kurt.
 
The front crank bolt requires a 1-5/16" socket. Same as the cam nut.

The valve springs can be used to help leverage the head up about a 1/4". Loosen the 9 head stud nuts (9/16" socket size) while leaving the 4-5/16" rocker stud nuts (1/2" socket size). The valve springs will work in reverse using the push rods to "lift" the head up. This is the way I do all head removals on the A-series.

Sometimes there has been head gasket leakage on the distributor side of the block and coolant has gotten into the short stud bores in the head. The rust/corrosion has "bound" the stud in the head bore. Spray some pentrant onto the stud/head junction and let soak for a bit. The head will then "pop" up or can be assisted by using pry-bars (from the side of the engine) between the head and the top of the engine backplate and between the head and the top of the water pump. This will usually release the head from the studs and permit removal. The head not releasing can also be from the head gasket being well stuck to the head and block.

It is common to have the nuts stick on the studs and the pair come loose during disassembly. Spray a little penetrant on the nut/stud and let sit for a while. Clamp the stud in a vise lengthwise and then remove nut. Some may be more difficult than others to remove and heat may be necessary too.

Clean the studs and check the threads in the nuts and on the studs. Sometimes the studs will show elongation. Replace any with damaged threads whether nuts or studs. Snug tight the studs into the block on re-assembly. The Harbor Frieght 3-pin stud sockets work nicely but tend to wear out after a hundred engines or so.

HTH,
Mike Miller
 
No dice using the starter motor while putting the spark plugs back in. It's still very firmly in place. With the "rope trick", I'm presuming that I have to pull the radiator? I can't see how to turn the engine by hand using the nut with the radiator still in place...there doesn't appear to be enough clearance to pull it off. I've got a little bit of movement on the left rear of the head, but the right side of the head is sticking solid.
 
If you've got movement, it'll go. Hit the opposing side with the dead-blow like JP said. Maybe use wooden wedges.
It's gonna happen. Persistence will pay off.
 
I like Mikes plan. Couple of bars placed as he mentioned plus penatrant on the offending studs and work it back and forth and I think it will come.

Kurt.
 
If you've got movement, it'll go. Hit the opposing side with the dead-blow like JP said. Maybe use wooden wedges.
It's gonna happen. Persistence will pay off.

Pardon my ignorance, but is "dead blow" the same as a metal hammer (versus the rubber mallet)? Right now I have enough movement to stick a screwdriver blade in on the left side, but that's about it. I hit it with penetrant this evening (PB Blaster...it stinks but it works). I'm not home tomorrow, so it looks like Friday night will be my next attempt.

Meanwhile, I've started cleaning up the engine bay, so I'm not completely at a dead stop.
 
A dead-blow is plastic/rubber coated and filled with metal shot. Non marring and doesn't bounce back. A steel hammer could crack cast iron. A Harbor Freight cheepie is good enough.


images
 
Hold on:

You mention a "head bolt in the center of the block. It looks like it may have become cold welded to the head"

Have you removed that head bolt?

If not, the head will never come off!

If you cannot remove it with vise grips or by using a six-point 9/16" socket, you may have to saw or grind it off.

11957205795_dffaa586c7_z.jpg
 
The center short stud bore in the head is the tightest fit/smallest hole. It is the one used by the factory for locating the head on the block. Keep the penetrant on it. Can try "double-nutting" the stud to try and break it loose from the block and the head.

I'll typically add 1/4" copper tube couplers to the two short end studs to enhance the cylinder head locating for race engines. Especially after I've cut valve reliefs in the pistons or notched the cylinder walls with exhaust valve reliefs.
 
Never hit the head with a steel hammer. You can easily crack it. Also never try to drive a screw driver or other steel device between head and block. Like Steve said, use a hardwood or plastic wedge of some sort. You do not want to damage those machined surfaces.
 
The nut has come off the center stud. The stud itself looks cold welded, although when I started hitting it with penetrant, it looked more normal. I hit it again this AM and probably will hit it a couple more times before trying to remove again. PB Blaster has never failed me before, so hopefully it will do its magic this time, too. I'll try to find some kind of wedge I can use.
 
You can't wedge something in there or you rusk damaging machined surfaces. No steel pry bars please. Heat and cold may be needed along with PB blaster. And if PB fails there is always acetone and ATFluid in a 50/50 mix
 
As Mike suggested you can use pry bars on the out side of the head away from machined surfaces. Back of the block against engine back plate and under the thermostat extension in front. If you have any movement and just keep working it it will come.

Kurt.
 
The pushrod trick appeared to have done very little. However the rope trick did get things moving. I can now wiggle the head laterally and very slightly vertically. It still seems to be sticking around the center bolt, although the stud no longer appears to be frozen. I hit it again with some penatrant and called it a night. Could I do the rope trick with cylinders 2 & 3 where the head is sticking? Right now, I just did 1 and 4.
 
Go for it. There is no limit on the rope trick. At this point seems safer than wedges.
 
Using the rope trick with cylinders 2 & 3 finally got the head to separate from the block. However, it is still hanging on for dear life to the center stud. I now have a solid 1/4" of clearance around the entire head and can wiggle it in any direction, with the center stud being the focal point of all movement. Scavenged around the house to find some kind of non-metal wedge to help it off, but so far no luck. I hit the center stud again with penetrant, this time also from the bottom, so hopefully it will give way soon.
 
Cylinder Head separation was accomplished at 2118 hours local time! Just some good old fashioned wiggling finally got it to break loose. No recessed brass plug problems! You can clearly see the break in the head gasket between cylinders 2 & 3. Now the fun can really begin.
 
woo hoo - time for some real damage!!!
 
Back
Top