• The Roadster Factory Recovery Fund - Friends, as you may have heard, The Roadster Factory, a respected British Car Parts business in PA, suffered a total loss in a fire on Christmas Day. Read about it, discuss or ask questions >> HERE. The Triumph Register of America is sponsoring a fund raiser to help TRF get back on their feet. If you can help, vist >> their GoFundMe page.
  • Hey there Guest!
    If you enjoy BCF and find our forum a useful resource, if you appreciate not having ads pop up all over the place and you want to ensure we can stay online - Please consider supporting with an "optional" low-cost annual subscription.
    **Upgrade Now**
    (PS: Subscribers don't see this UGLY banner)
Tips
Tips

TR2/3/3A Replacing the cam shaft

sp53

Yoda
Country flag
Offline
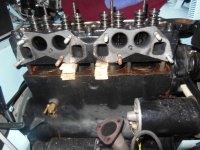
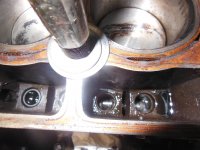
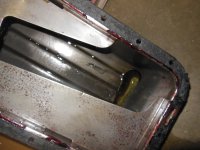
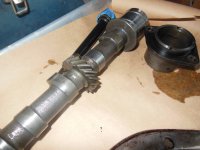
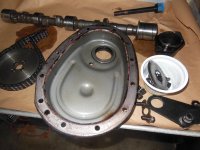
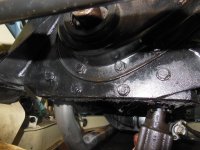
Replacing the cam shaft with the engine in the car, to my surprise I did not find a cam lob that was all scared. What I found when the head was off is that lobs are smooth and look normal and the lifters look fine. This is freaking me out because now I do not know where the metal pieces in the oil originated or why #2 intake valve seemed to not move. Perhaps the cam wore out gradually and only looks correct and when I get the cam out of the car and measure the lobs and compare them I will find better evidence for the origin of the metal fragments.

I am out of my comfort zone and never experience any in depth cam shaft studying. For now I am going to set the engine up with some shims, so I can use the hand crank to turn the engine. The oil pan and timing cover are still in place. Perhaps when I get the pan off I will see something.

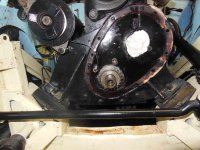
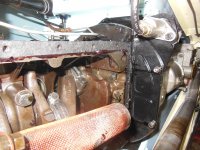
Any thoughts on how to proceed are welcome. The distributor drive shaft for the oil pump separated at the key when I removed it. I guess pulling the pan and trying to drive the shaft up and out is a possible answer, but again not curtain. So some help there would be nice also. I actually thought the shaft was pinned into the gear. I guess not.

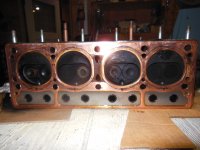
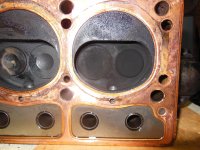
One more thing there is carbon and a sticky gasoline like varnish everywhere; the carbon on the head and heavy gasoline varnish on the carb throttle plates. Could these be from a cam shaft that is not function correctly?


Over my head Steve
 

Attachments

  • DSCN4355.JPG
    DSCN4355.JPG
    3.3 MB · Views: 143
  • DSCN4367.JPG
    DSCN4367.JPG
    3.3 MB · Views: 142
  • DSCN4368.JPG
    DSCN4368.JPG
    3.3 MB · Views: 129
  • DSCN4370.JPG
    DSCN4370.JPG
    3.4 MB · Views: 139

CJD

Yoda
Country flag
Offline
Another source for metal could be the tensioner. If the number 2 valve is not lifting properly, then it has to be a lobe problem or a sticking lifter. I don't think the varnish is from the cam...likely just from short runs without coming fully to temperature to burn the condensation out.

I can't tell if the sparkle in the lifter valley is metal or just reflection?
 
OP
S

sp53

Yoda
Country flag
Offline
Thanks you guys. The sparkle is the light reflecting, but there were chunks of metal, I saved it somewhere and yes as I need to stay on course and pull the cam. I am just so surprised how the lifter and cam look so smooth. that valve hardly moved, maybe an 1/8.

This is a good time to fit the crank starting handle. I did not before because my radiator with a hole in it leaked, but I fixed it --- I hope. Anyways these cars need a hand crank to turn them over now and then, and I wanted to see the cam work before I pulled the gears. Thanks much it is easier when I know someone is helping with the blind spots.

Steve
 

CJD

Yoda
Country flag
Offline
The crank is worth lining up, just to help when doing tune-ups. Otherwise you have to grab the sharp fan blade to turn the engine...or bump the starter 10 times to get the crank where you need it.
 

Stevenry

Senior Member
Country flag
Offline
My two lobes that were worn to nubbins we’re still fairly smooth, and only a little pitted where the lobe once was. Once out it was obvious they were worn down. The tappets were more pitted and I assumed accounted for the few tiny bits of metal larger than very fine powder in the oil pan.

Steve
 

Nobbster77

Freshman Member
Country flag
Offline
The cam is case or induction harden so once you have worn through the hardened surface it will wear quite quickly this can be caused by oil starvation or poor quality oil . Varnish inside the combustion chamber is either fuel or lubricant derived . The head gasket may have had some type of gasket sealer such as Heditite. If it were me I would check the filter and sump for metal particles . if particle have got into the filter they may have scored the bearings in the bottom end and also blocked oil galleries. Your cam followers should also be replaced when filling a cam shaft .. I would also change the chain and cogs but if you do you will need to reset your cam timing .
Its worth mentioning that your engine oil should keep your engine internals clean and hold the insolubles in suspension so that they are removed when the oil is changed. However if the oil is not changed as recommended, the oil viscosity will increase and the insolubles deposit out blocking oil galleries .
I would dangle a magnet into the removed sump oil to see how much iron debris is present . Personally I thing its good time to rebuild the engine if you have the cash otherwise you could be trowing good money after bad
qll the best
Steve
 
OP
S

sp53

Yoda
Country flag
Offline
Well I guess I will not using an old cam shafts anytime soon. I started working on these cars when purchasing new lifters and cams could cause problems, but that time has passed for me. I am buying a new cam, lifters, and push rods.

Anyways I got the oil pan off and found a few ounces of gray metal solution that looks like liquid metal. I am taking a break today, but should have the cam out tomorrow. When I look close, I do see some scaring on the cam, but cannot tell about the lobs.

I was able to get the hand crank to work by installing one large shim on the passenger side. I look through the shims I collected over the years and used one of the under the mount shims and perhaps I will add one of the thinner lift the engine shims when I get the car back together.

Moreover, I found the steering box is leaking out of top adjust screw. You can see the puddle of fluid if you look close at the top cover. I filled the box from the hole on the upper column some time back. Perhaps a copper washer or some thread sealer could help, but I guess the cover itself where the screw goes into the threads might be the problem.

I have a tool that reads small measurements and I figured with the help of the computer that the pistons are 86mm. Could some verify that because I get that stuff wrong once and a while?

Swimming to shore-- Steve
 

Attachments

  • DSCN4373.JPG
    DSCN4373.JPG
    3.4 MB · Views: 103
  • DSCN4371.JPG
    DSCN4371.JPG
    3.4 MB · Views: 105
  • DSCN4379.JPG
    DSCN4379.JPG
    3.3 MB · Views: 100
  • DSCN4386.JPG
    DSCN4386.JPG
    3.4 MB · Views: 110
  • DSCN4395.JPG
    DSCN4395.JPG
    3.3 MB · Views: 125

CJD

Yoda
Country flag
Offline
cams always scare me too. You are depending on a lot of people having done the grinding and heat treating just right, or it all comes apart. So sorry this happened...the rest of the car looks great!
 
OP
S

sp53

Yoda
Country flag
Offline
Thanks David for interpreting that caliper for me to 86mm. I was there with the 3.3 but was unsure about the last 2 numbers. I just looked again and now I think I get it; the calibration is in 2.5--- 5.0---7.5-- 1.0 right? and line is just a little past the 7.5

Well I got the cam out and # 1 intake is totally flat!!!!, so the good news is I think I found the problem. Thanks John you are always supportive and kind that is a quality I try for, but fall short. Heck Randall was often so direct that it hurt, but I loved him. He really helped me learn and help a lot of other people, also. Anyways taking the engine apart so soon was one of those deals where it is all good and I probably needed the experience or Karma or something anyway, heck it is all experience and learning.

I am kinda surprised how many bolts where lose and how much oil this tr3 thing leaks. I put on the Mad Max seal which is an impressive piece of engineering and it might leak or the oil is coming out of the last bearing cap that is not really part of the seal, but too hard to tell, and I am leaving that alone. The seal really is cleaver.

So, it is straighten out the timing cover and oil pan and clean them up. I am doing the sealing of the parts and the type of sealer different this time because under the car is challenging and it did not seal well last time. So cool ideas are needed, like 3 people to hold it in place will I put in a bolt

I wanted to get some of that Hylomar gasket sealer hoping it will work better than the last stuff I used, but I see there are few types. The Hylomar Moss sells is probably the stuff I want for a tr3. Anybody know the deal on the Hylomar, I remember something about a Blue strip that changed color or something.

I think I remember Geo laid the oil pan on a sheet of glass with the gasket and some Hylomar to set one side or something. Doing it different this time need ideas.

thanks Steve
 

Attachments

  • DSCN4420.JPG
    DSCN4420.JPG
    3.4 MB · Views: 119

CJD

Yoda
Country flag
Offline
Well, hard as it is, after going through all the trouble, it's nice when you positively find the problem. That's very rare in a TR engine to lose a lobe. My guess is it is likely due to corrosion. A little pitting can start the process...and pretty soon the lobe goes flat.

I've used the glass technique on the valve cover, because that gasket has to last a few removals to check the tappets before changing it. The key on the oil pan is to make sure it is flat. I always use a ball peen on the bolt holes to turn the dents back outward...then a nice flat table to makes sure the pan still sits flat. For stopping leaks, even tightening is the key. Overtightening can be worse than under-tightening. I also snug the pan into the gasket and compound. I let it sit overnight, and then bring the bolts to full torque. I found cork gaskets will split if you torque them fully when still wet.

Keep the pics coming!
 

DavidApp

Yoda
Country flag
Offline
On the calipers you read the 3.3 then the 0.75 line . Next you look at the sliding scale to see which line exactly aligns with the upper scale. In this case it is 5. The 4 line is slightly to the right of the upper line and 6 is to the left but 5 is exactly in line. It is a Vernier scale.

On the sump I thread in a couple of studs in on either side of the sump and hold it in place with nuts as I get the bolts started. The studs keep everything aligned as I struggle with the bolts. Then I remove the studs and replace them with the correct bolts.

David
 

Nobbster77

Freshman Member
Country flag
Offline
Its unlikly to be corrosion as the sulphur content of fuel is so low and the Base Number of engine oils are sufficient enough to neutralise acids , I have not seen cam corrosion in petrol car engines for 30yrs. Its hard to give good news here, but the wear is accelerated oince you are through the hardened surface of the cam lobes, which could have just been down to a badly heat treated item. A magnet would trell you if the silvery oil was ferrous or no-ferrous.. Large particles will get ground down in to very small particles which will damage, which means you need to check the cam bearings , the oil pump and a couple oif big end bearings and the center main bearing as the oil contining bits of steel will have been pumped round the bearings. As you have the sump poan off it makes sense to check .
If the thrust washers are through the white metal to trhe Copper you will need a crank grind, same with the big ends and main bearings. Sorry its not good news but I have seen a similar process in GT6 engine where the didtributor pedestal was rubbing on the cam gear sending cast iron around the engine.. If it was my engine i would strip it, but clearly there is a cost to all of this.. If when you fit the cam makje sure you use some Cam non the cam and the cam followers . the oil is essentilly a hiugh viscosity gear oil with a dye but it does cliung to theb surface

If you want to stop the leaks in the steering box try to get hold of some NGLI 000 semi-fluid grease. During use it becomes more fluid but is thick enough to stop leaks
hope this help sorry its not good news
rgds
Steve
 
OP
S

sp53

Yoda
Country flag
Offline
Thanks you guys I am going to get some studs like David suggested and put them in on the sides of the pan. I might set up the bottom side of the pan the night before with sealer on a piece of glass to make things more manageable under the car then do what John suggested on the up side of the pan by letting that set up overnight and then tighten things up in the morning. A day and a half might be too long with the sealants, but the Red gooop stuff stays soft for long time, like a few days easy

I think I have often tightened the parts up too quickly and pushed too much sealer away. Still have not made up my mind on the type of sealant to use, every tr3 I have rebuilt leaks more than I thought it should, but it does have the breather tube and a little oil makes big mess. Heck, I rebuilt a 327 with permatext hard drying and it did not leak a drop, but here on the tr3 I am leaning toward the hylomar.


I used the Red Gooop stuff the first time and I think it leaked between the tin and the gasket because of the way the gasket came off on one side and stuck on the other and maybe some witness marks. It seems to me a little oil slide by the pressed smooth side. This might have happened because I tighten stuff up too soon or used the wrong product or not. I just do not know, but I need to do things different.


There is no way to get cam bearings installed with the pistons in place, so I am taking a chance with the old bearings there and using my old bearings.


Steve
 

Attachments

  • DSCN4427.JPG
    DSCN4427.JPG
    3.3 MB · Views: 97
  • DSCN4424.JPG
    DSCN4424.JPG
    3.4 MB · Views: 91
  • DSCN4400.JPG
    DSCN4400.JPG
    3.3 MB · Views: 92
  • DSCN4440.JPG
    DSCN4440.JPG
    3.3 MB · Views: 105

Nobbster77

Freshman Member
Country flag
Offline
It is possible to get the cam bearing out without pulling the pistons but a special tool is required , you have done a great job of cleaning every thing up . but ts still worth checking the the oil pump and a couple of big end bearings while you have the sump off

If you use some silicone to hold the gasket in place and drop the bolt down through holes and leave overnight it should stay in place, The use of a couple of UNC studs in the front and back engine block hole is good idea as it will allow you align the sump with out moving the gasket
cheers
steve
 

DavidApp

Yoda
Country flag
Offline
While you have it apart check the timing chain cover for wear by the chain tensioner. This is what I found on my TR3A. I welded up the hole and rounded the corners on the tensioner.
Timing chain cover 2.jpg


David.
 
OP
S

sp53

Yoda
Country flag
Offline
I hear you Steve and I took the oil pump out last night and will have a look this morning by cleaning it. I do have some other oil pumps and if damage is there I will try a different setup. Yes David that area is a high wear spot. I will probably replace the tensioner in there, but the rest looks good. I have a new black steel tensioner, but I like how the original looked and felt; I believe they were stainless. The black ones look cheap.

I might pull the pressure regulator to have a look for metal pieces and give it a cleaning. My lack of understanding on those has kept me from taking them apart. I often hear my old machinist buddy’s voice telling me if it is not broke do not fix it. I really miss that guy.


Steve
 
OP
S

sp53

Yoda
Country flag
Offline
So cam bearing can be installed when the engine is in the car by using a special tool? I wanted to install cam bearings, but figured it could not be done with the engine in the car. Does the tool remove and install? I guess I could envision a long something that can catch and pull the bearing out. I would think honing would be difficult, but I have time.

thanks Steve
 

CJD

Yoda
Country flag
Offline
Well...you can change the cam bearings, but you will have to open the rear plug, so the tranny must be removed to do it for the rear bearing. That said, you should not have to change the cam bearings because of the bad lobes. The bearings receive clean, pressurized oil from the oil filter, so they should not be contaminated...and if they are contaminated, then all your rod and crank bearings will also be contaminated. Honing of the cam bearings will introduce grit and metal into the oil gallery, so I would not recommend that either, unless you plan to clean out the entire engine oil system.

I short, unless the cam bearings are notably bad, I'd run them as is. They do not wear very fast, and even if they are worn, they were not the cause of the lobe problem.
 
Similar threads
Thread starter Title Forum Replies Date
L Replacing Followers/Lifters and more cam questions Spridgets 5
S TR2/3/3A Pinion tail bearing replacing Triumph 12
B Replacing the Handbrake Cable Austin Healey 8
drooartz Replacing Bugeye windshield rubber Spridgets 6
K TR2/3/3A Replacing engine and gearbox mounts? Triumph 8
TR3Acustodian TR2/3/3A Replacing "H" front badge Triumph 11
K TR2/3/3A Replacing water pump pulley.....memory refresh. Triumph 7
I Replacing Windscreen Wiper Wheel Boxes Austin Healey 0
S MGB 1978, replacing the clutch. MG 3
PAUL161 T-Series Replacing Transmission MG 3
fpstude TR4/4A Replacing Rear Flexible Brake Hoses on TR4A w/ IRS Triumph 11
J TR4/4A Replacing springs Triumph 7
Got_All_4 TR5/TR250 Need guidance for replacing steering column bushings Triumph 11
L Replacing veneer on wood dashboard Restoration & Tools 14
D TR6 Replacing Horn insert in steering column Triumph 11
69MGC MGC Replacing an Outer Wheel Well panel MG 3
maxwedge5281 Replacing Factory Hardtop Rear Window Austin Healey 24
BN6_2197 Replacing gearbox switch of the overdrive system Austin Healey 10
TomMull replacing walnut veneeron the dash Lotus 17
R TR2/3/3A Replacing rear springs Triumph 51
Jer refresh my foggy memory - replacing clutch in my 67 Midget Spridgets 1
RAC68 Clutch Still Slipping after replacing 30W-Non-Det. for Red Line Austin Healey 52
T Replacing O/D switch with a clock Austin Healey 4
simon1966 Replacing the witches nose in-situ. BN1 Austin Healey 14
KVH TR4/4A Replacing Front Windshield Gasket Triumph 5
Michael Oritt Replacing timing chain tensioner and more Austin Healey 24
Rut Replacing rocker assembly Spridgets 1
T TR4/4A Replacing rear pinion seal - remove driveshaft? Triumph 21
J Replacing BJ7 Dash - Detailed Photos/Schematics Austin Healey 3
M Replacing front shocks, torque setting? Spridgets 2
T TR4/4A Replacing in situ oils sealing gearbox and rear axle Triumph 18
55modified TR2/3/3A warning indicator bulbs need replacing where and what to buy? Triumph 4
Jim_Gruber Replacing Wheel Studs Spridgets 10
P Replacing the crankshaft damper [harmonic balancer] Austin Healey 15
K TR4/4A Replacing a broken 4A turn signal switch indicator? Triumph 2
55modified Replacing rear spring eye bushings on a BN1. How difficult? Austin Healey 8
Michael Oritt Replacing Cold Air Box with Velocity Stacks Austin Healey 10
Rhodyspit75 Replacing boot floor need bracing? Spridgets 2
RickB MGB 1980 MGB No rear brakes after replacing MC & booster MG 5
Popeye TR4/4A Steering bushing: replacing rubber with poly, do I snug to 1/8" gap or...? Triumph 3
Jim_Gruber Replacing Spridget Coolant Spridgets 21
TimK Old brake hoses need replacing, if you need proof look here... Austin Healey 1
KVH TR4/4A Replacing the Real Axle Tube Seal Triumph 17
KVH General TR Short Wheel Studs for Wire Wheels--Replacing Triumph 17
GTP1960 TR2/3/3A Question on replacing brake lines & converting to Dot 5 Triumph 9
tomshobby replacing water pump Spridgets 1
D TR2/3/3A Patching, versus replacing floors? Triumph 15
T Replacing the crank pulley/damper Austin Healey 4
M TR4/4A Replacing the hood/bonnet onto the body Triumph 11
T TR4/4A Replacing Drive Train Seals Triumph 5

Similar threads

Top