• Hi Guest!
    You can help ensure that British Car Forum (BCF) continues to provide a great place to engage in the British car hobby! If you find BCF a beneficial community, please consider supporting our efforts with a subscription.

    There are some perks with a member upgrade!
    **Upgrade Now**
    (PS: Subscribers don't see this gawd-aweful banner
Tips
Tips

Removing oil and water guage from BT7 dash

fishyboy

Jedi Hopeful
Country flag
Offline
,Hi all
I am going to recover the dash on my 1961 BT7. I assume the oil pressure gauge is a direct oil feed from the engine. What happens when I disconnect the feed pipe from the back of the gauge? Will there be a significant leak (with the engine off)? Am i right in thinking that the water temp sensor needs to be removed from the block before I can take the gauge out?

Is there anything else I should be ware of when removing the dash and recovering it?

Thanks

Phil
 
Mine was very hard to remove from the head, even though I'd soaked it in Kroil for a few days.

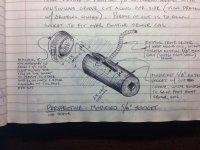
When removing my engine for my rebuild, watched the mechanic do it... he had a 5/8" (verify this) deep impact socket, in which he'd cut a slot to allow the capillary out one side.

He then used a breaker bar to gradually loosen the fitting, being careful not to stress the capillary.

I see deep impact sockets can be bought individually on eBay.

A regular cheapo 5/8" socket isn't strong enough - too soft.
 
What you can do using a cheap socket is place a SS hose clamp over the socket after it has been placed on the nut.
 
I used an open ended spanner suitably ground down to fit, there again, my sensor has been in and out of the head more times than I have had hot dinners over the 16 years that I have had the car so it has had very little time to seize in position. :highly_amused:

:cheers:

Bob
 
Thanks everyone,
I'll start soaking the sensor with penetrating fluid and looking for a ols 5/8 spanner to grind down.
Phil
 
Phil
Any old spanner will do, a thickish one will make up for the metal that will be lost, just grind the opening to size and reduce the outer until you can get it to fit. Then paint it Red so that you can find it easily in the tool box next time, or in my case misplace it and make a new one.

:cheers:

Bob
 
Thanks Bob
I'm sure ill find something in the garage.
What should I coat the sensor threads with before I screw it back in (assuming I can get it off)?
Phil
 
The big problem is not the nut seizing in the head. The problem is the capillary tube seizing to the nut. If the capillary tube is not free and it turns with nut it could break and you will need to rebuild the gage.
 
Phil

1) You will get it off - - - - its a question of how much damage will be created.

2) I must say that I would have thought that the copper pipe would not seize in the Nut, but hey, I might just have been lucky with mine. If you are using WD40 or similar to help release things, well squirt some in that area as well.

3) Personally I would use copper grease when putting things back - - - Mainly because I was given a Life Times supply, around 10+ kilos.

What is your time scale on this, you will need to keep squirting the WD40 every day for a good few days before you try opening things up, I could come over to assist with my trusty spanner (if I can find it) with a bit of notice. :highly_amused:

:cheers:

Bob
 
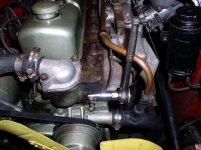
This works great on mine...but I'd be careful as to how much you rotate on the racket with each turn. Don't want to damage the coiled line.

Also, I found that pulling gently on the coiled part of the line enough where it meets at the hex nut helped to ease any further stress when rotating the rachet (spanner).

My design allows rotating the nut 1/6 turn at a time, removing and reinserting the socket then fastening, unfastening the hose clamp each time as I went. My advice if doing this is to go slow and be ginger as you go.
 

Attachments

  • TempSensorSpecialSocket.jpg
    TempSensorSpecialSocket.jpg
    70.4 KB · Views: 153
  • Slotted sensor socket Austin Healey.jpg
    Slotted sensor socket Austin Healey.jpg
    67.7 KB · Views: 156
Everything depends on how long the capilary and nut have been installed.
 
Probably don't need to say here, with Healey aficionados, but one key to removing stuck nuts or bolts is to 'rock' it back and forth; i.e. loosen as much as possible, tighten back up a little, then loosen a little more, repeat. A shot of penetrant mid-cycle can help.
 
Probably don't need to say here, with Healey aficionados, but one key to removing stuck nuts or bolts is to 'rock' it back and forth; i.e. loosen as much as possible, tighten back up a little, then loosen a little more, repeat. A shot of penetrant mid-cycle can help.

Good "move"
 
When looking at the threads it looks as if it could be tapered, like a pipe thread, so once broken it should be easier to undo as you go along.

:cheers:

Bob
 
Phil,

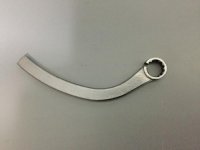
Another option is to use a spanner/wrench and cut it down with a slot in the ring end. I used a 5/8 “u” shaped wrench from the local hardware store which I cut down as in the picture. This way I had enough length to get purchase and the curve shape allows me to use it without removing the fan, radiator, or any hoses.

The slot is just enough to let the coil wire squeeze through. I then pull or push so the ring is essentially “compressing” the slot rather than expanding it. I have used it many times over the past 20 years and it has never failed to work regardless of how “stuck” or corroded the probe may be.

Cheers
Tony
 

Attachments

  • B16AA774-2FDE-42ED-8A51-D86BDC05E009.jpg
    B16AA774-2FDE-42ED-8A51-D86BDC05E009.jpg
    30.4 KB · Views: 136
Definitely not the professional way, but I recently got mine off by using a screw driver and a hammer. Just tapped the nut with the screwdriver till it broke loose. Of course this doesn’t address the problem if the tube is frozen in the nut, which mine wasn’t. Also, the radiator was out of the car at the time which gave me plenty of working room.
 
Back
Top