• Hey Guest!
    British Car Forum has been supporting enthusiasts for over 25 years by providing a great place to share our love for British cars. You can support our efforts by upgrading your membership for less than the dues of most car clubs. There are some perks with a member upgrade!

    **Upgrade Now**
    (PS: Upgraded members don't see this banner, nor will you see the Google ads that appear on the site.)
Tips
Tips

TR2/3/3A Removing front fenders on a TR3

Number_6

Jedi Warrior
Country flag
Offline
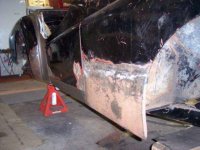
I have a question for any one that has taken apart TR3s. Can the front fenders on the a TR3A be removed without taking the front apron off? I'm thinking about repairing the fenders on my TR3 as a winter project. I've heard it can be a real bear to try and get the front apron back on a TR3 by yourself and since the apron on my car is in good shape I'd rather just leave it on the car and only take off the body panels that need work.

The rear part of the front fenders on my car have has rust damage repaired in the past, but it was done very badly and I'd like to take the fenders off this winter and use the repair panels that Moss sells(PN# 855-485 - REPAIR PANEL, lower R/H front and PN# 855-495 - REPAIR PANEL, lower L/H front) and try to repair them properly.
 
Yes, they can be removed without taking off the apron. Access to the fender bolts isn't the best, making assembly difficult. Don't forget the inner bolts that are accessible from the cockpit. The side wall carpeted panels must be removed to gain access.
Soak all of your captive nuts with a good penetrant for several days in advance before working on them. Have a pair of vise grips handy, and a good source of heat.
 
Number_6 said:
...I'd like to take the fenders off this winter and use the repair panels that Moss sells...

Are you sure you need to remove the wings to do this? Can't speak from hands-on experience as I paid to have this done but they did not pull the wings off to weld in the repair.
 
If you decide to remove them anyway, you will have to remove the doors to gain access to all the fender bolts hidden up the "A" posts.
 
Rich - any pictures of the section you want to remove? I'd also suggest that they <span style="font-style: italic">may</span> not need to be removed. In fact, having them on the car might aid in making sure the gaps are good.
 
We replaced the floor pans, inner & outer sills on this later TR3A. I MIG welded new sheetmetal to the lower 10" of this fender (off the car), fabricated the new piece that secures the bottom of the fender with the three bolts to the bottom of the inner sill and when we mounted it, there was too much metal in our patch. Maybe it was only 1/16 to 1/8", but the fender bulged out and we had to re-cut it and re-weld it (on the car) along the cut so the bulge was no longer there.

BTW, repair patches like this for an Austin Healey 3000 are available and the patch comes with a tube of adhesive so the patch can be "glued" along the top horizontal joint without any welding, therefore without any bulging or distortion. All that is required is to cut the fender, leaving 1/2" along the cut, impressing a thin step into the lower edge with a tool like I bought from Eastwood and then gluing on the new patch. After gluing and curing, (usually overnight) the repair was flush all along the joint because of the step created behind the cut edge.
 

Attachments

  • 18317.jpg
    18317.jpg
    33.8 KB · Views: 382
I realize it's possible to do so, but I would think that removing the fenders would a: make it easier to fit, shape and finish off any patching; and b: make it easier to do a proper and more thorough job of priming, painting and rustproofing the back side of the fender to prevent future problems?
 
Andy - I fully agree with the last part. After I finished that fender, plus all the others, the doors, etc. I took them all off to have them finished and sprayed off the car. That way, every hidden area insiade and behind gets painted plus the undersides of the fenders. This saves a lot of trouble the next time it needs to be done.
 
IMHO taking the wings off for repair is the worst of ideas.I always leave them in place so that any tensions in the steel can be addressed as the repair is done.Failure to do this will likely get you an "oil canned" fender,that was fine on the bench but goes boink,boink on the car......The wing must be removed for proper corrision protection after the weld/glueing operation is completed.(I prefer the hybrid approach of gluing in the flats with welding in the critical areas at the edges/corners).
(mad dog)
 
Don Elliott said:
Andy - I fully agree with the last part. ...
And the more I think about it, Don, I realize what you said earlier makes great sense, particularly with typical rust repair on the bottom edge of the front fender. It would make much more sense to do any and all trial fitting and at least preliminary welding whilst using the rest of the body as a "jig" for ensuring proper alignment, whether it's a hand-cut patch of metal or one of the repair pieces available. I can only imagine how frustrating it would be to remove a fender, graft in one of those repair panels, and find upon reassembly that you're 1/4" off in one direction or another! :hammer:
 
I see what you guys are saying about fitting the patch panel while the fender is on the car. That makes a lot of sense. I found out just how much work it can be to try and fit panels that are even a little bit off when I was fitting the panels on my Jag.

I'll have to take the fenders off to evaluate how much work will need to be done to them but put them back on to weld the patch panels on.
 
I pretty much did my front wings off the car, but checked fit after a couple of tack welds. After welding everything up, I did wind up with one wing "oil canning". It took some well placed "shrinks" to get rid of it. If I had it to do all over again, I'd use the adhesives such as 3M's Automix 8115 on any flat panel areas likely to warp from the welding. From what I've read about it, it is very good stuff and will save a lot of headaches.
 
Here's a couple of pics of the fenders on the car. It's hard to see in the pic of the passenger side fender but there is a row of 4 or 5 little bumps along the bottom of the fender about a couple of inches apart which I believe are rivets under the paint and filler. There is also a raised half moon shape that is further up on the fender. It's difficult to tell with the fender on the car but it appears that it is a repair panel that was riveted on the fender and then filled over with body putty.

The pic of the lower edge of the driver side is a lot more self explanatory, I'm just not sure how far up the fender the tin worm has gotten though.

Unfortunately it appears that taking the doors off to get at the row of bolts that hold the rear of the fender on isn't going to be easy. I tried an experiment to see if I could just loosen them a little and they all appear to be completely frozen in place. I didn't want to try to hard with the screw driver because I didn't want to strip the heads of the screws. Looks like they will need a good long soaking with PB Blaster.
PassengerFender.jpg


DiverSideFender.jpg
 
Rich,

I told you that you'd get the fever once that engine compartment was done. This stuff is addictive and one project leads to another.

In any event, it's a good winter project and you'll be glad you did it when it's done.
 
Number_6 said:
Unfortunately it appears that taking the doors off to get at the row of bolts that hold the rear of the fender on isn't going to be easy.
FWIW, I've found that this tool
https://www.sears.com/shc/s/p_10153_12605_00947641000P
works a treat on bolts like that. It won't strip the head (although it can develop enough torque to twist the head off the shank if the threads are really stuck).
 
Randall,

I bought a very similar model years ago to loosen the screws holding the brake drums on. I never thought to use it on bolts as well!

Scott
 
Great tip. I had to drill out the screws hold in the door latch on one door. I'll run out and get this tool for the rest of the screws on the doors.

Paul
 
It doesn't hurt to still soak them down with PB Blaster or whatever for a day or so, before attempting to torque them off. I'd wash the outside of the head or slots out with carb or brake clean to make sure that the socket or drivers fits properly before hitting it.

Those tools were very popular in the 70's, just as air wrenches were coming on the scene. I still have my old KD Tools unit from that era and it works well.
 
Back
Top