• Hi Guest!
    You can help ensure that British Car Forum (BCF) continues to provide a great place to engage in the British car hobby! If you find BCF a beneficial community, please consider supporting our efforts with a subscription.

    There are some perks with a member upgrade!
    **Upgrade Now**
    (PS: Subscribers don't see this gawd-aweful banner
Tips
Tips

TR6 Recommendation for tail lamp to body gasket

nichola

Jedi Hopeful
Country flag
Offline
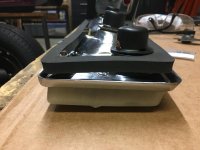
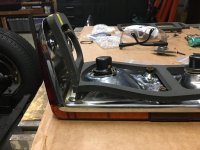
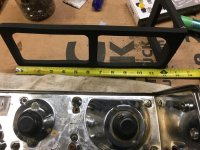
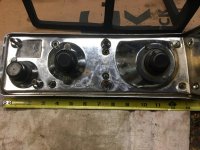
Can anyone recommend a decent gasket for sealing the tail lamp assembly to the body for a TR6? The one I received is a terrible fit (see pics), requiring a LOT of stretching to get it anywhere near where it needs to be. Alternatively, has anyone tried making their own, perhaps using a round foam cord? Thanks for any advice.

While on the subject of rear tail lamps... the replacement bulb holders are also worthless. Better off trying to rescue the originals.
 

Attachments

  • IMG-0444.jpg
    IMG-0444.jpg
    52.7 KB · Views: 149
  • IMG-0446.jpg
    IMG-0446.jpg
    64.4 KB · Views: 143
Back in the day I used TRF gaskets and thought they were fine. A little plastic polish, some silver paint for the reflectors and the taillights looked spiffy again.
 
Try a contact cement for seal I think it needs to be that thick as never a good fit to body. Madflyer

Yep, I agree it has to be thick like that, but it's too short and too narrow. I would have to stretch it in both directions and glue it to make it work.
 
Back in the day I used TRF gaskets and thought they were fine. A little plastic polish, some silver paint for the reflectors and the taillights looked spiffy again.

These are from TRF. I have refinished lamp assemblies, too, including "chrome" paint on some of the reflectors. I'm getting some foam rope and also a foam sheet today to see if I can make something that fits better, from McMaster-Carr.
 
Have you tried pressing the assembly into the sheet metal on the car? Gaskets are a tricky beast; sometimes they look all wrong but work, sometimes they shrink before installation due to being old, and sometimes they just aren’t made right!
 
If you find some foam or rubber to cut to fit be aware it does not hold water as may cause rust. I was looking at my PC mouse pad not big enough but a good rubber to look for. places that sell fan belts also sell all rubber sheets Industrial supply Madflyer
 
If you find some foam or rubber to cut to fit be aware it does not hold water as may cause rust. I was looking at my PC mouse pad not big enough but a good rubber to look for. places that sell fan belts also sell all rubber sheets Industrial supply Madflyer

I ordered closed cell foam that's good for all weather usage according to the website.
 
Have you tried pressing the assembly into the sheet metal on the car? Gaskets are a tricky beast; sometimes they look all wrong but work, sometimes they shrink before installation due to being old, and sometimes they just aren’t made right!

The assembly itself fits pretty nicely with just a little bigger gap right at the corner. But the new replacement 3/8 thick gasket seems to have shrunk like the waistband on my trousers. See the attached photos... gasket almost an inch shorter across the rear facing part than the fixture.
 

Attachments

  • IMG-0448.jpg
    IMG-0448.jpg
    77.9 KB · Views: 128
  • IMG-0450.jpg
    IMG-0450.jpg
    75.1 KB · Views: 124
I find the foam tricky to cut. What I have been using to cut foam is a pair of those 10 inch or so long blade scissors. Then, I get the scissors square for a straight long clean stroke so as they close they do not leave those jagged marks----for me this seems to work best. It looks like the gasket is 2 pieces glued plus foam is often inexpensive enough to practice on like an artist.

steve
 
Cutting foam; a razor knife can work A old knife laid on marked lines and hit with a hammer to shear foam also for corners a old socket say 1/2 hit with a hammer all will make a clean cut and round. I do gaskets this way for bolt holes. Madflyer
 
Thanks for the ideas. I’ve cut one from a flat 3/8 sheet but have yet to tackle the round outside corners. I’m also thinking the 3/8 foam cord would be much easier to deal with if i can find a contact cement that will hold it in the channel while I attach the assembly to the body. That’s what I’m trying tomorrow.
 
What if foam covered more and just edge had holes for lamps and screws rounded with a simple trim and not so round. easy glue and large size of water pipe to cut holes stamped with hammer. Madflyer
 
What if foam covered more and just edge had holes for lamps and screws rounded with a simple trim and not so round. easy glue and large size of water pipe to cut holes stamped with hammer. Madflyer

Smaller holes - I've had success with a short sharpened piece of 3/8" tubing in my drill. For carpet snaps, I use a sharpened piece of EMT conduit tubing which I hit with my knockoff hammer.
 
All done, could not have been easier using the 3/8 diameter EPDM foam rope. Ten feet from McMaster-Carr for $6, plus a ten pack of super glue from HF for $3.75. Each lamp assembly took a few minutes to glue down the rope in one continuous piece. To be safe I taped the corners down with masking tape until just before I installed onto the body. I laid a bead of glue down in the channel and spread it a up the sides of the channel with a small brush. The glue sets in a few seconds. This is the same type of foam used in automotive door seals, I think. Super glue is the best adhesive to use, in the gel form. Clean up with acetone.
I used a piece of the 3/8 sheet foam to bridge across the middle of the rear part of the fixture like the stock gasket and added a little length of foam under the cord at the front edge of the side marker to push it out more toward the edge because the channel gets much wider there. Might even consider using the 1/2 inch foam if I had to do it again. Can't remember if they sold a 7/16 diameter cord.
 

Attachments

  • rear lamp assembly gasket.jpg
    rear lamp assembly gasket.jpg
    85 KB · Views: 133
Back
Top