• Hi Guest!
    If you appreciate British Car Forum and our 25 years of supporting British car enthusiasts with technical and anicdotal information, collected from our thousands of great members, please support us with a low-cost subscription. You can become a supporting member for less than the dues of most car clubs.

    There are some perks with a member upgrade!
    **Upgrade Now**
    (PS: Subscribers don't see this gawd-aweful banner
Tips
Tips

Rear Axle leaking from oil seal dust cover

HI TH. The Pinion Gear Bearing torque is set to 150 Lbs. A Clunk could be the the pinion sliding back and forth if it has loosened sufficiently. My experience with loose ones is it causes a vibration in the car at different speeds. The Hub nuts can be torqued that high if you can attain it using a proper wrench with about an 18" handle. I simply get them as tight as I can using the hub wrench and that length Tommy Bar and have had no problems.---Fwiw--Keoke
 
Progress update; I was able to simply unfasten the drive shaft and then prop it up out of the way using a couple of wood blocks so I didn't have to take off the tunnel. I made a steady bar from an old garge door opener piece of steel that has many adjustment holes already drilled. I had to make and use the steady bar, even though my brakes held it from turning, there was just enough " give " in the whole thing to prevent me from loosening the 1 1/8 " nut until I used my steady bar. The yoke surface that meets the seal doesn't have any grooves. I think it will polish up very well with emery cloth. The old seal simply appears to have lost the inner spring strength to keep the rubber tight around the yoke shaft or it cannot keep it tight because the rubber material is hard as rock from sitting idle and unlubricated for 25 years. Tommorow after work I'll install the new one and put it back together. Should I use any locktite on the drive shaft bolts ? They all were slightly loose when I took them off ? Perhaps my dad forgot to tightem them up after he reinstalled the engine/transmission/od some 25 years ago. /ubbthreads/images/graemlins/hammer.gif
 
Hi Ed,
My drive shaft flange bolts have self locking nuts. Guess it wouldn't hurt to use some blue Loctite on them though.

I personally would use some sealer on the pinion gear splines. Without, there is a path along the splines that may or may not be sealed by the big washer or the U joint. Same on the transmission end.
D
 
Mine has the locknuts also. I guess my dad just forgot to tighten them up all the way ? I'll use some locktite to be safe. I didn't see any sign of leaking from the inside of the yoke shaft under the washer but it will be easy to apply a little sealer to the bottom of the washer. That should seal it as good as putting sealant directly on the pinion shaft ?
 
Could you snap a photo or two depicting your process.
 
Sorry Ed, I couldn't follow where you were putting the sealer under the washer? Can you refrence the Moss cataloge? I aout to do this same leak.
Thanks
 
Hi Ed & Rich,
I assume Ed was refering to the lockwasher #44, which locks the nut holding the splined flange #42.
https://www.mossmotors.com/Shop/ViewProducts.aspx?PlateIndexID=36378
I've never had much luck trying to use sealer on a lockwasher. Thus, the suggestion to put the sealer on the splines before the lockwasher goes on. Something like Permatex Aviation Sealer works well for me.

Not the end of the world if it leaks a bit, just a nuisance.
D
 
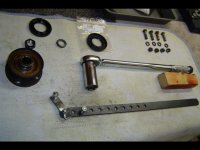
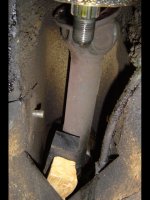
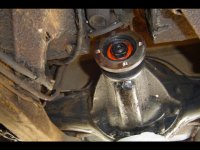
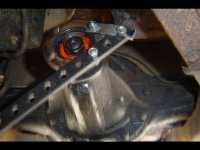
That's right Dave, under the big lock washer. After installing the new seal, I put the yoke back in and used the big nut to pull the yoke back into position. As I was pulling the yoke back into position with the nut, I let the yoke turn a little bit so it would work it's way into the new seal without tearing anything up. I oiled up the front of the new seal and the edge of the yoke after the yoke was close to entering the new seal. Once I had the yoke seated all the way in, I removed the big nut. I put some permatex red high temp RTV on my finger and smeared some all around the base of the pinion. I also smeared some on the bottom of the big lock washer and then pushed it down onto the pinion and threaded the nut back on, fastened my steady bar back on and torqued the nut down to 140 ft/lbs . I took some pictures but after I got to working, my hands were too nasty to handel my wifes camera anymore. The 1st shot is of my tools including my steady bar. I had to use the little piece on the end of the bar in order to have enough room for the 1 1/8" socket to make it past my steady bar when it was installed on the yoke flange.
I don't think it will be able to leak out the front from under the washer after doing this.
 

Attachments

  • 289850-DSC00591.JPG
    289850-DSC00591.JPG
    145.9 KB · Views: 161
Here is a shot with the old seal removed before I installed the new seal. I cleaned off the surface where the seal will go to prevent damage to the new seal from dirt and crud. I used a small plastic hammer and gentley worked the " well lubricated " new seal down into it's recess in the casting using a lot of little taps all around the new seal. When it was started, I used the old seal as the tool to seat the new seal all the way into place by holding the old seal against the new seal and then hitting the old seal with my plastic hammer.
 

Attachments

  • 289851-DSC00592.JPG
    289851-DSC00592.JPG
    152.3 KB · Views: 149
I tried to get a shot that shows that you don't need to remove the transmission tunnel in order to replace the pinion seal in the rear end. This is a shot straight up that shows the drive shaft disconnected, slid back towards the front of the car, and then pushed way up into the tunnel. I just slid a couple of wood blocks under the drive shaft above the frame to hold it up out of the way.
 

Attachments

  • 289852-DSC00593.JPG
    289852-DSC00593.JPG
    141.7 KB · Views: 145
I don't have a lift, ( wish I did ), so I had the back end of the car up on jack stands with my large floor jack under the center of the rear end for safety. I had let the rear end back down to the bottom of travel after I had the car supported on jack stands. This gave me enough room to work. I was able to break the big nut loose from reaching in under the car without actually being under the car when I was pulling with 140 + ft/lbs of pressure. Like wise I could reach under the car to push on the torque wrench when I tightened it up. Better safe that dead.
 
Ed, thanks for the walk through. I get it now. It will make my job easier. (I've put latex gloves over dirty hands to take pictures and protect the camera.)
 
Thanks Ed,
I appreciate the photos, I am a visual guy.

So I assume the home made gizmo was used to keep the flange from turning while you removed the nut?

Tracy
 
I didn't reattach the drive shaft last night and I am off of work today, so here are more pics;
This one shows how I supported the car. The weight is on the jack stands. The floor jack is just snug for the safety factor,( I wish I had a lift !).
 

Attachments

  • 289917-DSC00597.JPG
    289917-DSC00597.JPG
    150.2 KB · Views: 128
Here is the flange reinstalled and torqued down. You can see where I put the permatex.
 

Attachments

  • 289922-DSC00598.JPG
    289922-DSC00598.JPG
    138 KB · Views: 140
And this one shows my " special tool " installed in the tightening position. Just put a block of wood between the frame and the bar to keep from tearing up the fuel line, wires, etc.
 

Attachments

  • 289924-DSC00599.JPG
    289924-DSC00599.JPG
    140.6 KB · Views: 148
Ok, play time is over, back on the floor to finish up . Then..... I can start on the Christmas decorations... Maybe after a little test drive to lunch.
/ubbthreads/images/graemlins/driving.gif /ubbthreads/images/graemlins/cool.gif
 
edk, ya know how i love "special tools" great idea love it! /ubbthreads/images/graemlins/yesnod.gif /ubbthreads/images/graemlins/savewave.gif
 
Back
Top