• Hi Guest!
    If you appreciate British Car Forum and our 25 years of supporting British car enthusiasts with technical and anicdotal information, collected from our thousands of great members, please support us with a low-cost subscription. You can become a supporting member for less than the dues of most car clubs.

    There are some perks with a member upgrade!
    **Upgrade Now**
    (PS: Subscribers don't see this gawd-aweful banner
Tips
Tips

Rattle can advice please

RickB

Yoda
Offline
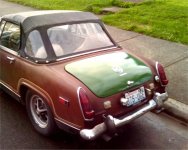
I've been at it again with the rattle cans, painting up a boot lid. I put on about six coats of color and then according to instruction on the cans within 1 hour applied a few coats of the crystal clear coat.
It was about 72F outside but the humidity was pretty high, though this was a sunny part of the day yesterday.
It looked ok, was dry enough to handle within a couple hours so I brought it inside over night.

This morning I can see what looks like foggy tiger stripes.

Thinking it's the clear that has not cured yet I got out a nice big 'Reveal' flood lamp and tried curing it in a few spots.

Sure enough, the stripes disappear. Unfortunately this method burns the paint pretty fast - just too intense.

Question - if I just install this thing onto the car will the stripes eventually go away? We probably wont see much sunshine here for a while.
 
sounds like moisture to me. If it was, not sure what the results will be.

what happens is the paint evapotated cooling your metal, drawing moisture to the surface and then you applied the clear on top. Without the complete process of how all material was applied and the temps. really cann't say for sure
 
But it clears when the light and heat of the flood lamp is applied, does that fit your theory?

The paint was applied as per instructions on the can.

Spray a light coat and then wait ten minutes then spray another light coat.
I did this about 6 times.

The clear said to apply within one hour of the color.
They were both the same brand and type of paint.

After a few coats of clear I let it dry about two hours then brought it inside.
I could see striping at that time, I hoped it would go away as the paint cured.

When applying the flood lamp the area becomes warm, so I know I'm baking the paint. I moved it every 30 seconds to avoid blistering (after leaving it too long on one spot and getting a small blister).

The area where I applied the lamp cleared up and is still clear about an hour after cooling. It is really tedious to hover a flood lamp over a spot and move it around, takes a long time to have the desired effect.

Normally I'd set it out in the sun at this point, but we have moved into the rainy season here in the Pacific Northwest so we may not see the sun again for a while...

I guess I am hoping there is still enough UV making it through the clouds to work on this stuff but I don't know if that's even what it needs to clear it up.
 
Good news, the sun came out briefly and much of the striping went away.

Here's a pic of what I've been up to - this is going on Frank. he's getting a slow facelift from the old crappy brown to this nice deep green.
His hood is all gray primer right now, waiting for some sunny days to get the green on.
 

Attachments

  • 22769.jpg
    22769.jpg
    50.7 KB · Views: 395
There have been a few breaks in the rain today, so I got the thing bolted on the car.

Definitely a work in progress, have to get the hood done next.
 

Attachments

  • 22774.jpg
    22774.jpg
    83 KB · Views: 380
If it reappears you can reapply clear on top of what you have within 30 days. with a light sanding.

The only other thing that comes to my mind is not enough clear applied on last coat and the streaks are dry spots from overlap of clear fan not burning into clear because not enough product applied.
I apply 3 coats of clear
1. light tack coat
2. wet coat
3. very wet coat. almost ready to sag

If you apply to quick between coats metal will turn cold causing blue. Also you may also get solvent pop from top drying before bottom coats
 
Stuff oReilleys sells, its their acrylic auto paint.

Duplicolor brand
 
This panel turned out better than previous attempts.
Lots of sanding on old rusty mk1 panels.
I hope the hood turns out good, weather report is saying we will have some sunshine this coming weekend. Maybe I can get more prep work done during the week and get it painted over the weekend.
 
If possible paint under a open shed (something with a roof overhead) iF you have some of those work flood lamps set them up so the heat of lamps will "warm" the surface (not cook) of part you are painting. if you have a infra heat sensor aim for about 98-100 deg. This should help with moisture and aid in drying of paint and clear.

When I paint I test paint to see if it is ready for next coat by touching with my finger the cut in tape, when my rubber glove tries to pull off my finger from paint adhesion I know next coat is ready.

Are gonna attempt to paint both sides of the hood at the same time ?
 
mightymidget said:
Are gonna attempt to paint both sides of the hood at the same time ?


Yeah, I never had luck with rattle cans on a large surface.

I'm behind you 100% Rick. Nobody should be poop brown; not even poop.
 
<div class="ubbcode-block"><div class="ubbcode-header">Quote:]Are gonna attempt to paint both sides of the hood at the same time ?[/QUOTE]

No - Definitely not.
I'll position the light under the hood. Painting it while still mounted to the parts car - it's good for holding the thing in place at least.
So maybe I should hook up an electric heater under the hood as well? Of course I guess I want to be wary of the potential for flamage.

My last hood came out "ok". Nothing to write home about but looks allright from a distance.
 
Shouldn't be any danger, it's probably going to be 65F outside, might get close to 70 if we're lucky.

I will at least use the flood lamp.
 
If the flood/heat lamp was curing the problem, why not try it again, but to avoid blistering, keep it far enough away so as not to overheat the paint (like in a room overnight with the lamp 6-8 ft or so above the panel!).
 
it is called "Russet Brown" probably about the ugliest color paint i have ever known. My first midget was that color.

m
 
SilentUnicorn said:
it is called "Russet Brown" probably about the ugliest color paint i have ever known. My first midget was that color.

m

so who is Russ and why did he ____ on your car?

tragically, I suspect it isn't even close to the ugliest colour out there.
 
I just did the bonnet of my Bugeye with some Dupli-Color rattle cans. It came out OK and just like yours, the main hood is streaky and not very shiny. I managed to get some bad cans that could not hold a constant pressure and the clear coat was uneven and thin (tiger-stripped, like yours). I plan on Wet sanding it and trying again next weekend. Even still, it looks a lot better than it did. My entire front end was pockmarked with rock chips....almost worse than having poop brown paint. :wink:
 
Bummer about the bad cans.
I used those short cans when I did the hood on my Sprite, I was not pleased with several aspects.

1. The cans are short and $7 each - it's like you get half a can of paint.
2. They get down to that last 25% pretty fast, where the uneven spraying gets way worse.
3. Hats off to whoever the marketing genius was who designed the little cans, they make you think you are getting something special. However good luck matching any paint you already have - just ain't going to happen. You feel like you are getting something good because you are paying twice as much money for half as much paint.
4. The taller cans with fewer color choices have better paint that finishes better and looks better and costs less than half as much. If you can go with a basic color then you're set.

All IMHO and YMMV of course.
 
Back
Top