Hey Guest!

 Hey - did you know if you click on the title of a thread it will take you to the first unread post since you last visited that thread?
 but were afraid to ask:
  STOP!! Never post your email address in open forums. Bots can "harvest" your email! If you must share your email use a Private Message or use the
  smilie in place of the real @
 Pretty Please - add it to our Events forum(s) and add to the calendar! >>
Moseso
Jedi Knight
Offline
I have been an avid reader here, asked some questions and, when I felt I had a good answer, answered a few. But I have been very stingy with the pictures. This is primarily because I am loath to stop what I'm doing, wash my hands to the point where I am willing to touch my camera, and use it. There aren't many pictures to post.
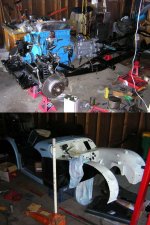
Last evening, I married the engine and tranny and secured them to the frame. The front end is done as far as it can be without some more weight on the frame to allow external compression of the springs to allow installation of the shocks and lower bump-stops.
The motor was done at my guitar repair shop over the winter -- the garage is unheated. The existing 87mm pistons and jugs were deemed reusable. New rings, bearings (main, big-end, small-end and cam) were installed along with an Iskenderian "TR 23" cam: duration 260, lift .440" (new lifters, of course!). The head was surfaced and fitted with hardened seats, valves and new cast-iron guides. The distributer was overhauled by Jeff at Advanced. My one nod to engine jewelry is the pretty Offenhauser valve cover.
The body is painted rat-rod style in powder bluish flat epoxy primer on the outside. The frame, underside of the tub and the engine bay are all finished. Should my ship come in and I decide to finish the top side, it won't be necessary to part the frame from the body again to do a proper job. The engine bay is white so I can SEE what is going on in there. An odd choice, I know, but I think it will be a help as I continue to age and my eyesight does too.
Things are moving along well enough that I think it VERY likely that I will get some road time in before the snow flies again this year.