• Hi Guest!
    You can help ensure that British Car Forum (BCF) continues to provide a great place to engage in the British car hobby! If you find BCF a beneficial community, please consider supporting our efforts with a subscription.

    There are some perks with a member upgrade!
    **Upgrade Now**
    (PS: Subscribers don't see this gawd-aweful banner
Tips
Tips

Pics of throttle shaft reaming

blueskies

Jedi Warrior
Country flag
Offline
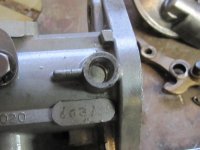
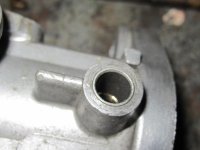
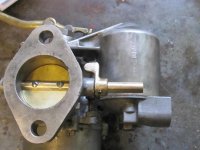
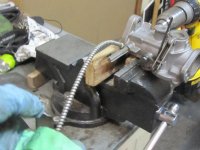
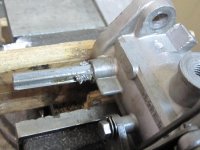
I posted about this a few days ago but thought a few pics might be helpful. This worked so well that I am still happy about it. No need for that expensive tool; an inexpensive $20 tool did the job well. Hope this helps someone else without lots of fancy equipment.

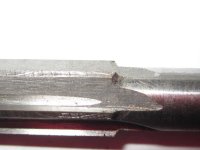
The chucking reamer worked very well using the existing throttle shaft bore as a guide. The shaft on the Grizzly reamer is exactly 5/16" diameter, which is perfect for running in the worn existing bore, while cutting a new 3/8" hole with the reamer. The key was to sharpen the reverse end of the flutes to turn them into cutting teeth; it is not intended to work that way, but it does work well when sharpened at that end. Also, one does not want to go all the way through; only go far enough so that the new bushing will fit completely into the hole. Then one can use the rest of the orignal 5/16" bore to act as a guide for the other side. Don't insert the new teflon coated bushings until both sides are reamed out.

The important thing is that the 100-6 now purrs like a kitten, without air leakage at the throttle shafts, and no leaks noted. The new throttle shafts, butterflies, bushings, jets, and jet sealing parts in the master rebuild kit did come in useful. A number of the other parts in the kit did not fit the H4 carbs. I guess that is what one gets with universal kits.
cutting.jpgcutting 1.jpgcutting 2.jpgcutting 3.jpgcutting 4.jpgcutting 5.jpg
 
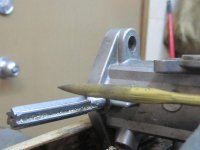
I posted about this a few days ago but thought a few pics might be helpful. This worked so well that I am still happy about it. No need for that expensive tool; an inexpensive $20 tool did the job well. Hope this helps someone else without lots of fancy equipment.

The chucking reamer worked very well using the existing throttle shaft bore as a guide. The shaft on the Grizzly reamer is exactly 5/16" diameter, which is perfect for running in the worn existing bore, while cutting a new 3/8" hole with the reamer. The key was to sharpen the reverse end of the flutes to turn them into cutting teeth; it is not intended to work that way, but it does work well when sharpened at that end. Also, one does not want to go all the way through; only go far enough so that the new bushing will fit completely into the hole. Then one can use the rest of the orignal 5/16" bore to act as a guide for the other side. Don't insert the new teflon coated bushings until both sides are reamed out.

The important thing is that the 100-6 now purrs like a kitten, without air leakage at the throttle shafts, and no leaks noted. The new throttle shafts, butterflies, bushings, jets, and jet sealing parts in the master rebuild kit did come in useful. A number of the other parts in the kit did not fit the H4 carbs. I guess that is what one gets with universal kits.
View attachment 41235View attachment 41236View attachment 41237View attachment 41238View attachment 41239View attachment 41240
Great post, it seemed worth the effort to post up full-size pics, so one could look back and forth at them, studying your process.

I have the piloted reamer, and do them with a lathe, but that's just me; whatever works for others is great too! ;)

attachment.php


attachment.php


attachment.php


attachment.php


attachment.php


attachment.php
 
Could you show a close up of how you filed the back of the reamer so it would act as a cutter. Thanks and have a good day!

John
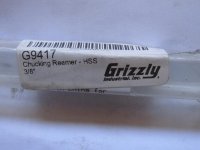
Here is a picture of the filed rear edge of the reamer, as well as a picture of the label on the reamer package. The hardness of the metal on this reamer is not the best, so it required resharpening a few times to do the four holes.

sharpened flutes.jpgreamer grizzly.jpg
 
Thank you to Blueskies and Randy for these posts.

Bloody brilliant!
This information inspired me to ream out and replace the worn bushings on my triple HS4's.

I would like to share my "lessons learned" to assist anyone else encouraged to attempt this repair:

1. The correct reamers are on Ebay. Less than $30, including shipping.
2. I sharpened the back edge of each flute using a Dremel with a 3/4 inch (carborundum?) cut-off wheel. Easy!
3. Reamed out the first bushing by hand in 25 minutes. BORING! Used a cordless drill on the next 5 bushings; 2 minutes each.
4. Wrapped electrical tape around the reamer to mark my intended depth. This proved unnecessary.
5. Each existing bushing would break loose in it's housing after all but the last 1-2 mm was reamed out.
6. Since this remnant was spinning with the reamer, it would no longer cut. This acted as an automatic depth gauge.
7. A small punch carefully tapped out the bushing remnants.
8. Place the new bushing and use it for a guide to ream out the opposing side.
9. The reamer shaft worked well to guide the new bushing into proper alignment.
10. A drop of Blue Locktite secured each new bushing.
11. SU-sourced bushings are steel with a Teflon-coated interior. Oilite brand bronze bushings are available for under $1 each.

Good luck. This should result in a consistent idle and improved performance.

Douglas Glesmann


Full disclosure; I am not a mechanic, engineer or machinist.
 
Last edited:
Back
Top