• The Roadster Factory Recovery Fund - Friends, as you may have heard, The Roadster Factory, a respected British Car Parts business in PA, suffered a total loss in a fire on Christmas Day. Read about it, discuss or ask questions >> HERE. The Triumph Register of America is sponsoring a fund raiser to help TRF get back on their feet. If you can help, vist >> their GoFundMe page.
  • Hey there Guest!
    If you enjoy BCF and find our forum a useful resource, if you appreciate not having ads pop up all over the place and you want to ensure we can stay online - Please consider supporting with an "optional" low-cost annual subscription.
    **Upgrade Now**
    (PS: Subscribers don't see this UGLY banner)
Tips
Tips

TR2/3/3A One more crank pulley question

RC64

Jedi Hopeful
Country flag
Offline
Thanks to John's tip, I've got the crank pulley aligned correctly with the key on the crank. But now I'm curious about the correct way to mount the hub extension. I'm using a Macy's fan which is a big help with the cooling. I took plenty of photos when I disassembled everything, but unfortunately I didn't get one of the face of the hub extension with the fan removed. Didn't dawn on me that there might be an alignment issue.

Now that it's going back together the fan with the locking plate properly in place isn't lining up with the crankshaft bolt as it did before. With the fan back off I noticed the small drill hole in the face of the extension. It was opposite the hole in the pulley. Looking closely, there seemed to be a slight offset. I then turned the extension by 180 degrees so the drill hole was on the same side as the hole in the pulley as shown in the photo below.

Before remounting everything I thought I would pose the question here first. Is there a specific orientation of the drilled hole in the extension with the key position on the crank, and thus the hole in the pulley?

The manual does mention the 'drill spot', but it wasn't at all clear.
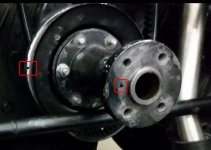
Hub extension.jpg

Rick...
 

Geo Hahn

Yoda
Country flag
Offline
I believe the drill hole in the extension was a witness mark for preserving the balanced position of the stock fan (would have been drilled through the fan, hub and weights once the parts were balanced as a set) - irrelevant since you are replacing with a Macy fan.

I do not believe that hole's position had anything to do with the position of the TDC mark hole in the pulley - you were able to line them up solely due to random chance.
 

CJD

Yoda
Country flag
Offline
Geo is correct. The small hole was drilled during the factory assembly to aid in positioning the balance plate the same during later service. If you have a non-original fan, then ignore the small hole...it won't align with the keyway, fan, plate, or anything else.

When installing the large extension bolt, the manual talks about using shims. These would be used as necessary, so that when the bolt is torqued, the angle of the crank handle would be correct for hand cranking. If you are not planning to hand crank, then you can ignore the shims.

The next thing is the lock plate for the bolt. You position this plate in a way that the fan bolts will go through it and lock the plate to hold the bolt. You may have to lift and reset it 1/6th of a turn to get the slots for the fan bolts to align.

Those are all the alignment items that I can recall...?
 
OP
R

RC64

Jedi Hopeful
Country flag
Offline
When installing the large extension bolt, the manual talks about using shims. These would be used as necessary, so that when the bolt is torqued, the angle of the crank handle would be correct for hand cranking. If you are not planning to hand crank, then you can ignore the shims.

The note about the origin of the drill hole from you and Geo makes sense. I had hoped to keep the crank function, but when I went to the aluminum radiator I had to scrap that idea. So the shims apparently aren't an issue.

However, you mentioned the 'torque' on that bolt. I couldn't find any note on a torque spec for that bolt in the list in the manual. Is there one that you guys are aware of?

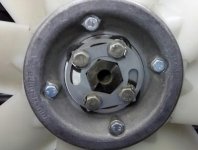
The Macy's fan does have a sturdy locking plate for that bolt. It just seemed to fit the bolt just right when I first assembled it. I suppose I'll just have to tweak the bolt so that the four bolts, the locking plate and the bolt head are aligned properly so the bolt can't back out.

This is before disassembly...

Macys fan hub.jpg

Rick...
 

Geo Hahn

Yoda
Country flag
Offline
I don't think I have ever seen that torque specified in the manuals. Tight enough. Not too tight (that can be expensive). I would guess about 50 ft lbs and some blue Loctite if you are wary.

...I suppose I'll just have to tweak the bolt so that the four bolts, the locking plate and the bolt head are aligned properly so the bolt can't back out...

Looks like the holes for the fan bolts are slotted so the plate can always be positioned after the crank bolt is done up.
 
OP
R

RC64

Jedi Hopeful
Country flag
Offline
Looks like the holes for the fan bolts are slotted so the plate can always be positioned after the crank bolt is done up.

I made that assumption at first myself. However, I seem to recall that the round lock plate should be rotated all the way counter clockwise up against the 4 bolts. It may have been in an exchange with Mark Macy, but I wouldn't swear to it. I've had discussions with a variety of folks on this. In any case, it would make sense to have it aligned like that so that the crank bolt could not back out any further even if there was some slippage of the slotted lock plate.
 

Geo Hahn

Yoda
Country flag
Offline
I do recall that if one is setting the dog bolt up for use of a hand crank, although shims are used, the torque is somewhat dictated by the need to end up with a 10:00/4:00 orientation. As I recall, I used shims to get in the ball park then settled for a decent torque that put the bolt where I wanted it. Perhaps this is why no torque number is provided.
 

CJD

Yoda
Country flag
Offline
I use 100ftlbs/lbs on the big bolt. The plate is placed over the bolt head in a way that the slots allow the 4 bolts to be installed. It may be full CCW...It may be full CW...or more likely somewhere in the middle. The 4 bolts then lock the big bolt in place.
 
Similar threads
Thread starter Title Forum Replies Date
Bayless More Prefect Progress Other British Cars 2
B MGB while driving engine cuts out if I let off or push more throttle it comes right back on MG 5
C MGB More Weber help needed MG 27
DrEntropy More lessons in Japanese engineering Other Cars 7
KVH General Tech More Technical Questions—TR4 Triumph 5
KVH General Tech Heater and Vent Control Cables--TR2 thru TR4, and more . . . Triumph 3
KVH General Tech More Engine Rebuild Questions Triumph 15
AngliaGT A Few More Spotted 6
AngliaGT Saw a Few More Spotted 0
Bob Claffie More Village pics Other British Cars 0
Bob Claffie More Village pics Other Cars 3
M TR6 More noob questions… Triumph 14
Bayless More Paint Other British Cars 3
AngliaGT A Few More Local Vehicles Spotted 5
Basil More BMW Z4 trials Other Cars 21
AngliaGT A Few More I saw Yesterday Spotted 10
SteveTheBrewer Spitfire More rust repair Triumph 1
AngliaGT A Few More along Highway 220 Spotted 3
Bob Claffie More pics from Falls Village Festival Other British Cars 3
Sherlock Another cruise night, more interesting British iron Spotted 2
Y MGB More things that seem odd.... MG 2
D TR2/3/3A More Fuel pump questions. Triumph 10
jlaird MGB More on Bee's status MG 6
AngliaGT A Couple More Spotted 0
tr6nitjulius TR6 TR6 meeting my Demands & Giving Back more! Triumph 2
tr6web TR6 More leg room needed Triumph 5
Got_All_4 For Sale Brake caliper pistons Ceramic Coated and more Triumph Classifieds 0
Nelson No more MG Midgets Spridgets 3
HealeyPassion Getting a bit more space for triple Webers... or EFI Austin Healey 3
K TR2/3/3A Auxillary Carb Return Spring in More BS about TR's. Triumph 0
K TR2/3/3A More pics of Kast Cam Triumph 4
K TR2/3/3A TR3A SU's More Pics Triumph 0
Ripper01 For Sale more TR-6 Used Parts Oct 2019 Triumph Classifieds 0
lbcspinners A- H Frog E: no more Bugeye oil leaks! Austin Healey 4
7 No more Bosch tools for me Restoration & Tools 4
D TR2/3/3A More small nuts [ and studs!] Triumph 2
C TR6 More fun with Lucas Triumph 5
Bayless More Sprite progress finally Spridgets 23
Bayless Even more progress - the Prefect Other British Cars 5
maxwedge5281 one more time.....mirrors! Austin Healey 14
Bob Claffie T-Series More or less TD action MG 0
R More Shroud to Scuttle install Austin Healey 4
Y MGB Answer to a question creates more new questions.... MG 12
K TR2/3/3A Auxillary carb return spring in "More BS about TR,s" Triumph 9
S TR2/3/3A little more door gap Triumph 14
Michael Oritt Replacing timing chain tensioner and more Austin Healey 24
T How to add a bit more realiability/endurance to a stock 1275 engine rebuild? Spridgets 9
D BT-7 tri-carb Two more questions Austin Healey 18
K TR2/3/3A More electrical....the Starter? Triumph 8
T TR2/3/3A Is there a timing cover seal that will last more than a couple of year? Triumph 23

Similar threads

Top