• Hi Guest!
    You can help ensure that British Car Forum (BCF) continues to provide a great place to engage in the British car hobby! If you find BCF a beneficial community, please consider supporting our efforts with a subscription.

    There are some perks with a member upgrade!
    **Upgrade Now**
    (PS: Subscribers don't see this gawd-aweful banner
Tips
Tips

General TR Oil Pan Questions

RJS

Jedi Warrior
Country flag
Online
Hi All

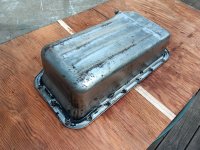
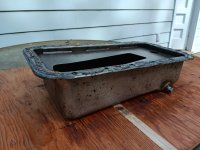
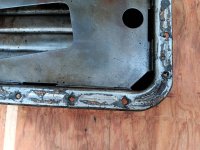
Dropping my oil pan this week mostly to repaint and also to replace the gasket. Back in 2017 I replaced the gasket with a thick cork version. I torqued the bolts to the specified 18 lbs-ft which was probably a mistake. It led to crushing the gasket, resulting in leaks. I used all new hardware, including new bolts, flat washers and lock washers. Used RTV Ultra Back Gasket Sealant to secure gasket to pan first. After that dried in place, I then I used Permatex 2 against the engine block. I seem to consistently have a drip hanging at all four corners of the oil pan and on the drain plug. A few questions/ comments:
  • I don't believe I bent the bolt holes but, will re-check the pan for flatness
  • I purchased both a stock gasket (~$5) and a "Payen" gasket (~$25) from the "Big M". Any preference/ difference?
  • I did not replace the Block Sealing Pads last time. I will this time
  • Drain plugs:
    • How tight do you make the drain plug? I read that pipe thread can actually be tightened very tight.
    • I am using a magnetic drain plug. Any experience with them not sealing completely? I have several stock plugs in the basement
    • Does anyone recommend using thread sealant?
Otherwise, any idea on how many quarts difference between the high and low marks on the dip stick? I always used to refill with 6 quarts of oil. Last Fall, I used only 5.5 quarts. Dip stick reads somewhere between 1/3 and 1/2. BUT, I noticed the oil leaks have reduced a noticeable amount. Any problem/ issue to refilling with only 5 quarts?

Thanks all for bearing with all my questions

Bob
 
5 and 1/2 quarts for a TR6 and the thickness of the felt washer on the dipstick can make a difference in the reading of the oil level on the dipstick...Some are too thick making it seem you need to have more than 5 and 1/2 to reach the FULL mark
On the magnetic plug, I use a gasket dressing, not a thread locker, usually Hylomar, but sometimes Permatex non hardening on the threads..pretty snug but not gorilla tight.
I suppose I could checking filling the volume between mark (that's probably what you should do), I haven't and during the 3000 miles between changes the level comes nowhere near the low mark.
 
TR2/3 takes about 7-1/2 quarts.

Anytime you use RTV with a soft gasket, like cork, you cannot torque to final value initially. The RTV acts like a lubricant and you will shred the soft gasket. You must snug the bolts on day 1, and then you may come back on day 2 and tighten to spec. Of course, cork does not require any gasket compound at all.

Never tighten the drain plug more than snug. If it is a pipe plug, then snug will work. If it is an actual straight thread, then find an o-ring to go around the threads. Then snug it plenty, as the o-ring will do the sealing and last many years.
 
Hi All,
Thanks for the comments. Mine is a TR4A. The Moss catalogue lists "Sump Capacity" as 13.2 US pints or, 6.6 quarts. I had always filled with 6 qts. But, had read that reducing it a bit will reduces leaking. Anyway...

Attached are photos of the pan - now off the car. What a beast to get off. Now soaking the lip in acetone (upside in a large tin foil pan) to remove the rest of the cork and RTV Black). Hoping to finish cleaning today and straighten. Then painting with Eastwood 2K Epoxy primer and engine paint. Still deciding which gasket and what treatments (if any). I will say the "Payen" gasket is thinner than cheaper stock version.

Bob
PS: I think the difference b/t the Hi and Low marks on the dipstick is 2 quarts. Agree, disagree?
 

Attachments

  • 20250702_161822.jpg
    20250702_161822.jpg
    504.3 KB · Views: 3
  • 1000001078.jpg
    1000001078.jpg
    293.3 KB · Views: 2
  • 1000001079.jpg
    1000001079.jpg
    482.8 KB · Views: 3
I will be watching to learn how you come out. My latest oil pan job leaks. I had used cork gaskets on the bridge piece and I think I am leaking there.

In the past and on a different pan I used RTV on the bride piece and that seems to have helped a lot. My fear of using RTV was it takes a big piece of RTV to fill that spot in and I did not want the RTV coming loose inside the engine, but used the RTV all the same without problems.

Next time I think I will cut my own gasket out of gasket material probably 1/16 or 3/32 thick using non-hardening permatex on the pan and carefully use RTV on the bridge piece. I will also fit the gasket to the pan with non-hardening permatex then set some thing flat and a little heavy on that for a day or so. Please keep us posted.
steve
 
When re-gasketing a sheet metal flange, rest the flange on a wooden block and enthusiastically tap with round end of a ball peen hammer to dimple the hole and remove the distortion caused by the last torquing. Better seal on the flat part without cutting the new gasket.
Bob
And running a quart low definitely reduces oil leakage.
 
Hi All
Steve, I hope you are patient - I am slow/methodical. Plus, other home projects get in my way (last night in SW CT we had a viscous storm come through which meant I spent all morning in the yard with the chain saw doing tree clean up).

I was pretty concerned about how to remove the rest of the Permatex Ultra Black Oil Resistant sealant. It is super tough stuff. I was considering all kinds of very nasty chemicals. But, this afternoon I sat down with a razor and gently cut most of it away. Took me about an hour sitting on the back deck on a beautiful July 4th afternoon. I then took a wire wheel on the drill and the remaining bits came off in about 10 mins. Super clean now (whew!).

One thing that shocked/surprised me was how bent the flange was around the bolt holes. Back when I put this on in 2017, they were perfect. But, using the thick/soft cork gasket and torquing to 18 lbs-ft per the manual, I was shocked to see how bad they are. Time to straighten again.

Last, I've done some research on Permatex sealants, mostly to see what compares to Hylomar and Wellseal
  • Permatex 82180 Ultra Black Oil Resistant - this is what I used to fasten the cork gasket to the pan itself. I will likely not use this again
  • Permatex 80015 Form-A-Gasket #2 Sealant - this is what I used between the cork gasket and the engine block
  • Permatex 85420 Permashield Fuel Resistant Gasket Dressing & Sealant: this equates to the Hylomar Blue which supposedly many British car mechanics swear by. It' non-setting, non-hardening character remains tacky even with rapid changes in temperature, enabling repeated assembly and disassembly of parts. Suitable as either a gasket maker or dressing, PermaShield® seals surface imperfections between metal parts and is ideal in high performance applications
  • Permatex's 80017 Aviation Form-A-Gasket No. 3 Sealant Liquid: this equates to Wellseal, often cited by British car enthusiasts. It is a slow-drying, non-hardening, and oil/fuel/grease resistant sealant.
So, thinking I may go with a lite smear of the 85420 both on both sides of the gasket. Does anyone use a naked paper gasket (i.e. no sealant at all)?

Best regards

Bob
PS: Steve, really like your suggestion of using RTV on the bridge piece only
 
Last edited:
I will be watching to learn how you come out. My latest oil pan job leaks. I had used cork gaskets on the bridge piece and I think I am leaking there.

In the past and on a different pan I used RTV on the bride piece and that seems to have helped a lot. My fear of using RTV was it takes a big piece of RTV to fill that spot in and I did not want the RTV coming loose inside the engine, but used the RTV all the same without problems.

Next time I think I will cut my own gasket out of gasket material probably 1/16 or 3/32 thick using non-hardening permatex on the pan and carefully use RTV on the bridge piece. I will also fit the gasket to the pan with non-hardening permatex then set some thing flat and a little heavy on that for a day or so. Please keep us posted.
steve
What is meant by the bridge piece?
 
It's the little aluminum piece (~3" long) at the front of the engine block. The front-center bolt of the oil pan screws into it. It can be seen in this image - it doesn't have a number but, bolt "43" is pictured screwing into it:

1751717080162.png


Because it is not continuous with the face of the engine block, it creates opportunities for leaks

Added question: does anyone know if the sealing pad (no. 3) can be replaced without removing the sealing block itself (no. 43)? If the answer is No, is removing and replacing the sealing block a big deal (without opening a can of worms)?

Bob
 
Last edited:
It's the little aluminum piece (~3" long) at the front of the engine block. The front-center bolt of the oil pan screws into it. It can be seen in this image - it doesn't have a number but, bolt "43" is pictured screwing into it:

View attachment 104508

Because it is not continuous with the face of the engine block, it creates opportunities for leaks

Added question: does anyone know if the sealing pad (no. 3) can be replaced without removing the sealing block itself (no. 43)? If the answer is No, is removing and replacing the sealing block a big deal (without opening a can of worms)?

Bob
Is bolt 43 shorter than the others? Are all the other pan bolts the same length? I think the clutch slave cylinder support rod bolt may e a bit longer.
 
So, bolt 43 is actually (2) screws to secure the sealing block. However, one oil pan bolt does then go into the center of the sealing block. There are 19 bolts in total to secure the oil pan. (17) are 3/4" long. (1) is 1" long for the clutch slave support, as you suggest. And then the final (1) goes into the sealing block and is only 5/8" long (so yes, it is shorter).

Note, mine is a 1966 TR4A. Not sure if it differs on TR2's or TR3's - especially if they include the downdraft block breather

Bob
 
Back
Top