• Hi Guest!
    You can help ensure that British Car Forum (BCF) continues to provide a great place to engage in the British car hobby! If you find BCF a beneficial community, please consider supporting our efforts with a subscription.

    There are some perks with a member upgrade!
    **Upgrade Now**
    (PS: Subscribers don't see this gawd-aweful banner
Tips
Tips

GT6 Oil pan bridge installation

Richter12x2

Jedi Hopeful
Offline
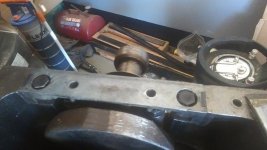
This may have been covered before if I could think of the right name for it, but at one end of the engine there's a sort of bridge that goes over one of the crank journals, with a recessed hole for the bolts to fit in - once they're in to a certain point, it's not possible to get a wrench or socket on them. They won't be able to come out because of the pan, and the other side of it is the timing covers, so probably intended for oil to find its way there, but it still makes me nervous.

I can find videos online showing that Spitfires at least have the same piece, but none seem to actually show it being installed or mention it.

What's the right way to install those?
IMAG0017.jpg
 
That was my first thought...flat head screws that fit inside the recess completely.

For the end seal, I goober (highly technical term for saturate completely) a strip of felt with gasket sealant and stuff it in until it pops out the opposite end. Once it starts to harden you can trim the felt flush and install the oil pan.
 
Properly too late now, but it was a wood wedge at one time, even came in the kit for bottom end.

Wayne
 
The kits do still come with the wooden wedges. You can also carve your own from paint stir sticks. Regardless, they both have to be shaved to fit and tapped into place with a bit of sealant.

Richter, if you have not installed the sealing block yet... hold off for a few days. Either find a 5/16-24 HeliCoil kit or someone who has one. The sealing blocks are notorious for having their screws strip out resulting in a nasty front engine oil leak. The HeliCoils make the part much stronger. At one time there was a guy on eBay selling billet blocks he made from steel. (Footnote on the HeliCoils... two of the holes are very shallow. This makes them trickier to install and you may find you need to shorten the HeliCoils by cutting off a winding or two).
 
That ship has sailed unfortunately - thanks to new laws in the state of Texas, we have to get this running and inspected by the end of the month or we lose our 1967 license plates for good. :p The bridge I was using actually had a timing cover bolt broken off in it, luckily I still had a good one from the other engine. My big issue now is just finding that big screwhead timing cover bolt, since the others don't fit the threads at that location. I obviously had one, because the other engine wasn't missing a bolt (or gushing oil) but it didn't end up in the bag marked "timing cover" somehow. Or else I did something clever there, because I do have an extra bolt.
My kit did have the wood blocks, and I pared them down and hammered them in place, so that part should be fine. Although they were taped together so tight that one of them split in half on me just taking the tape off.
 
This is from memory so don't cuss me if I'm wrong.

The vertical "bolts" holding the front sealing block to the engine block are sort of jumbo pan head screws with screwdriver slots. Those get tightened as best you can. The front plate bolts and pan bolts that go into the sealing block were short 5/16-24 hex heads. You may need to measure the tap depth in the sealing block and cut hex head bolts down to the correct length if you have lost them.

There are some additional pan head 5/16 bolts used at various places to secure the timing cover to the front plate. I remember them being very short. If you cannot find a bolt for one of those locations you may have to file down the head height of a hex head and cut a screwdriver slot in its head using a hacksaw.
 
What I'm running into now is, the bolt hole along the left hand side of the timing cover, just past the one that goes into that block, it appears to be threaded correctly, not broken, but the normal bolt, and even the slotted screw is too small to grab the threads - I can't get the next size up bolt to grab there either, looking like that may be due to the timing cover. It's almost as though the timing cover is drilled for 5/16 all the way around, and then engine itself is 5/16, except for that one which is 3/8.
 
Not good. If any of those bolts are loose or missing you will have a leak. No amount of sealant is going to compensate.

Since you are on a deadline to get this car inspected by the end of the month, I would focus on temporary sealants with whatever bolt you can get to fit. Once the inspection is behind you, take the time to fit a steel or HeliCoiled sealing block.

If a 3/8" bolt will not fit, your next step up is 10mm but it's only a small step. Obviously the engine was not designed with metric fasteners so I would only consider a 10mm bolt temporary to get you to your deadline.
 
So the plus is, I managed to find the other front plate, and that particular bolt is only threaded into the front plate, not the block behind it. So whatever happened, it's only the front plate that needs to be fixed. That teaches me to be in a rush (didn't reuse that front plate because it needed to be painted again, which would have meant we'd wait 3-4 hours for it to dry and lose half a day.) The bad news is, that other front plate is obviously tapped the same size as the rest of the bolts - so unless that changed year to year (wouldn't be surprised, because the crank bolts changed, apparently) then something happened. I picked up a 3/8 fine thread bolt and I'll have to cut it shorter so it doesn't extend into the block, then we'll see if I can get it in there. Otherwise, because of where it's located, the pulley will have to come off so I can tap it properly
 
Ended up being tapped perfectly for that larger sized bolt, the challenge was just cutting one down short enough to not foul the main bearing cap behind the plate. Once I had a bolt that would start I just ran it down snug and we're fine! You can all sleep comfortably at night now! :D
 
Good deal. How's the rest of the project progressing with 3 weeks to go?
 
Got the engine back in last Tuesday, finally got it running on Thursday after fighting a bad timing light. Spent 3 hours Thursday night trying to figure out why the horn wouldn't honk, chasing things around under the dash, checking wiring diagrams, finally after taking apart the steering rack determined that the center bolt wasn't at ground, so pressing the horn button didn't do anything. Got under the hood and finally discovered the missing engine mount bolt (I had replaced it) - I left the ground wire through it, and it fell down to dangle under the car. Put that back in and horn worked fine. Drove it down to Kwik Kar Friday and passed inspection straightaway, drove it back home and started to overheat by this point. I'd had the original radiator repaired last year, but when I flushed it out this time, there was an awful lot of brown water in it - I guess it's just not up to the task anymore, so will have to order a new one soon (sooner than driving it again, anyway.) My supplemental electric fan didn't seem to help any either. I have it wired into the dip beams, so when you turn the headlights on low, the fan comes on.

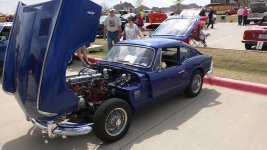
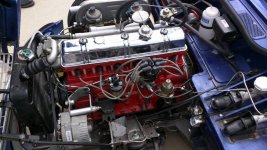
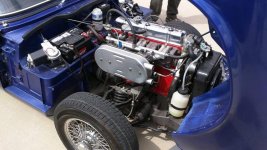
Drove her down for a car show on Saturday. (Conveniently right next to the same Kwik Kar that was at the limits of overheating.) Didn't win, but the ones that did win all definitely deserved it, lots of neat cars there, although we may have been the only Brit.

lantana car show 1.jpglantana car show 2.jpglantana car show 3.jpg
 
Congrats on passing inspection. I knew you would meet your deadline.

Another thing to keep an eye on with the horn circuit is that there is a ground wire/braid that jumps from the top end of the steering column to the lower at the flex joint. That is a more-or-less hidden failure point. It can drive you crazy after a while, particularly if it makes intermittent contact.

GT6 brass radiators are not cheap. There were several vendors (on eBay) offering an aluminum version for less money but I have no experience with them.
 
Brown water is from the block not the radiator. Brass radiators leave a green tinge to the fluid. Sounds like block needs to be flushed. Check for proper thermostat and belt tension. Just a thought , not a diss, check fan for proper rotation, have seen them on backwards.
 
Don't forget to retorque the head now that it has run
 
Back
Top