• Hey Guest!
    British Car Forum has been supporting enthusiasts for over 25 years by providing a great place to share our love for British cars. You can support our efforts by upgrading your membership for less than the dues of most car clubs. There are some perks with a member upgrade!

    **Upgrade Now**
    (PS: Upgraded members don't see this banner, nor will you see the Google ads that appear on the site.)
Tips
Tips

TR4/4A OD Transmission Removal and Install - 1966 TR4A

OP
RJS

RJS

Jedi Warrior
Country flag
Offline
Hi All,

Does anyone have step by step instructions they can share? I understand the only way out is through the cockpit, not dropping it from below.

More importantly, what tools has anyone used? I do all my own work on the car with extensive set of tools but, I am 62 years old with somewhat limited access to helpers, so this maybe a solo job.
I saw someone made a transmission hoist here:
1773764764394.png

If anyone in the States has access to one, I will gladly pay to have it return shipped. I am in CT. Please PM me.

Otherwise, I have an engine hoist but, I think it needs to be low profile to lift from transmission's center of gravity (which is below the dashboard)
How about Dr. Doolin's tool. He says it is for TR6's? But will it work on a TR4A? Also, I think it only really assists with install, not removal: > Dr-Doolin - TL502 <

Thanks

Bob
 
Bob: I don't think you should be approaching this on your own. An OD gearbox is pretty heavy and manipulating it out and back in is much easier with additional help.

I have no experience with any kind of hoist and I'm not sure they would be much help.

You are fortunate in having some good TR clubs in your area: I am sure New England Triumphs or CT Triumph Register would both be helpful resources. Maybe offer pizza and beer for a "tech session" at your house ?
 
Hi Bob, I'm getting ready to pull the transmission/OD on my '67 Healey 3000 and I'm guessing the difference with your car is minor. I am planning to get help from my friend's son-in-law and grandson as I'm told the combined weight is about 100lb. I haven't yet quite understood why it can't be removed from below except that maybe the bell housing won't clear the rear engine plate if rotated downward? I also have to have something in place to hold up the rear of the engine while the transmission is disconnected. I will probably rebuild both while they're on the bench.

I also live in CT. Maybe we can collaborate.

Steve
 
I have had the gearbox out and in my 3a a few times before a complete professional rebuild and I borrowed a crane that a uk TRR member devised. The crane is the best diy tool ever for this job single handed.

Once by myself and I struggled - harder to get it aligned to put it back. And an OD BOX IS BLOODY HEAVY
But I have got the by myself removal down to couple hours.
One with 2 people and it’s so much easier than struggling by yourself
Essential tip is to make a long stud 2-3” to hang the box on (yes the stud and block will take it) to help the refitting guiding back in. Just a bolt with the head cut off and a slot or square end cut to screwing it in and out.
Make sure the clutch plate is centred if you have messed with that.
With the 3a you can chock the engine with a suitably size block of wood between the engine and the bulk head but I use a little trolley jack on the sump again with a wooden board weight spreader.

Also when refitting tie/wire with clutch slide bearing side lever forward towards the bell housing as this keeps the clutch bearing secure in the fork in the bell housing. As there will be some box turning jiggling to get the lever past the floor lip into the void and your really don’t want to get it all fitted to find the bearing has come out of the fork !

And a little wooden block to support the gearbox tail helps too
Note that the block has some dowel pins in set positions. These correspond to tight fitting holes in the gearbox flange. Note where they are and keep then there or replace in the same place these help to locate the box and take the rotational force when driving and the bolts only clamp.
 

Attachments

  • IMG_0494.jpeg
    IMG_0494.jpeg
    715.2 KB · Views: 49
  • IMG_0495.jpeg
    IMG_0495.jpeg
    745.4 KB · Views: 39
  • IMG_0486.jpeg
    IMG_0486.jpeg
    277.6 KB · Views: 36
  • IMG_0487.jpeg
    IMG_0487.jpeg
    264.5 KB · Views: 44
  • IMG_0488.jpeg
    IMG_0488.jpeg
    169.6 KB · Views: 40
  • IMG_0489.jpeg
    IMG_0489.jpeg
    277 KB · Views: 38
  • IMG_0491.jpeg
    IMG_0491.jpeg
    713.6 KB · Views: 43
  • IMG_0493.jpeg
    IMG_0493.jpeg
    599.5 KB · Views: 44
  • IMG_0496.jpeg
    IMG_0496.jpeg
    744.2 KB · Views: 43
Last edited:
Gents,

Appreciate the good info, one and all. Agreed, likely foolish to try this on my own. Smart move is to call on a neighbor and a friend. I've been reading and building a list of "tips". Hamish Racing (I've seen so many of your posts before on other sites) those are really useful tips. The photos say it all. It's nice to benefit from the experience of others and I appreciate you taking the time to post. I really like the idea on 3" studs. My current plan is to use the Dr. Doolin tool (> Dr-Doolin - TL502 < ) - or make my own. He confirmed it would also work on a TR4A and updated his website accordingly. I'll support the engine under the sump with a scissors jack. That will allow me to make minor adjustments to the engine angle for reinstall/alignment. And although it may be redundant with the Dr. Doolin tool, I'll likely get a transmission/trolley jack from Harbor Freight specifically for the install. That will provide added support from below with height adjustment. The wheels will also allow me to move the trans forwards/backwards as I try to align the input shaft.

Steve, on the TR's there is a cross brace on the chassis which makes removal from below not an option. That is why it has to come out via the cockpit. Not sure about your AH3000

I still work full time with long days and somewhat limited time on the weekends. So, it maybe 6 weeks before you hear back from me.

Bob
PS: my trans was rebuilt in 1998 and has (only) about 14K miles on it. The reason I am considering pulling the trans is starting last summer I starting hearing the dreaded "ticking" (like a clock) in 1st, 2nd and 3rd gears. But, not in 4th. To me, that tells me the needle bearings on the layshaft are starting to fail - if not completely already. First step is to drain the gearbox and drop the OD cap to see if there is any debris
 
I wish I'd seen this thread before pulling my transmission a few months ago. As a connoisseur of home-made tools, I really admire that transmission jack.

I did it myself, so it's possible, but some help would have been more than welcome. I used a couple of hydraulic jacks, including one transmission jack from Harbor Fright. The biggest problem was to get the box lined up straight with the engine; when I finally got it aligned, it slid in and out easily. I used Hamish's technique of threading a long stud into the engine block to support the transmission as it was removed and installed.

I removed it because one of the roller bearings for the laygear disintegrated with only about 3500 miles on it and took out the other one. I learned too late that the bearings sold by the usual suppliers are garbage. I replaced them with good-quality INA bearings; I would have used Timken if I could find them. The bearing number, if you need it, is SCE1314.

The transmission expert in our local club recommends a laygear from Moss that takes two front bearings. Only problem is its cost, $500+. I have wondered about getting a standard laygear rebored to take a second bearing, but that's complicated by the very hard metal used in the gear, which makes it impossible to machine conventionally.
 
I helped a friend remove his 4 speed gearbox and replace it with the rebuilt 4 speed with OD. It’s really a 2 person job, working on all the fiddly bits, handing tools back and forth, etc. The hardest part was twisting the gearbox down and out from the cockpit; the clutch arm on the left fouled on the floorpan. Lots of humping and heaving. The Dr. Doolin kit really was helpful.
 

Attachments

  • IMG_6876.jpeg
    IMG_6876.jpeg
    36.4 KB · Views: 38
Hamish, I love your lift!

The only thing I would add is that, unlike US made cars, the Triumph engines are mounted on the front...so you must support the rear of the engine while the tranny is out. US cars place the engine mount in the middle of the engine, so you can get away with removing the tranny and not supporting the engine.
 
This link will get you to on-line copies of a vast collection of Triumph literature and manuals. If you scroll down far enough there is a pdf of the TR4 shop manual. It will give you the factory procedure for what you're doing:


And yes, making a set of 10 (or so) studs to hang the gearbox on as you're guiding it into place is a great tip. You'll need several studs, because if you use too few, the studs will bend. Aligning the gearbox and getting it into the car is awkward the first time you do it. Kind of learning to ride a bicycle or having sex.
 
Having removed a 4A tranny with overdrive, I echo the comments here. Bloody heavy and awkward.

Protect the floor pans; I suggest thick duct tape (two or three layers even better).

Jack up the rear of the motor with a screw Jack.

I did it by myself. Removal is “easy”, install is a “booger” (I'm sure the more accurate words are not allowed here). Install was a task where nothing fits, nothing aligns, you step back and repeat, then suddenly all goes together like a hot knife in butter.

Refitting the transmission cover was more fiddly than the transmission install. Except of course it does not involve wrestling a 100 pound elephant.

Quantum Mechanics im CT is a great place for transmission work.
 
You’ve been here awhile, and already have some good advice. Here’s what I’ll offer in case it helps at all.

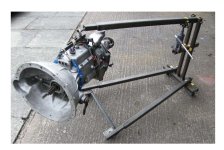
I have a ‘66 TR4A overdrive that I rebuilt and installed about 8 years ago, then I installed an OD into another 4A I have just two years ago. In each case, I used a Harbor Freight transmission jack and heavy protective blankets for my floorboards and sills. My son helped with the install, but I was able to remove them myself, both times. Not that I’d refuse help for that part, too. However, back to the installation part, and assuming the great jack setup from Hamish Racing isn’t available, I think two men can line things up and get the job done.

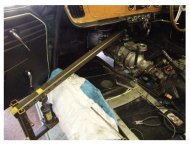
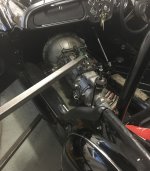
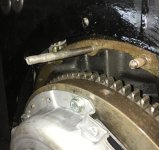
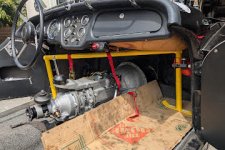
For me, the trickiest part was knowing we had the angle correct when we tried to mate the spigot with with the rear crankshaft pilot bushing. We did use headless bolts in the engine block, but not as long as those shown above. I think longer ones might have avoided some guesswork on the angle of mating. What I do recall is that when the mating occurred it was as if something magical happened. Neither I nor my son had any idea what we suddenly did for everything to just snap together. And don’t forget, putting headless bolts into the block is also useful for removing the transmission, as it assures you’re going straight back and, as I’ve been told, can lessen the stress of the transmission spigot “hanging” on the pilot bushing.

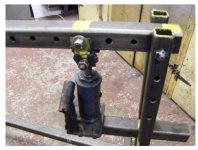
As for process, you must of course remove just about the entire interior, seats, console, dash support, etc., and in my case the emergency brake assembly as well. You must of course support the rear of the engine with a jack (fixed if possible) and good block of wood, perhaps padded with rags, under the rear of the oil pan. Otherwise the engine will surely not remain supported by the front engine mounts. What I used under the rear of the engine was a screw type bottle jack so that if I needed to slightly adjust the engine height I could do that while at the same time adjusting the transmission height with my transmission jack.

Be sure when you support the rear of the engine you’ve done so in a way that allows room and clearance for you to maneuver the transmission and the transmission jack. And you don’t want to bump that support from under the engine.

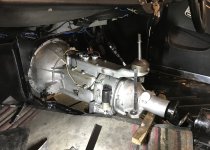
All in all, it’s a doable job and mostly a one-man job. A few minutes of brute strength seems to do the trick. If there is one aspect of the process I wish were easier, it would be finding a way to maneuver that clutch adjusting arm on the side of the transmission so it stops constantly impeding installation and interfering with the floorboard on the driver’s side.

Other things I’d mention from experience: a) consider “machining” your tunnel cover in two ways, first with a plug hole for future access to the solenoid adjusting lever on the passenger side of the overdrive unit, and second creating an access panel to fix or replace your transmission angle drive, all without removing the entire interior of the vehicle again; b) be extremely careful to check all O/D wiring and color coding to return everything to proper connections, and triple-check the bullet connectors, especially the one off the solenoid. If that wire falls out—mine did—you’ll be removing your interior and enjoying that experience again. I also suggest you verify that the wires connecting to the O/D relay in the passenger footwell remain accessible in case you lose a connection there. Anything to avoid removing the interior; and c) consider repairing the tunnel cover wherever needed before reinstalling it. In my case I used fiberglass and cloth mesh to strengthen the tunnel and I also strengthened the bottom ridge part of the tunnel with the securing bolt holes by gluing then strips of wood along that ridge, pre-drilled to match the hole pattern. This enabled me to keep my old fiberboard OEM tunnel cover.

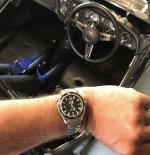
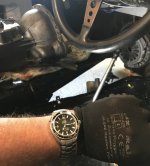
You mentioned tools. Here are my thoughts: When you get up under the vehicle to remove the rear cross bracket, you will want good handy open end wrenches, and I recall needing 1/2 inch and 9/16 inch short ones to reach and work easily. The other nuts and bolts are mostly accessible with ratchets, and I recall 9/16 and 11/16 on that cross member. But nothing special or dramatic. You will want to make the headless bolts we talked about for guides, and maybe even the really long ones for reinstalling, though I wonder if those might bend or be problematic (probably not). I’d definitely have a low profile hydraulic jack, probably two of them handy and ready, and small enough to not be clumsy. Plus that adjustable bottle jack was essential for me, as well as the Harbor Freight transmission jack. But let me add a note in that regard. Folks right here on this Forum warned me that the ears for the straps on the transmission jack interfere with the exhaust pipes near the transmission. They were right, and I never used the straps in any event. So, yes, I cut those clumsy ears off the transmission jack and it fit much better where I wanted it during the entire process. Here’s another “tool” for you. Good pliable comfortable protective gloves. They make a huge difference grabbing and muscling that transmission/overdrive. For me, I suddenly felt so much stronger and able to maneuver. It’s just a fact. You’ll want plenty of zip ties to move and hold wires and cables well out of your way while removing the transmission. You don’t want to damage, rip or ruin any wiring, and there will be plenty right above the transmission near the plinth.

All I can think of right now. I somehow think it’s all still a load of fun, even horsing that O/D transmission out all by myself though reinstalling is another job entirely. If you can get a helper for that last “most difficult” step, I’ll bet the rest will be easy for you.

Good luck.

PS If there’s any other detail you’re wondering about, like removing the support bracket at the rear of the transmission, or how to reattach the exhaust pipe to that funky bracket dropping from the transmission, Part 39 of the Moss Catalogue (exhaust), let us know.

PPS Since you’ll have the transmission out, will you replace the throw out bearing? The tapered pin?
 
Last edited:
^^^^ Excellent write-up KVH. I feel you were right along with us as we did my friend’s gearbox.
 
I would also humbly add that adding an access hole in the tunnel cover for the fill/check plug will make life easier. A flap(bind the edges) in the carpet also helps. This makes it possible to check the oil with the car level and not having to crawl under the car.
Berry
 
I've been away traveling a few days for work but, WOW! What can I say other than these are all super useful tips/tricks which will make this job less of a bear than it needs to be. BCF for the win. I will definitely adopt all these ideas. I plan to document step by step in writing and will post back here. I will also use plywood sheets to protect the floor boards and did not think to make access holes in trans tunnel for the "service" items.

Life is super busy right now but, looking to get started asap. I have learned not to give myself time/deadlines. That just leads to me rushing and making dumb mistakes. Turning wrenches and solving problems is just a part of the ownership experience.

Anyways, I am super lucky that where I live in CT means Quantum Mechanics is only about 25 mins from me. For once something in my favor. I had them rebuild my differential ~15 yrs ago. Just glad they are still around! I spoke to them and they said they have a fully rebuilt unit on the shelf for exchange. But, I am not convinced namely for two reasons: 1) While I highly doubt "numbers matching" matters (this not Ferrari GTO!), I'd like to keep my original unit in my car for posterity 2) this unit was rebuilt 25 yrs/14K miles ago and I think all I need is new layshaft bearings so not certain I need a "complete rebuild". We'll see - still undecided.

Bob
 
We used thick cardboard to cover the carpet, easy to trim to match contours. His car had a replacement floorpan which didn’t have the cage nuts; made reinstall of the trans tunnel harder for sure. Have fun!
 
You’re lucky to be near Quantum. I live about as far as you can be from him and still be in the continental USA. He rebuilt my trans many years ago and it had to make several trips back and forth (definitely NOT his fault, he’s great!). My transmission now has more frequent flyer miles than I do. I just pulled it today to have some work done on it, but am going to have to find someone more local (any recommendations of someone in San Luis Obispo county, CA?)

X2 on the long headless bolts, don’t know how I managed before figuring out that trick. I have a custom made set for every vehicle I own (I have a lot of old junk)

I also agree that cutting an access hole for the fill plug (and replacing that ridiculous square plug with a brass hex headed one) saves a lot of hassle. Last time I had my trans out though, I took it one step further. I always thought the transmission dipstick on my old TR3 was really cool. The top cover of my 4 has a flat spot where that would have been, so I drilled and tapped it for the same 1/2” pipe plug as the fill and drain holes. I then fabricated a dipstick to check the oil level. Now with another access hole in the top of the tunnel and a small funnel, I can easily check and top up the transmission.

Hope this helps
Tom
 
Back
Top