
-
 Hey Guest!
British Car Forum has been supporting enthusiasts for over 25 years by providing a great place to share our love for British cars. You can support our efforts by upgrading your membership for less than the dues of most car clubs. There are some perks with a member upgrade!**Upgrade Now**
(PS: Upgraded members don't see this banner, nor will you see the Google ads that appear on the site.)
You are using an out of date browser. It may not display this or other websites correctly.
You should upgrade or use an alternative browser.
You should upgrade or use an alternative browser.
New Model A project
- Thread starter Bayless
- Start date
Bob Claffie
Jedi Knight
Offline
I vote NO on the use of glazing putty. In my experience, that stuff SHRINKS like crazy and will come back to bite you.

OP
Offline
There has been a lot of work over the last few weeks and the body with all its bits is now ready for top coat. that is all but the side cowl pieces below the gas tank. The bottoms of both pieces were badly rusted and we bought new replacement panels. When it came time to fit them up, they did not fit very well. I decided the best plan was to cut the rusty bottoms off the original parts and replace with the bottoms of the new ones. Fortunately the shop now has access to a MIG welder but yours truly has never used one. Over the next week or so I had to teach myself how to do it. I learned that grinding that stuff takes a whole lot more time than welding it. Anyway, this is how the left side looks, now ready for some epoxy primer. The other side is similar but I did show the better of the two.
I tacked it in place while on the car then finished the weld from the back side.
I tacked it in place while on the car then finished the weld from the back side.
OP
Offline
Basil, I swear I did exactly what you told me but I still get the thumbnail in the post. I used the "insert image" icon and browsed for the photo. Then clicked "upload file(s)". It then went back to my post with "[some code]number[some code]". I never got a thumbnail to double click.

OP
Offline
I tried Tom but still no luck. I selected "Edit Post" but didn't actually get the image, just View attachment 62285. Clicking on that didn't do anything. I know I have mucked it up somehow. OK, putting that actual code in just shows the thumbnail so here it is with extra spaces [ a t t a c h = c o n f i g ]62285[ / a t t a c h ]. Anyway, I did get the primer on the parts today so may be able to get it assembled soon.
OP
Offline
We finally got the firewall/gas tank/cowl sides assembled and attached to the body. This was necessary because the welting where it meats the body is supposed to be painted body color. I like it black but I understand. Assembling that thing after it is all painted would very likely result in some scratched paint. It was a fair challenge for two of us to get it together. With that done, the whole thing is now ready for final painting. Now if we can just get some proper single stage paint, mixed to the original color.

 That's my Prefect with the missing boot lid on the left of the second photo.
That's my Prefect with the missing boot lid on the left of the second photo.
Last edited:
OP
Offline
Over the last few weeks we got the engine and transmission reinstalled on the chassis and got the brakes all installed and semi-adjusted. I say semi adjusted because all the rods for the mechanical brakes are individually adjusted; there are no equalizers in the system. Dick wanted to convert from the original steel brake drums to cast iron. That required the services of a machine shop. We now have a full set of tires and the wheels are a week overdue from the powder coating shop. Meanwhile, I did get all the black parts painted today. this includes the fenders, the splash aprons and a whole bunch of miscellaneous parts. Here is everything in the paint booth.

OP
Offline
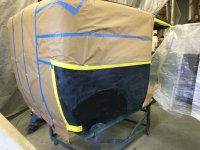
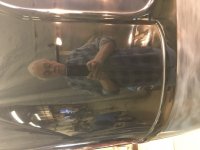
It turns out I had too much in the paint booth and some pieces too close to the floor as a result. Bottom line was, I got to do those fenders all over again due to orange peel or thin paint. With them all polished up and looking good, we got the body and hood and all the other parts painted and polished. All except for one more flaw, that is. When polishing, we found another thin spot about the size of a fist on the lower right side just before it starts to turn to the rear. The photo shows the body all masked and ready to respray that section although you probably can't see the flaw now that it is scuffed to 600 again. The other photo is the panel above that one, now covered in masking, with yours truly's selfie. I was trying to show off the paint, not my own ugly mug.
Attachments
OP
Offline
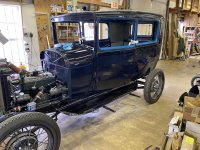
Haven't posted much lately but we have been working. Put the body on the frame yesterday. Paint is finished. Interior kit ordered. Still need to replace or rechrome some parts. Here it is today. Looks kinda like a hotrod with no fenders and no hood. Well, until you see that 4 cylinder motor.
Attachments
OP
Offline
Thanks guys. Yes, that is an original color. We have tried to stay as authentic as possible on it although owner says it is not a show car. The body is Andalusite Blue (looks almost black until in the sunlight). The beltline and upper back are black, The window reveals are Niagara Blue Light or as close as we could get to it. Fenders and aprons are black. A lot of work involved. Now the owner understands where the $10k paint jobs come from as he did his fair share of the many hours sanding and polishing. I suspect even materials were close to $1k. Next time we're gonna build a paint booth trying to cut down the dust (my Sprite and Prefect are next).

Offline
Magnificent work, sir!
If it is to look right, all the work is under the paint. Hours and hours of it. And even when you think you've found every little imperfection, there's always at least one spot where it might have been done better! But hopefully, only YOU know where it is. :wink:
And for future reference, if you haven't used it, a product called "Dolphin Glaze" is about the best two-part "spot putty" we've ever found. I've taken to callin' it "Porpoise Poop". It has held up for over a decade on quite a few of the restorations we've done. And I've checked. If you've not used it, get some and play with it!
Bayless said:...Now the owner understands where the $10k paint jobs come from as he did his fair share of the many hours sanding and polishing. I suspect even materials were close to $1k....
If it is to look right, all the work is under the paint. Hours and hours of it. And even when you think you've found every little imperfection, there's always at least one spot where it might have been done better! But hopefully, only YOU know where it is. :wink:
And for future reference, if you haven't used it, a product called "Dolphin Glaze" is about the best two-part "spot putty" we've ever found. I've taken to callin' it "Porpoise Poop". It has held up for over a decade on quite a few of the restorations we've done. And I've checked. If you've not used it, get some and play with it!
Craig Robin
Member
Offline
This build looks great and brand new. You did a job well done.