• Hey Guest!
    British Car Forum has been supporting enthusiasts for over 25 years by providing a great place to share our love for British cars. You can support our efforts by upgrading your membership for less than the dues of most car clubs. There are some perks with a member upgrade!

    **Upgrade Now**
    (PS: Upgraded members don't see this banner, nor will you see the Google ads that appear on the site.)
Tips
Tips

Ned a frame photo

T

Tinster

Guest
Guest
Offline
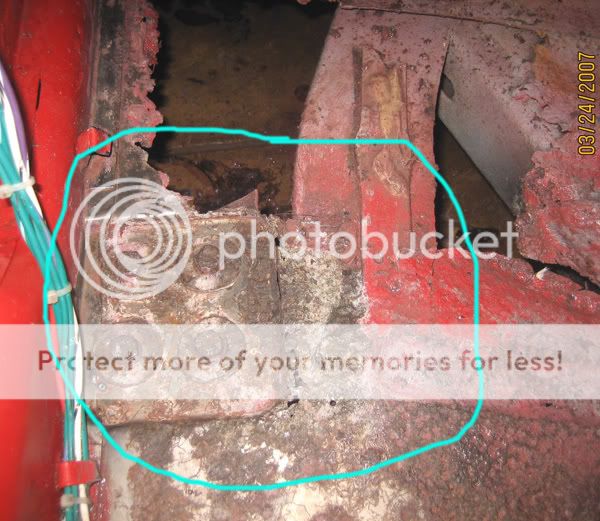
Last major task to accomplish on Crypty.
Replace the floor in the driver's footwell.

Before I start the cutting process, does anyone
have a photo of the frame in this area? I am
unclear what the four bolt body mount assembly
in my photo is bolted into. Also are these 4 bolts
part of the floor pan or are they some kind of
seperate tab that sticks out?

Thanks as always,

Tinster /bcforum/images/%%GRAEMLIN_URL%%/thankyousign.gif /bcforum/images/%%GRAEMLIN_URL%%/thankyousign.gif

mountMarch.jpg
 
Thanks Peter, yes I have a parts catalogue,
yes I have the entire car body mount replacement
kit, yes I understand how the body bolts to the
frame.

I am looking for an actual photo of what is going
on here. An artist's rendering does not provide the
detail to make saw cuts.

In my photo, I am not sure if the rectangle surrounding
the 4 bolts is a metal tab or stamped into the floor pan itself.

Thanks as always,

d
 
Dale,
Your picture shows what is left of the floor pan where it attach's to the the frame. Under the panel is a frame bracket with four attached nuts (photo attached). Your floor is really bad, worse the TRBills.

The entire front side of your body rests on that support. Cutting it off or out will cause the body to sag and the front door post to move out. You need to take good measurements and brace and support the door opening, sills, and front of cockpit

As I recall, you were planning to construct your own repair panel. Given the extent of the damage, it is my opinion that you obtain a replacement floor panel.

You will need to remove all the rusted metal back to good metal, cut the new floor to fit under the inner sill, front area, and remaining floor, then have it welded in place.
 

Attachments

  • 4889-chasis(Small).jpg
    4889-chasis(Small).jpg
    15.5 KB · Views: 44
Dale,
I have a photo frame if that is any help!
Nick
 
Dale,
it would be easier and cheaper to acquire some Heritage floorpans rather than use sheet metal. The indented part would be in the new replacement panels. The original pans were spot welded in place as well as brazed in some areas. IF your rocker panel are still sound, just leave these untouched and the tabs attached to them and just lay the new panels over them and weld in place. If the indented tabs are sound, leave them also. Just lay the new pan in over these. Indeed, cut off your indented tabs and the body sags. That is a bad thing. There are two indented tabs outboard (the one in your photo and one near the rear B post with 3 body bolts) and two other body bolts, one in the front inboard and one about halfway down the tunnel, inboard. Leave them all and just overlap the floors, tabs and all, the minimal possible. I did an inch overlap everywhere, except where the indented tabs were. Left them complete and completely covered them with the new tabs. A body hammer (or any small hammer) comes in handy to persuade the panels to approximate each other before welding. I used Clecos to hold them down before welding. First spot tack, them connect the dots, skipping around to avoid heat buildup. Remember, you have a fuel line down there! I personally think you should remove that first. Also, the rubber strips that cushion the body should be replaced. I just used 1/4" closed cell rubber sheets and cut the strips to fit and glued them to the frame. Rubber burns quickly, don't weld over a strip area. It is imperative to have the car up on jack stands, not on its suspension. You will need to slide underneath more than a few times. Support it behind the rear suspension so there is no tendency for the body to sag. Use .023 light gauge wire to avoid burning your metal (MIG). Remember, cut out any of the above mentioned body mount tabs and you are asking for trouble. Be prepared to somehow support your body against a hard floor if you must cut any tabs out. Make sense?
 
Oh, and you may need an impact wrench to remove the body bolts. They are on there.
 
Soak them down with several applications of a good penetrating oil for a couple of days before starting too.
 
Dale,

What's happening? You're too quiet. I hope that it's because you're fishin' and not metal fabricatin'
 
Yup, been cruising the San Juan harbour
with Wendy all day since 9:00 AM.

Paul/Bill- Spent past few days chemical stripping off
layers and layers of old paint to see what I actutally
have in the drivers side.

I dug away all the crud off the seven bolts with
a dentist's pick and rotary wire brush. I had to file
a few rounded bolt heads into hex shapes. A home made
breaker bar and all the bolts are now out. Whew- all
that before Wendy got up this morning.

Basically, I have clean white metal everywhere except
where the driver's feet rest. Rockers solid, and the
indented tabs are both solid.

I like your overlayment solution Bill but welding
is like almost impossible for me to obtain. I have
very limited access to a welding device used in muffler
shops. That's about it. Will it work?

This project MUST be a DIY of low expense and not more
months in garages or up on jack stands or $ thousands
spent to complete small tasks. The Crypty fund
is depleted. The boss says "No more cash into Crypty".
"Drive it or Crush it."

Since I only need a small portion of the floor pan,
will it be possible to cut the TRF pan in half with
a hack saw??

dale
 
Dale, they are very easy to cut, even with a good pair of aviation shears. Or, just use your disks to cut. The welder used in most welding shops is acetylene torch with brazing rods. That will work but will throw a lot of heat. Ya gotta be good with this technique to master it and not make a mess. Can't you rent a MIG machine (with gas) or hire a welder to show up with his truck? Or do they have those in PR? Not welding the seams solid will make for less than a great hold. Do not attempt to use high-tech bonging here. It won't work. You need large, flat surfaces with no spaces to speak of. Surely there is a welder out there. Better yet, buy one from Home Depot, use it one day, and return it because it doesn't perform as advertised. I didn't tell you to do that.
 
Dale,
Please post or link to additional photos around the floor, with tape or edited pic showing what you are cutting out.

Also, if you have never welded, welding on your car is not the place to learn..

As Bill suggested, here where I live, welders do house calls, but very, very few want to weld automotive sheet metal. That said, good welder should be able to do your job in four hours or so if you have done all the fitment and prep work. You may want to check around.

At last, I know this will send just about everyone on this forum through the roof. But I do believe given you are placing the patch panel into a sound frame, you should be able to use metal bonding agents of which you are familiar.

The caveat is that you reinforce your joints with steel rivets (available from Eastwood) placed 3/4 inches apart (probably except over the tabs which the bolts will hold in place but be careful not to bond them in place).

The trick is to get a good, close fit between the repair panel and the old floor. Again here I do not think you will have a problem with this task as you have worked quite successfully with aluminum not much different from the replacement floors which are made from 21 gauge mild steel and easily formed. You will need Clecos (or another method) to hold the panel in place as you install the rivets.

When done, you will have more rivets holding your bonded repair in place then the number of spot welds in the original.

You have all the skills needed to do it this way. Give it some thought
 
I'm not a structural body man, so I can't comment one way or the other, but it does sound like it may have possibilities. I'll defer to the guys with more experience than me on this one.
 
Pop rivits are a good method, as stated previously you will have more of them than the original spot welds. However, there is one thing to consider when useing pop rivits. That is, Not if but when the pop rivit shanks fall out there will be a hole through the rivit, giving water an easy access inside your floor. The solution is, remove the shanks as you go and seal both side of the hole with epoxy or some other metal "Bonding Agent"

Cleco clamps are a MUST HAVE for body panel replacement, weather you are welding or pop riviting them in place.
They make life so much easier!

Kerry
 
I'll defer to the old man with the experience but I beg to differ. Considering the amount of flexure in the TR6, anything short of welding would be a mistake. That said, the newer bonding agents offer a lot of promise, but only in areas of non-structural, broad contact adhesion. The ability of anyone to get a good broad purchase on the two metals is virtually impossible because you don't have the area to grab onto. Yes, multiple rivets would help but on thin gauge, somewhat rusty metal, a bunch of rivets will not make for a structural shell. The rockers are connected to the tunnel in this car by multiple spot welds and brazing of the floorboard, which in turn makes a down turn of uninterrupted sheet metal down to the bottom of the rocker drains. The whole makes for a fairly stout shell, reinforced by the aluminum center console bolted to both the dash (scuttle) and frame. Adding a bunch of rivets and some glue in the mix will not make the whole as stout as the original. That said, if you only cut out the front foot rest area, you might approach the same integrity and stiffness as the original with the rivets and bonding agent, but you won't have the long term stiffness. When I cut out my floorboards, I was able to flex the body shell with a lever under the frame, just to see how much I lost when the metal was gone. A lot. After finishing the continuous weld and before bolting the body down, I tried the same levering action the the whole thing would not budge, even with a lot of force. IMHO, weld the thing up and forget about it. Just me.
 
Bill,

I know zip about welding. The welding device I have available is a box with 2 cables- a pinch clamp end is on one end and
it holds a stick of thin metal of some type. It makes a
blinding light when used and sparks fly. You muct wear heavy
gloves and a black helmut. Will this rig work with the TRF
overlay pan set into the foot well?

On the other hand, structural expoxy like resins are making
themselves known in the auto industry. Some resins are so strong they can be machined along with the metal pieces bonded. I have 10,000 psi shear strength resin weld in
my garage right now.

I'll post some photos by next weekend of footwell
cut out and let everyone kick in their 2 cents.

I'm real familiar with extreme strength bonding agents.
I am leaning in their direction with pop rivets to
stabilize the floor pan until the resin weld sets.

But hey! Don't forget DPO Pedro drove this TR for thousands
of miles miles with that gaping hole and only three bolts
holding the tranny in place. The way I see it, anything I
install can only be an improvement over the existing.
This TR6 will be a close to home driver that will outlive
it's owner.

Busy week ahead: adios on this topic until next weekend.
Thanks everyone for some excellent ideas to ponder.

dale
 
Tinster, bond it, rivet it, forget about it.
In a few years if it's still a problem revisit it and do it 'properly'.
Until then do what you gotta do to get it running and stay married.
 
Hey Dale, I grabbed this from a TR250 on ebay. Think it's what you're loolking for:

//i11.photobucket.com/albums/a171/munkmunk/1968%20Triumph%20TR250/Small/triumph097.jpg
 
Back
Top