but were afraid to ask:
 justin_mercier
Jedi Warrior
Offline
If I remember correctly, I used 3.

 Hey Guest!

 Hey - did you know if you click on the title of a thread it will take you to the first unread post since you last visited that thread?
 STOP!! Never post your email address in open forums. Bots can "harvest" your email! If you must share your email use a Private Message or use the
  smilie in place of the real @
 Pretty Please - add it to our Events forum(s) and add to the calendar! >> Here's How <<
  Change the look and feel of the forum to fit your taste. Check it out


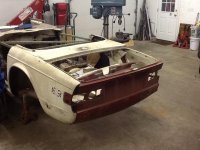
John_Mc said:Fantastic work, Scot! I'll be sending you my frame in the mail!


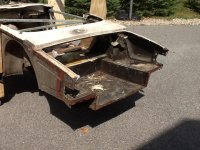
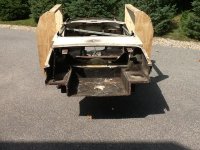
I defininitely will go over the front suspension before blasting. I noticed a couple cracks in the factory welds around the shock mounts. So it will get a thorough going over.big6 said:I would advise you to look closely at the factory welds for the front suspension. The factory welds were poor so with a little grinding and re-welding completed the frame work.
I'd never thought of a stress relieving the frame, but I like the idea! At work, almost everything we make gets sent out for stress relief, so maybe they won't notice if a TR6 frame is on the truck with the aircraft parts!? Seriously, I don't know if there is anyone in my area who does shot peening, but It is worth looking into. Thanks for the info!big6 said:Another step you may consider is having the frame shot peened instead of sand-blasting. This will stress relieve the frame from earlier driving use and welding.
Ed - Feel free to stop by with that beautiful spot welder !