• The Roadster Factory Recovery Fund - Friends, as you may have heard, The Roadster Factory, a respected British Car Parts business in PA, suffered a total loss in a fire on Christmas Day. Read about it, discuss or ask questions >> HERE. The Triumph Register of America is sponsoring a fund raiser to help TRF get back on their feet. If you can help, vist >> their GoFundMe page.
  • Hey there Guest!
    If you enjoy BCF and find our forum a useful resource, if you appreciate not having ads pop up all over the place and you want to ensure we can stay online - Please consider supporting with an "optional" low-cost annual subscription.
    **Upgrade Now**
    (PS: Subscribers don't see this UGLY banner)
Tips
Tips

Lucas SLR Driving Lights installation

Patrick67BJ8

Obi Wan
Silver
Country flag
Offline
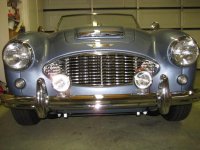
I have a a pair of Driving lights with a build date of March 1955 that I want to put on my BJ8 and I want to mount them on the Light Bar that goes between the bumper guards.

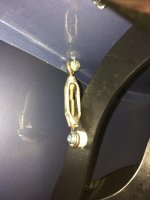
I'm wanting to do a clean installation and make it look authentic but I want to know how others have run the wires and connected them? The wires coming out of both Light fixtures are 28 strand, braided and red/yellow and this wire is still available and stocked British Wiring.

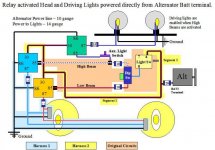
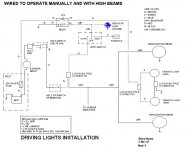
I'm going to use a relay for power distribution(relay on a electrical distribution panel I made under the glove box area), and use the OD switch to turn on/off since I have a 5-speed. I've thought about protecting the wires with a plastic sleeve, the kind that is slit and is pressed on.
thanks for input suggestions, etc. BTW, I didn't know that Concours judges inspect the Lights for mfg dates for authenticity with cars year or production. My Healey is not a Concours Healey.
 

bob hughes

Luke Skywalker
Country flag
Offline
Conkers - what's that.

Mine is a genuine driver.

I ran the wires without additional sleeving under the existing wiring and down onto the bumper bars. Where it left the chassis I ran the wires in a clear poly pipe. No photos but can take some if required.

:cheers:

Bob
 

RAC68

Darth Vader
Offline
Hi Patrick,

Although I don't have my driving lights mounted as you intend, it was as recommended when I first purchased the car new. Not too long ago however, I did install my alternator and, soon after, off-loading the main power flow to my headlight and driving lights from my original wiring harnesses to new supplemental wiring harnesses and relays. To adhere to NJ laws, my driving lights can only be turned on when my headlights are on high beam.

Additionally, after using a driving light actuation switch mounted in my left hand dash support, and recognizing I had only used my windshield washer pump a hand full of times and now with its dry-rotted diaphragm, I installed my driving light switch inside and now press the button to turn on and off with all looking original.

Hear is a picture of my light installation and a wiring diagram presenting my:

100_1416-001[3].jpg


All the best,
Ray(64BJ8P1)
 

Attachments

  • Headlight Relays.jpg
    Headlight Relays.jpg
    68.1 KB · Views: 305

Healey Nut

Luke Skywalker
Country flag
Offline
Mine are monted to the badge bar that has tabs with holes specifically for driving lights . The wires run between the bumper and front apron then along the bumper brackets to the frame . Up into the engine bay , I installed a fused feed from the fuse block with small relay and swithed them of the high beam power feed so they come on with my high beams .
I dont drive much at night but when I do they really light up the way with the high beams on dark unlit roads .
 

RAC68

Darth Vader
Offline
Patrick,

I contacted a friend who mounted his driving lights on a badge bar he explained how he wired up his lights. He indicated that, although his bar placed his lights half way between the bumper and body, he wanted to hide all wiring as much as possible. To do so, before he installed the bar onto the car, he drilled wiring holes into the bar (2 below the center of each light mounting bracket and 1 on the bottom of the side bumper mounting bracket). He explained, he then passed 2 wires through the bar with 1 each exiting at each light mounting bracket. Later, he though he should have the 2 power lines joined inside the bar at or around the first light to have only 1 line to route to the relay. He then installed an appropriately sized rubber (or plastic) insert into the holes to protect the wiring installation from being cut and, finally, used some silicone calking to seal the wires at the bracket holes.

Since the bracket is grounded through the bumper and frame, each light was grounded through tedthe bracket, each emerging wire was extended into the light and would be connected directly to the bullet that extended into the light bulb board. The power line was routed down the top of the bumper bracket to a relay mounted on the inside of the wheel well access panel with a 10 amp fuse installed. From there he followed my lead and installed 2 additional relays to handle the headlights on the same access panel. All wires were routed to and into the cabin under the with original harnesses.

I appreciate that not many have thought this extended effort necessary, however, this installation is both clean and reasonably transparent.

Hope this helps,
Ray(64BJ8P1)
 
OP
Patrick67BJ8

Patrick67BJ8

Obi Wan
Silver
Country flag
Offline
Conkers - what's that.

Mine is a genuine driver.

I ran the wires without additional sleeving under the existing wiring and down onto the bumper bars. Where it left the chassis I ran the wires in a clear poly pipe. No photos but can take some if required.

:cheers:

Bob
I don't know what Conkers is either. A photo(s) of the wires where they left the chassis showing mounting and routing would be great. Thanks!
 
OP
Patrick67BJ8

Patrick67BJ8

Obi Wan
Silver
Country flag
Offline
Mine are monted to the badge bar that has tabs with holes specifically for driving lights . The wires run between the bumper and front apron then along the bumper brackets to the frame . Up into the engine bay , I installed a fused feed from the fuse block with small relay and swithed them of the high beam power feed so they come on with my high beams .
I dont drive much at night but when I do they really light up the way with the high beams on dark unlit roads .
The Badge Bar you have sounds like the one I ordered. There are tabs on to mount the Lights.Thanks!
 
OP
Patrick67BJ8

Patrick67BJ8

Obi Wan
Silver
Country flag
Offline
Patrick,

I contacted a friend who mounted his driving lights on a badge bar he explained how he wired up his lights. He indicated that, although his bar placed his lights half way between the bumper and body, he wanted to hide all wiring as much as possible. To do so, before he installed the bar onto the car, he drilled wiring holes into the bar (2 below the center of each light mounting bracket and 1 on the bottom of the side bumper mounting bracket). He explained, he then passed 2 wires through the bar with 1 each exiting at each light mounting bracket. Later, he though he should have the 2 power lines joined inside the bar at or around the first light to have only 1 line to route to the relay. He then installed an appropriately sized rubber (or plastic) insert into the holes to protect the wiring installation from being cut and, finally, used some silicone calking to seal the wires at the bracket holes.

Since the bracket is grounded through the bumper and frame, each light was grounded through tedthe bracket, each emerging wire was extended into the light and would be connected directly to the bullet that extended into the light bulb board. The power line was routed down the top of the bumper bracket to a relay mounted on the inside of the wheel well access panel with a 10 amp fuse installed. From there he followed my lead and installed 2 additional relays to handle the headlights on the same access panel. All wires were routed to and into the cabin under the with original harnesses.

I appreciate that not many have thought this extended effort necessary, however, this installation is both clean and reasonably transparent.

Hope this helps,
Ray(64BJ8P1)
It sounds like a really clean install! Thanks!
 

BJ8Healeys

Jedi Warrior
Country flag
Offline
My driving lights are mounted on a Moss badge bar with holes to accommodate the lights. I enclosed the wiring from the lights to behind the bumper in clear plastic tubing to protect them, then connected the two red power wires from the lights together so that there is only one wire going to the engine bay. I drilled a small hole in the lower shroud behind the bumper, installed a grommet, and ran the single red power wire through it into the engine bay.
I chose to install a single pole, double throw switch under the dash to control the lights: one position is to manually turn on the lights (for adjustment, or as daytime running lights), one to operate automatically with the high beams, and the central position is OFF. The wiring diagram is attached.

I have found that high beams nowadays are almost useless, since there is so much traffic at night -- even on two-lane back-country roads, that it's constantly necessary to switch back and forth from high to low. For me, it isn't worth the bother. I primarily use my driving lights as daytime running lights whenever I'm on a two-lane road.
 

Attachments

  • Manual and Hi-Beams.jpg
    Manual and Hi-Beams.jpg
    76.9 KB · Views: 287
OP
Patrick67BJ8

Patrick67BJ8

Obi Wan
Silver
Country flag
Offline
My driving lights are mounted on a Moss badge bar with holes to accommodate the lights. I enclosed the wiring from the lights to behind the bumper in clear plastic tubing to protect them, then connected the two red power wires from the lights together so that there is only one wire going to the engine bay. I drilled a small hole in the lower shroud behind the bumper, installed a grommet, and ran the single red power wire through it into the engine bay.
I chose to install a single pole, double throw switch under the dash to control the lights: one position is to manually turn on the lights (for adjustment, or as daytime running lights), one to operate automatically with the high beams, and the central position is OFF. The wiring diagram is attached.

I have found that high beams nowadays are almost useless, since there is so much traffic at night -- even on two-lane back-country roads, that it's constantly necessary to switch back and forth from high to low. For me, it isn't worth the bother. I primarily use my driving lights as daytime running lights whenever I'm on a two-lane road.
Where I live in East Texas the roads are very dark. Lot's of animals crossing the roads at night. I have headlights that have a separate 20 watt halogen bulb installed inside of them for daytime running. I got those from BCS.
 
OP
Patrick67BJ8

Patrick67BJ8

Obi Wan
Silver
Country flag
Offline
Hi Patrick,

Although I don't have my driving lights mounted as you intend, it was as recommended when I first purchased the car new. Not too long ago however, I did install my alternator and, soon after, off-loading the main power flow to my headlight and driving lights from my original wiring harnesses to new supplemental wiring harnesses and relays. To adhere to NJ laws, my driving lights can only be turned on when my headlights are on high beam.

Additionally, after using a driving light actuation switch mounted in my left hand dash support, and recognizing I had only used my windshield washer pump a hand full of times and now with its dry-rotted diaphragm, I installed my driving light switch inside and now press the button to turn on and off with all looking original.

Hear is a picture of my light installation and a wiring diagram presenting my:

View attachment 46856


All the best,
Ray(64BJ8P1)
What kind of stems does your lights have? Mine have chrome stems a couple of inches high and they would probably work fine attached directly to the splash apron and the wiring would be easier to hide. I had the Lucas 8(Cobra Lights) installed back in the mid '70's and they worked great but the flicker of the lights with the cars vibration was a little annoying. Someone also really liked my lights are they were stolen very soon afterwards. I installed a badge bar that only holds badges after that and even when I restored my Healey I didn't fill in those original holes. Maybe I have two options now, new badge bar with tabs for lights or using my existing splash apron holes.
 

Michael Oritt

Yoda
Gold
Country flag
Offline
My car came to me with a pair of 576's mounted through the apron with wires fed through the valance and up through the light stems. When I bought the car the lights were wired so that they would come on only when the high beams are selected. I chose flexibility and can put them on whether on high, low or no beam.

What the use for a switch and where to place it is always a question. The original owner of my car had separate Lucas rotary switches mounted between the tach and speedo on either side of the flasher--perhaps at one time he had one fog and one driving light and wanted to be able to choose either or both. I decided to put both lights on one switch and use the other one for an auxiliary electric fan.

The most discrete and least noticeable switch arrangement for auxiliary lights I have ever seen was devised by Kent Lacy--he chose to use the small sliding switch that regulates the instrument lights for his and they were simply energized along with side/head lights.
 

RAC68

Darth Vader
Offline
Hugh/Patrick,

Ray, how are your lights mounted?

Simple answer, through the splash pan.

In 1964, a supporting bar was created and mounted under the splash pan to the inside bumper brackets with set screws. Appropriately sized holes were drilled through the splash pan and support bar. 2" wooden donuts were initially created, later replaced by 2" plastic pipe end caps, to raise the driving lights sufficiently to clear the bumper. Since the original light screw mounting was not long enough to extend through the pipe cap, splash pan, and support bar, a simple pipe couple and extension pipe was added to secure each light.

Patrick, with the bar supporting the lights and pan, I have no vibration to cause light flicker. Additionally, power to the lights is through 3 light relays (as seen in the diagram) mounted on the inside of the passenger wheel well access panel and connected to the lights through weaver and fused wiring. As a result, I can install the highest wattage lighting available while reducing amperage flow on my original harness to a minimum as it serves for switching only.

As previously mentioned, driving lights are controlled through a push on/off switch mounted inside my original dash-mounted but very infrequently unused windshield washer pump. The driving light switch is Power from and when high beams are have been selected at the floor switch and if switched on, will direct power to switch on the driving light relay mounted along with the 2 headlight relays on the passenger wheel well access panel (per the previously posted diagram).

IMG_0655.jpgIMG_0636.jpg

Back then, it was not as concerning to modify the splash pan as all OEM parts were available and new cars were still being manufactured. However, today, I would have second thoughts and probably create and install a bumper stiffener bar mounted onto the 2 center bumpers brackets. I would then attach 2 created light brackets to the bar that ran up and back over the splash pan at the desired location for each light with a nut compatible to the light permanently attached. 2 plastic pipe caps cut to allow sliding over the bracket would be made and a rubber/plastic gasket added to the open bottom to eliminate potential pan vibration and scuffing. After installation of the bracket and cover, the lights can be screwed directly into the bracket with wires routed along the bottom of the bracket and run across the bumper stiffener and down the top of the passenger side bumper bracket into the car.

Hope this helped,
Ray(64BJ8P1)
 
Last edited:

steveg

Yoda
Gold
Country flag
Offline
Flexing/jiggling of lights is a problem if lights mounted on splash apron without suitable bracing.
I mounted mine through the splash apron. The brace is made from a 1/4" thick steel angle bracket from the home store:

DrivLampBrace.jpg


The black cap is a plastic furniture leg end cap, drilled for the wires.
Suggest using a hole saw for the apron itself. I used the large drill (for the bracket holes) and it made jagged holes.
 

bob hughes

Luke Skywalker
Country flag
Offline
Hope you can make sense of this, in essence the red and the purple wires stem from the solenoid and go down to the dip switch, then return and follow down the leg of the main harness. I have then encased the wires in a clear poly tube and run them down onto the cross member and from there they go onto the rear of the front shroud, fixed on with adhesive cable clips. At this point I have then split the wires down to thinner ones running to each of the driving lights along the legs of the bumper brackets and fixed again with adhesive cable clips. My PM to you was slightly incorrect regarding the bracketry ( senior moment) as you can see, the main brackets holding the badge bar are from angle iron fitted to the rear of the bumper brackets with the bracket bolts. The brackets holding the fogs are made from flat bar cut bent and welded to suite with legs going down to the bumper irons where each leg was bolted


OP
Patrick67BJ8

Patrick67BJ8

Obi Wan
Silver
Country flag
Offline
Hope you can make sense of this, in essence the red and the purple wires stem from the solenoid and go down to the dip switch, then return and follow down the leg of the main harness. I have then encased the wires in a clear poly tube and run them down onto the cross member and from there they go onto the rear of the front shroud, fixed on with adhesive cable clips. At this point I have then split the wires down to thinner ones running to each of the driving lights along the legs of the bumper brackets and fixed again with adhesive cable clips. My PM to you was slightly incorrect regarding the bracketry ( senior moment) as you can see, the main brackets holding the badge bar are from angle iron fitted to the rear of the bumper brackets with the bracket bolts. The brackets holding the fogs are made from flat bar cut bent and welded to suite with legs going down to the bumper irons where each leg was bolted


Great photos! Thanks. I ordered and receive the original red/yellow wire for the Light from British Wiring and they even had the "split sleeved bullets" too. I'll be cleaning up the Lights, rewiringbthem, and waiting for new splash pan which will have to be painted. Nice Light set you have....you can never have enough Lights!
 

Rob Glasgow

Jedi Knight
Country flag
Offline
I've attached some photos of how I eliminated the jiggles on the driving lights with the added benefit of having a method of making a fine adjustment to the aiming of the lights. The turnbuckles mount to the back lip of the splash apron and the bumper brackets.
I used 5 inch driving lights from Mini Mania instead of the the usual Lucas SLR. This is an homage to the first set of chrome tractor lights I installed back in 1964 when I couldn't afford the real deals. I grew to like the smaller size since they didn't overpower the looks of the front in my opinion. The silver mounting brackets under the lights are what's left of the original 1964 tractor lights.
 

Attachments

  • IMG_0073.jpg
    IMG_0073.jpg
    81.7 KB · Views: 179
  • IMG_0076.jpg
    IMG_0076.jpg
    29.5 KB · Views: 179
  • IMG_0428.jpg
    IMG_0428.jpg
    72.2 KB · Views: 327
Similar threads
Thread starter Title Forum Replies Date
J For Sale Lucas 75150A Wiper Motor Other British Classifieds 0
M Replacement of Lucas HA12 with Lucas SA12 Coil Austin Healey 6
L TRW-Lucas Brand Master Cylinders Austin Healey 2
R TR6 Lucas Starter 2M100 - Extra Part? Triumph 2
angelfj1 TR5/TR250 TR250 - Lucas 4ST Starting Solenoid-Mounting Location/Details Triumph 2
MGTF1250Dave T-Series Lucas Generator MG 1
T Lucas Flasher Unit Austin Healey 5
D Lucas Low-Tension Leads Austin Healey 1
Popeye General TR Connecting to Lucas switch grub screws? Triumph 5
Rob Glasgow Wanted Headlight Lucas Austin Healey Classifieds 4
H Lucas Starter Model for 3000 Mark II, BT7 Austin Healey 3
B Wanted Lucas wing mirror Other British Classifieds 1
B TR6 Swapped Lucas to GM alternator Triumph 9
AngliaGT For Sale Lucas Headlight - used MG Classifieds 0
J TR2/3/3A Early Lucas Ignition Switch Triumph 4
M Looking for Lucas parts catalogue British Motor Corp 13
AUSMHLY Lucas Generator C42 End Caps Austin Healey 3
B Delayed charging Lucas alternator Triumph 1
S Stag Lucas 18ACR alternator conversion Triumph 5
Lin Lucas coil question Austin Healey 8
red57 Lucas 1748 horns Austin Healey 19
B TR2/3/3A Lucas, SU, and the rest Triumph 3
K TR2/3/3A Who owns the "Lucas " brand name? Triumph 7
K TR2/3/3A Do Lucas distributor points still have the" Lucas logo" on them.... Triumph 4
K TR2/3/3A What vehicle is this Lucas voltage stabilizer from? Triumph 8
F How do I get rid of "Lucas"? FORUM Navigation Questions 2
T Which Lucas dynamo does a BJ7 have? A C45?? Austin Healey 6
F T-Series Lucas m133 headlamp? MG 2
S BJ8 Ignition Switch - Lucas Part Number? Austin Healey 4
S Intermotor or Lucas Sport Coil ? Austin Healey 14
C General Tech Lucas Fog Lamps Triumph 2
K TR2/3/3A What is the little white fiber thing for that comes in the Lucas points box? Triumph 2
R LUCAS 17L Batteries for Healey 100s Austin Healey 3
C TR6 More fun with Lucas Triumph 5
S TR2/3/3A Rebuilding Dr2 Lucas wiper motor Triumph 16
AUSMHLY Led headlight conversion kit with Lucas headlight bucket Austin Healey 37
Michael Oritt Lucas 576 lights Austin Healey 4
J MGC Lucas alternator/regulator MG 3
Rob Glasgow Weird Lucas Headlight Austin Healey 7
CJD General Tech Boeing using Lucas parts? Triumph 7
D Wanted lucas wt618 Triumph Classifieds 0
Basil SOLD!! Lucas Spot and Fog lamps Jaguar Classifieds 1
H Lucas Prince of darkness Austin Healey 4
NutmegCT Lucas 432 bulb Restoration & Tools 6
T Lucas HF 1748 horn parts Austin Healey 5
T TR5/TR250 Question on Lucas Hazard relay Triumph 14
T Installing a Lucas 16 ACR alternator on Bugeye Spridgets 10
M TR2/3/3A Moss Lucas elektrik alternator install? Triumph 5
A TR4/4A Lucas parts Triumph 7
TulsaFred Moss Lucas Control Box/voltage regulator Spridgets 4

Similar threads

Top