• Hi Guest!
    You can help ensure that British Car Forum (BCF) continues to provide a great place to engage in the British car hobby! If you find BCF a beneficial community, please consider supporting our efforts with a subscription.

    There are some perks with a member upgrade!
    **Upgrade Now**
    (PS: Subscribers don't see this gawd-aweful banner
Tips
Tips

It's Happeing, It's happening to Bugsy IV

Jim_Gruber

Yoda
Country flag
Offline
It's finally happening. Bugsy IV is getting his new engine and tranny installed by my buddy and fellow BE & Mini Owner Tim Bosse. I'm in the process of getting a house ready to go on the market in 3 weeks and decision was although I'd rather do this all by myself, showing a house with an immobile Spridget in the garage is probably not the best plan for a quick sale. Anyway a few pics of the process.


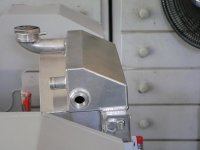
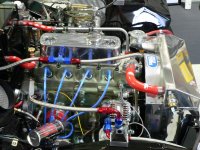
1) Engine now painted Healey Green instead of MG Colors. This is my rebuilt 1,326, Street Cam, Mild Porting, new damper pulley, LCB, Gerard's Rear Seal Kit and 5 Speed Kit with W Short Shift Kit, Aluminum Radiator, Revotec In Line Electric Fan Controller new Wiring Harness, Gear Reduction Starter, Alternator in a Generator Case from BPNW.
2) New Engine Back Plate Installed
3) Bugsy's 948 ready to come out. I knew this was a hot little 948 with a Cooper S Head on it, Cam, and HS-2's, but after header was removed you could really see how the Exhaust Ports were hogged out. Yes this one had been breathed on. Lew McCallan in Chicago is getting this engine for one of his BE's going to Elkhart Lake. Top the oil up and this engine will run just fine.
4) New engine with Rear Seal Kit, Clutch and Pressure Plate installed
5) Bugsy's old engine out and ready to go to a new home. I'll be over to help with Pressure Washing the engine compartment and the tranny tunnel, there is a bit of oil back there.
 
Excellent! That's going to be a fun drive for sure. :cheers:

Posts like this really get me motivated to get working on my Bugeye. It's currently 3rd in line, but I'm hoping to be back at it by winter.
 
Fun!!! I recognize Gerard's gear. Keep the reports coming...
 
Engine and Tranny are installed and Motor Mounts are bolted down. Starter was short 1/4" at footwell on Clearance. BFH fixed the issue/ and or Clocking the GR Starter. Don't know which yet but it's in.

Next Up - Replumb the Clutch Slave
Install Radiator and Fan
Connect up Starter
Install Alternator
Install Short Shift Kit
Go Drive and Smile
 
Went to visit Bugsy tonight. Engine is in and bolted down. A very tight fit with GR Starter and LCB Header not wanting to fit. Solution turned out to be a 1/4" steel shim under the PS Motor Mount. Gave enough clearance to allow GR Starter to clear the corner of the footwell by maybe 1/8" and LCB Header no longer hitting on the framerail but it is real tight on the PS. Starter is clocked and simply up against the corner of the footwell. Need a suggesting on how to fix. The BFH will not work well as it is right up against the corner. Other than notching footwell and welding piece in from behind or for that matter JB Weld a patch in place from footwell side. Need some thoughts gentlemen. Shim is resting against Motor Mount Rubber. Not sure this will work as a permanent solution.

Ran Flex line from Slave to home made Bracket bolted to Firewall. Will attach standard flared line to bracket for clutch. Have not worked out Bleeder arrangement Yet. May do the same way.

Shim was installed with Tranny bolted down tight, likely will need to add some washers at rear tranny mount to **** the engine a little more and keep driveline aligned.

Photo 1&@ GR Starter up against the cornerView attachment 53584View attachment 53585
Photo 3 - Shim under motor Mount Bracket
View attachment 53586

Photo 4 & 5 Engine Looking Nice and Clutch Hose Line Attachment
View attachment 53587View attachment 53588
 
Went to visit Bugsy tonight. Engine is in and bolted down. A very tight fit with GR Starter and LCB Header not wanting to fit. Solution turned out to be a 1/4" steel shim under the PS Motor Mount. Gave enough clearance to allow GR Starter to clear the corner of the footwell by maybe 1/8" and LCB Header no longer hitting on the framerail but it is real tight on the PS. Starter is clocked and simply up against the corner of the footwell. Need a suggesting on how to fix. The BFH will not work well as it is right up against the corner. Other than notching footwell and welding piece in from behind or for that matter JB Weld a patch in place from footwell side. Need some thoughts gentlemen. Shim is resting against Motor Mount Rubber. Not sure this will work as a permanent solution.

Ran Flex line from Slave to home made Bracket bolted to Firewall. Will attach standard flared line to bracket for clutch. Have not worked out Bleeder arrangement Yet. May do the same way.

Shim was installed with Tranny bolted down tight, likely will need to add some washers at rear tranny mount to tillt the engine a little more and keep driveline aligned.

Photo 1&@ GR Starter up against the cornerView attachment 53584View attachment 53585
Photo 3 - Shim under motor Mount Bracket
View attachment 53586

Photo 4 & 5 Engine Looking Nice and Clutch Hose Line Attachment
View attachment 53587View attachment 53588
 
Next Steps
Add a little more tilt to get more clearance
Finish Clutch Slave Line
Bleed Clutch
Connect up new alternator
Install radiator and Electric Fan and Revotec Fan Controller
Wire Up GR Starter
Rebuild Carbs and install,
Connect fuel Lines
Set Timing 16-20 degrees BTDC at Idle per Mickey Pleasant - Got a Street Cam installed - seems like a lot of advance to me
Button up Electronics -
Valvoline Oil VR-1 20W 50 Dino Racing Oil, Tranny Fluid 80-80 W
Pull Starter and see if we can get Bugsy to go Vroom, Vroom.
IF Tim has time could be this week or may need another week to finish. Getting Close
 
Jim,
How much starter engagement do you have on the ring gear? If you have enough to move the starter forward I would use a spacer vs cutting out the footwell. I would also change out your motor mount shim for one that fits the two bolts to help keep things together...don’t want that falling out!
Rut
 
Generally, the gear reduction starters will engage about half the ring gear, so shimming the starter will only prematurely ware the ring gear. I had the same issues and decided I didn't want to alter the body in any way so I notch the starter to clear the foot well. For the LCB headers easiest fit its best cut all the sheet metal back to frame rails on all sides. .

After you notch the corner of the starter you can then take your shim out!!!
 
Thinking two washers under each bolt to move the starter out to gain additional clearance. That may be all it takes. Will add washers to rear tranny mount to compensate for spacers on the Front Bolts.
 
Getting Closer and Closer to Vroom, Vroom time

Thoughts and Observations
Engine from Drivers Side

Plumbing for PCV installed, cross connected to Valve Cover. LCB Header under there as well
View attachment 53917

Nice New Radiator w Electric Pusher - Tried to install as Mechanical Fan delete but insufficient clearance, there is a new 6 Bladed fan back there along with a 180 degree thermostat. RevOTec Inline Fan controller located in lower hose automatically turns on Fan at 195 Degrees IIRC. Will install manual override as well. Connected to battery, electric fan will continue to run until temps drop down on shutoff
View attachment 53918

Engine Right Side - New Coil and 25 D Dizzy from Advanced Distributors
View attachment 53919
New Alternator from BPNW - They do not come with a fan but alternator in a Generator Case. - 2 Wire Connection. Anyone know doe this alternator need a bulb on the end as a trigger. Will follow instructions on Alternator Upgrades and Wiring to connect/bypass. New Wiring harness will await install until I pull thing apart for paint. The other question, if I run Generator Lamp to trigger charging, can I piggyback the LED in my Speedhut Gauges to turn on as well?

View attachment 53920
No Vroom, Vroom yet. Still need to wire Alternator , Check GR Starter connections. But close, likely ready by next weekend.

Clutch with 3/4 Master from Gerard really goes down very easy. Feels totally different. Clutch engages just about an inch off of the floor. Have not driven or started engine yet. Clutch is bled and can see clutch arm travel but seems like clutch pedal works too easily. Thought Gents.


New Short Shifter from Gerard has almost rifle bolt action. Can't wait to try that out. Still in the car making vroom, vroom noises. Will be interesting to see how it feels. The nice engraved g on the polished shift knob can also stand instead of Gerard for Gruber.

Vroom, Vroom Noises soon!!! New Engine, New Tranny, Rebuilt Carbs, New Dizzy, Short Shifter Kit, 5 Speed, 1,326 w LCB Header, Mild Cam, Some Porting, 3.9 Rear End, Front Discs and Later Backing Plates, Sway Bar, JBL 8 Spoke Wheels 175 x 80 x 13 Tires, Speedhut Gauges, Still to come OEW Paint, Red Interior and Carpet, new Red Top. It's going to be a blast.
 
I think that your heater pipe will interfere with your filler neck. Had the same issue with the Griffin. They manufactured the tank 90* to core and that causes the filler neck to be tilted down instead of level. Ended up with a Sereck.
 

Attachments

  • P1030502.jpg
    P1030502.jpg
    34 KB · Views: 107
  • P1040147.jpg
    P1040147.jpg
    94.4 KB · Views: 106
Even the stock radiator is close to the heater pipe there. So, you might have an issue.
 
Thanks guys, as Bugsy is moving to Tampa May not be an issue but want to make sure I have as an available option. Will take a look. May need to modify heater pipe for clearance with some piece of hard copper pipe with a bend in it to gain some clearance.

any thoughts on the clutch seems to easy to depress question. I can see clutch fork movement in the first inch of travel off of the floor. Possibly some air still in the Line?
 
Remind me again of the slave size and master size.

My midget with a five speed is the same way. Now that I'm used to it, it makes no difference. I've been driving it that way for almost 15 years.
 
JIm,

You really can't judge the clutch feel until you've driven the car a bit. If you are used to the 7/8"master-7/8" slave, you won't feel that hard of a pedal in comparison. I could be wrong, but my recollection is that you used the 1" slave, which will give you quite a soft pedal. That combination was made in later Spridgets and intended to make the car more appealing to female buyers. Based on my experience, my opinion is that the 3/4" master and 7/8" slave is the best combination, but it will work just fine with the 1" too. You may also still have some air in the line.

Thanks guys, as Bugsy is moving to Tampa May not be an issue but want to make sure I have as an available option. Will take a look. May need to modify heater pipe for clearance with some piece of hard copper pipe with a bend in it to gain some clearance.

any thoughts on the clutch seems to easy to depress question. I can see clutch fork movement in the first inch of travel off of the floor. Possibly some air still in the Line?
 
Bugsy went Vroom, Vroom just after 1:30 today I just learned. Good oil pressure, No leaks, electric fan working. Tuning and tweaking needed, loud very loud w no muffler on yet. A great day. And me with no time to drive him until after house goes on market on Monday. Oh well supposed to rain next 4 days
 
Congrats again, Jim!
 
Back
Top