• Hi Guest!
    You can help ensure that British Car Forum (BCF) continues to provide a great place to engage in the British car hobby! If you find BCF a beneficial community, please consider supporting our efforts with a subscription.

    There are some perks with a member upgrade!
    **Upgrade Now**
    (PS: Subscribers don't see this gawd-aweful banner
Tips
Tips

HUS 2 main jet adjustment

sim

Jedi Trainee
Country flag
Offline
Hi I have the cabs installed 948. Running lean Checked for vacuum leak using carb cleaner. I have the vacuum line plugged at this time. The adjusting nuts are 6 to 10 turns from the top. Still runs about 1500 RPM. I can drop idle to around 850 by spraying a tad of carb cleaner into the carbs. I do not know the size of the jets. Is there a number stamped on them? Any suggestions. I can get a Movie of it tomorrow
Thanks
 
The jets on HS2s are typically 0.090" inside diameter. There are 0.100" jets but they are typically used with larger carbs, not HS2s. The needle is what changes (not the jet) and that may have a two or three digit/letter identification stamped into the mounting shoulder... so you won't be able to see it without removing the needle. Unless you have made major changes to the engine since it last ran on these carbs, the existing needles should be OK.

There is an order of steps to carry out when tuning SUs and it sounds like you need to start from scratch. I hate to sound like I am not willing to help but read through the steps in your service manual or visit the Burlen web site to read through their online documentation on tuning SUs.
https://sucarb.co.uk/technical-hs-type-carburetter-description-adjustments

Before making the mixture adjustments make sure that the carb is mechanically set up (jet centered, piston operates freely). Bring the engine to operating temperature before starting to make mixture and tuning adjustments. Make sure both choke and throttle linkages are disconnected and loose (completely loose) before starting to make mixture adjustments.

That said, when did the engine last run correctly and what has changed that you are now dealing with mixture adjustments and tuning?
The change was for Su H1 to HS2 I will read through the info thanks very much
Rod
 
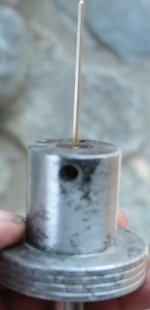
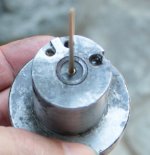
Img_1708.jpg I am having a time trying to remove the needle from the body. I have heated it several times. cooled it with carb cleaner and it still will not move. This is the spring loade needle for self centering. Any suggestions?


Img_1707.jpg
 
I'd be willing to bet that there is nothing wrong with the carb needle. If you do not have an air leak in your intake i would bet that the carb butterflies are not closing enough at idle. Personally, the air leak is what I would suspect.

Kurt.
 
I'd be willing to bet that there is nothing wrong with the carb needle. If you do not have an air leak in your intake i would bet that the carb butterflies are not closing enough at idle. Personally, the air leak is what I would suspect.

Kurt.
I will check again for air leak. I did rework the butterflies to get them as they should be. One other note the front carb seem to be working just fine. so this should indicate that the needles are ok. Is it possible to center the HS2 jet? I think they are self centering . The damper drops with a clunk.
 
If damper drops with a clunk they are centered. From what was said you have a butterfly valve that is not closing or maybe is in backwards?
 
If damper drops with a clunk they are centered. From what was said you have a butterfly valve that is not closing or maybe is in backwards?
So how can one tell which way is top and bottom and front and back?
From the exhaust it looks like it is running rich
 
I do remember seeing your other thread about the butterflies (HS2 Rebuild). You would know if the butterfly is backwards. The edges are beveled so if you put it in backwards it REALLY won't close.

A leak around the butterfly is not like the external leaks you can find by spraying things on the carb flanges and intake manifold... this would be an internal leak. If after your last thread you re-positioned the butterfly you won't have a leak around it.

If you have the spring loaded needles you typically do not center the jet. With those carbs the jet does not have lateral adjustment. As for removing the needle, obviously you remove the set screw from the side of the piston. Spray penetrating oil on the steel collar around the needle. Then try your heat cycles again replacing the oil as it evaporates or burns off. Finally tap the steel collar with a small flat faced punch. Tap gently working your way around the collar. You want to shock the joint to get the penetrating oil to work into the gap. It is likely to be corrosion between the piston and collar that is holding the jet in place.
I must have the bevel on the wrong side. thanks very much on the advice on removing the jet
 
Take a look at your problem carb comparing it to the butterfly pictures at the bottom of the page linked below. The page is for a BMW motorcycle so the carb is not an SU but the page owner is illustrating in the pictures what a butterfly will look like if installed backwards. The SU would look about the same.
https://bmwmotorcycletech.info/bingcv.htm

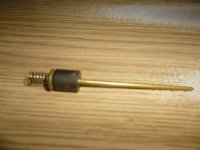
Concerning the carb needle, the image below (if the link works) shows what you are dealing with. The black collar around the needle is steel. Behind it is the spring and a flange on the needle. The steel has a tendency to corrode a bit and stick to the piston. Cycles of penetrating oil, heat, and gentle tapping with a small punch will eventually loosen it so you can remove the needle. However, before you decide you have to get this needle out... measure it. Use calipers to Measure its diameter every 1/8" down from the piston face. Write your numbers down and then repeat this for the other carb and its needle. If they are the same (likely if they were a matched pair when you bought them)... and if the needles are free to swing and do not have obvious score marks... leave the needles alone... at least for now.

P1100266.JPG
 
Take a look at your problem carb comparing it to the butterfly pictures at the bottom of the page linked below. The page is for a BMW motorcycle so the carb is not an SU but the page owner is illustrating in the pictures what a butterfly will look like if installed backwards. The SU would look about the same.
https://bmwmotorcycletech.info/bingcv.htm

Concerning the carb needle, the image below (if the link works) shows what you are dealing with. The black collar around the needle is steel. Behind it is the spring and a flange on the needle. The steel has a tendency to corrode a bit and stick to the piston. Cycles of penetrating oil, heat, and gentle tapping with a small punch will eventually loosen it so you can remove the needle. However, before you decide you have to get this needle out... measure it. Use calipers to Measure its diameter every 1/8" down from the piston face. Write your numbers down and then repeat this for the other carb and its needle. If they are the same (likely if they were a matched pair when you bought them)... and if the needles are free to swing and do not have obvious score marks... leave the needles alone... at least for now.

View attachment 34132
Thanks very much. I will let you know what i find
 
Need we mention that some butterflys have a pop valve built in them to prevent backfires or something. Remove the valve and soldier the opening.
 
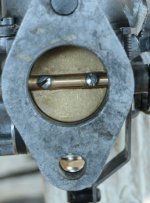
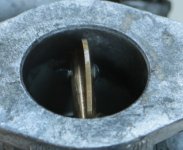
Img_1709.jpg Looks like I have the bevel facing the correct direction Any suggestions?Img_1710.jpg
 
Hard to tell from the pic but it looks like the butterfly is not fitting snug on the bottom like it should, loosen the screws mess with it till it fits tight all around and tighten screws. Tis the bottom that concerns me.

But I been wrong before.
 
Yes, it look's like the butterflies are in the correct way but they should close up better than the closed photo show's. Is that possible? They should hardly let water run through when closed.

Kurt
 
What they're saying is the plate has to be perfectly centered before you tighten the screws. So loosen them just enough so you can move the plate a bit then close it, letting or making the plate slide until it closes all the way. Then tighten the screws.
 
Up date
I reworked both throttle plates. When fully closed it is very hard blow air through using my mouth and lungs as the test equipment.
I started with the jets flushed with the inside of carb. I am now about 2 turns out. It now has a pulsing idle My guess on the range is 800 to maybe 2000 rpm. At the low end it is more of a pop pop than a purrr. I think the needle size should be leaner..
One jet seem to be weeping a little gas into the carb after shutdown. Any ideas as to what is next?
thnaks
rod
 
Up date
One jet seem to be weeping a little gas into the carb after shutdown. Any ideas as to what is next?

The float bowls should be level when installed on the intake manifold. If they are not, let us know.

The fuel weeping into the carb may be an indication that the float valve on that carb is not completely closing. When you remove the suction chamber from the top of the carb, you should be able to look down into the jet and see gas but the gas should not be at the top of the tube. If the float valve is leaking, that could also be affecting the idle.
 
Back
Top