• Hi Guest!
    You can help ensure that British Car Forum (BCF) continues to provide a great place to engage in the British car hobby! If you find BCF a beneficial community, please consider supporting our efforts with a subscription.

    There are some perks with a member upgrade!
    **Upgrade Now**
    (PS: Subscribers don't see this gawd-aweful banner
Tips
Tips

How to adjust the front suspension of a BN6

BN6_2197

Jedi Trainee
Country flag
Offline
Gents,

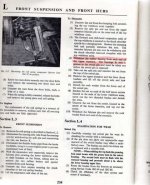
I observed that the distance of the top wishbone arms from the shock absorber is less than 1 inch. This also would explain the unexpected distance of the front wheels to the front wings. According to the workshop manual Fig. L.7 the distance should be equal to 2 inches.

Can anybody tell me how to adjust it? With a lot of power I am able to raise the top wishbone arms to get this distance. But unfortunately it does now stay stable as soon as I loose the power ;-)

Cheers,

Volker
 
There's no adjustment there. Are you sure you don't have the trunnion installed 180 degrees out? Take a look at the illustration here and note the correct position of the trunnion (item 45): https://www.mossmotors.com/Shop/ViewProducts.aspx?PlateIndexID=28887 The only other possibility I can think of is someone installed an eccentric trunnion bushing to make the camber adustable, but that's probably a long shot. Good luck!
 
IMG_1403.jpg
 
Last edited:
Your picture isn't showing up (practice in the test forum until you figure it out) but the front suspension should look like this (MKIII with disc brakes, but otherwise the same as your BN6).

IMG_2583.jpg


The 2" space referred to in the manual, is part of the process for setting up the clearance in the outer/lower pivot pins (they're threaded, so movement up/down must not bind/must not be too loose); this process is done without the spring fitted.

IMG_2551.jpg
 
Randy, this is the picture of the workshop manual I am referring to. I have the coil spring removed and plan to detach the swivel pin from the top wishbone arms. Once done I want to place a 2'' distance peace as shown in your picture. At this state it is unclear for me what has to be done that the distance can be kept even if swivel pin and the coil spring have been assembled.
 
You're thinking too hard; you only use that 2" distance to set the threaded bushes at the bottom of the king-pin. They must be set to allow the the suspension to rise and fall (threading the bushes on and off as the A-arm goes up and down). Once that is set, you're done with the 2" spacer, and yes, the suspension will droop afterwards, until the spring (and the rest of the parts) are reassembled.
 
Randy, may the distance be less than 2'' after the the swivel pin and the coil spring has been assembled? That means less than 2'' distance in the completely assembled state?
 
When fully assembled and resting on the ground, the distance between the upper A-arm and shock absorber mount on my BN4 is a bit more than 2", maybe 1/16" to 1/8".
 
Hi Volker, The 2" distance piece is a gage. In the Bentley Shop Manual, page - 237, Section L.5, subsection "To Replace", it explains that the 2" distance piece is used to raise the shock arms to that given height before you tighten the fulcrum cross bolt (pin). You do this during your final assembly of the suspension system with the spring in place. It explains in the book that your are to assemble the fulcrum pin and not tighten it right away. When you have everything fitted as you want it, then before you tighten the fulcrum bolts, you jack the suspension up with a jack under the lower "A Frame" or "Wishbone" which will raise the whole system up including raising the shock arms. You jack it until you can get The 2" distance piece in place as the picture shows. Slide the distance piece in there. Then lower the jack alittle to let the suspension rest on the distance piece. What this does is positions the bushing in a relative place in the upper trunion before you tighten the "Upper Trunion Fulcrum Pin. That way when the suspension is in motion during normal driving the rubber in the bushing is not stressed as much by excessive twisting. This helps to prolong the service life of the bushing. When you are finished with this process REMEMBER TO REMOVE THE DISTANCE PIECE. IT IS JUST A GAGE. Dave.
 
Dave, now I understood the procedure very well. What I still not got is: what hinders the upper wishbone arms to lower less than 2''? is there something I must tighten (e.g. at the lower sihbone arms) to keep this distance? Volker
 
Dave, now I understood the procedure very well. What I still not got is: what hinders the upper wishbone arms to lower less than 2''? is there something I must tighten (e.g. at the lower sihbone arms) to keep this distance? Volker

No. The shock ('upper wishbone') arms can fall below 2". There are half-round 'pads' on the arms, and they will come to rest on the rubber buffers bolted to the shock plates (item# 10 on this diagram: https://www.mossmotors.com/Shop/ViewProducts.aspx?PlateIndexID=28887&SortOrder=240 ).

These should be installed before the shock (damper) is bolted down; if you forget, you can slot the metal backing plates on them to get them under the bolt heads (think you have to use shorter bolts as well).
 
So it is not a MUST that the clearance between the upper wishbone arms and the mettal plate of the shock absorber is still 2'' when all is fully assemled and the car is on the ground as John posted earlier iin this thread?

When fully assembled and resting on the ground, the distance between the upper A-arm and shock absorber mount on my BN4 is a bit more than 2", maybe 1/16" to 1/8".

By the way: any hint how to remove the trunnion (suspension link) from the swivle pin? I cannot remove it easily after the upper swivel pin nut has been detached.
 
I sometimes take the picture from Moss

https://www.mossmotors.com/Shop/ViewProducts.aspx?PlateIndexID=28887

Remove 14 / 15 to take away the load from the spring

Remove 52 / 73
Hold 70 or 68
Turn 68 or 70
Remove one or both
Remove 65
lower 48

The 2" block is to prevent the shockabsober being pulled down to much with the wheels up in the air
Without the block the full load is on the one tiny rubber bumper
With the wheels on the ground the load is on the shockabsober as it is designed

I remember having a manual in German somewhere ... do you (want to) have one ?
 
I disassemled the swivel pin from the top, i.e.

* Remove 14 / 15 to take away the load from the spring
* Remove 41-43 (fulcrum pin)
* Tilt the swivel pin outward to be able to access 49 (nut of the swivel pin)
* Remove 49 (nut of the swivel pin)

Now I want to know how to remove 45 (the trunnion). I expected to be able to just take it of, but it wasn't.

"BigGreen", if you have an electronic copy of the German manual I would really appreciate to receive it.
 
When I removed 49 on my car, I put a long iron through the hole with the rubbers in place
Edit; see remark by Vette under this post.
I removed the bolt and rubbers and put them back not to damage the iron

Then tried to turn it, and gave it a good wack with a hammer.

The book is a paper copy, and unfortunately for a BJ7
Does not differ very much from a 6, but not the right one

BigGreen aka Hans
 
Last edited:
Take the bushing out before you try to remove the fulcrum.
 

Attachments

  • img195.jpg
    img195.jpg
    44.1 KB · Views: 130
Dave, ...... What I still not got is: what hinders the upper wishbone arms to lower less than 2''? is there something I must tighten (e.g. at the lower sihbone arms) to keep this distance? Volker
Volker, The suspension geometer is what it is. The 'A' arms will ride at a specific height or angle based on the weight of the car, etc. they may be angled down alittle from horizontal, or at horizontal or maybe alittle up from horizontal (which is a bit unusual). The dememsion you are concerned about is not important. the 2" spacer or gage is to get the bushing tightened up at an approximate position to the angle that the arm will be at when the car is flat on the ground. If you put the car on the ground, and push up and down on the fender and make the car bounce, that angle and distance will be changing all the time. .... Bolt her up and git 'er going! :smile-new: Dave.
 
Take the bushing out before you try to remove the fulcrum.
Dave, it is easy to execute step 5 including. But I am not abel to remove the trunnion. It is hard to turn it and removing it is impossible. Did I miss something? I thought that this should be an easy job. Volker
 
Back
Top