
-
 Hey Guest!
British Car Forum has been supporting enthusiasts for over 25 years by providing a great place to share our love for British cars. You can support our efforts by upgrading your membership for less than the dues of most car clubs. There are some perks with a member upgrade!**Upgrade Now**
(PS: Upgraded members don't see this banner, nor will you see the Google ads that appear on the site.)

Tips
- We have a special forum called "Member Articles" where you can submit actual articles for consideration for publication. Learn More
- Don't have an Avatar? If not, your avatar will default to the 1st character in your username. Go into "Account Details" to change your Avatar.
- Some basic forum navigation info: click
 Hey - did you know if you click on the title of a thread it will take you to the first unread post since you last visited that thread?
- Hey Guest - Is your British Car Club in our Clubs database? If not, send me a PM - Basil

- Looking for a local club? Click the "Clubs" tab above and browse hundreds of clubs world-wide.
- Add Android or iPhone APP: click
- Did you know - any picture or video you add in your posts in any marque-specific forum will also get added to the Media Gallery automatically.
- A few more tips about posting and replying: click
- Hey there Guest - be sure to keep your profile page up to date with interesting info about yourself: learn more
- More tips and tricks on Posting and Replying: click
 but were afraid to ask:
  STOP!! Never post your email address in open forums. Bots can "harvest" your email! If you must share your email use a Private Message or use the
  smilie in place of the real @
- Want to mention another member in a post & get their attention? WATCH THIS

- So, you created a "Group" here at BCF and would like to invite other members to join? Watch this!
- Hey Guest - A post a day keeps Basil from visiting you in the small hours and putting a bat up your nightdress!
- Hey Guest - do you know of an upcoming British car event?
 Pretty Please - add it to our Events forum(s) and add to the calendar! >> Here's How <<
- Hey Guest - you be stylin' Change the look and feel of the forum to fit your taste. Check it out
- If you run across an inappropriate post, for example a post that breaks our rules or looks like it might be spam, you can report the post to the moderators: Learn More
- If you would like to try some different "looks" or styles for the site, scroll to the very bottom, on the left and click the Style Selector.
You are using an out of date browser. It may not display this or other websites correctly.
You should upgrade or use an alternative browser.
You should upgrade or use an alternative browser.
TR2/3/3A Here We Go!
- Thread starter CJD
- Start date
OP
CJD
Yoda
Offline
12 hours over the solvent tank this weekend. When I'm done with this tranny I never want to see another solvent tank in my life.
I had learned to take many things for granted. I thought oil is a liquid that makes parts move easily...nope. It is a solid that holds every bearing locked and every shaft welded. Many times I had to stop and reference pics and diagrams to make sure that I was holding 2 parts that should come apart instead of a single part. I broke every lock ring plier I have trying to free welded lock rings.
There is no way this started as 30W oil.
But, the good news, all is cleaned except the OD case. It will soak all week before I try to clean it.
OP
CJD
Yoda
Offline
I spent the evening studying pics about the overdrive internals. I learned that the planet gears have roller bearings. Bummer. With the ball bearings I had to soak them and scrub for an hour. Then one race would break free, but the balls remained locked in the cage, so I had to soak, scrub, and rotate the bearings at least another hour to get them to actually roll.
I now know I will have to dis-assemble the planets to ensure the needles are loose, otherwise it could be bad if they slide at start up and flatten a side.
Anyone have a trick for getting the lock pins out? They press in, but have no way to remove without drilling from what I can tell...
I now know I will have to dis-assemble the planets to ensure the needles are loose, otherwise it could be bad if they slide at start up and flatten a side.
Anyone have a trick for getting the lock pins out? They press in, but have no way to remove without drilling from what I can tell...
OP
CJD
Yoda
Offline
I'm not dealing with any rust, but Steve your post got me thinking. I used the torch to heat the parts to about 250 degrees and the glue turned to liquid. That allowed me to get the bearings rolling again. It also freed the stuck pistons and their rings. That was the easy part. After heating the blob gets stickier than snot...so everywhere it touched on the housings it stuck again, which then had to be cleaned...again.
Anyway...heat is the ticket to freeing this goop.
The good news is that everything is apart and there are no broken parts. I am not happy with the feel of the big bearings, so those and new snap rings should get me back in gear, so to speak.
Anyway...heat is the ticket to freeing this goop.
The good news is that everything is apart and there are no broken parts. I am not happy with the feel of the big bearings, so those and new snap rings should get me back in gear, so to speak.
OP
CJD
Yoda
Offline
I've been studying the Laycock overdrive manual and found this statement:
"The oil in the overdrive is common with that in the gearbox. The oil to use is ordinary mineral oil in the following grades :
Normal summer climates — S.A.E.30
Normal winter climates — S.A.E.20
Under no circumstances should extreme pressure gear oils be used, because the centrifugal effect of the planets may separate some of the additives from the oil and cause sludging. "
I see no way 30w oil could harden like I see in this OD. I'm thinking thick gear oil was used by the PO.
OP
CJD
Yoda
Offline
Well, I find myself posting to myself ...again. On the Lockheed dif I got several PM's wanting to know what happened, but I had quit taking pics for what I thought was lack of interest. I know some of you are interested in this. So for those members...here are some before pics of an OD rebuild.
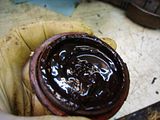
This is how bad the gook is. This shot is the inside of the large oil drain plug.
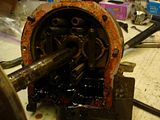
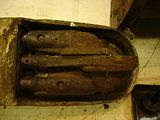
This shot is how an OD looks coming off the tranny. There is an adapter plate that attaches the OD to the back of an otherwise normal transmission. You can almost see 8 pencil sized springs. These push against the adapter plate and release the OD clutch.
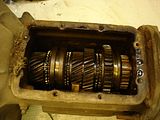
This is the top of the tranny after the top is popped. Not bad. All the goo hides below! The same oil is circulated between both the OD and tranny. Trannies are full of metal chips from every time you miss a shift, so a filter in the OD (the one I'm holding above!?!) keeps the chips out of the precision OD hydraulics
This is the underside of the top. Of interest, the TR 2 top has every single nut and set screw safety wired. Good thing I have a set of aviation safety pliers for the rebuild...

This is how bad the gook is. This shot is the inside of the large oil drain plug.
This shot is how an OD looks coming off the tranny. There is an adapter plate that attaches the OD to the back of an otherwise normal transmission. You can almost see 8 pencil sized springs. These push against the adapter plate and release the OD clutch.

This is the top of the tranny after the top is popped. Not bad. All the goo hides below! The same oil is circulated between both the OD and tranny. Trannies are full of metal chips from every time you miss a shift, so a filter in the OD (the one I'm holding above!?!) keeps the chips out of the precision OD hydraulics

This is the underside of the top. Of interest, the TR 2 top has every single nut and set screw safety wired. Good thing I have a set of aviation safety pliers for the rebuild...

OP
CJD
Yoda
Offline
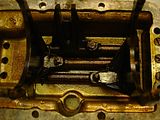
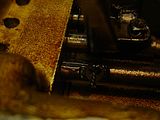
This is the underside of the top where the shifter hand lever engages the shift rods. You can see the top lever is out of alignment. The blob had locked the tranny into reverse. And that is the reverse rod. It took a lot of pressure and time to loosen these rods. They were also corroded. The top of the tranny sits dry, while the bottom is full of oil. So all corrosion is limited to parts at the very top.
The shift rods where they enter the inside of the tranny. Lots of black goo, but of note is the shift fork set screws are all safety wired.
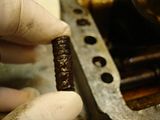
The shift rods use springs and balls to catch detents in the rods, which locks the rods in...or out...of gear. There is a shuttle rod that prevents more than one gear engaging at one time. I haven't removed the shuttle yet. This spring shows how bad everything is glued together in my tranny...
This is of interest. The TR2 OD only engages in 4th gear, so there is only one interlock switch and no cast bosses for engagement in 2nd and 3rd like later OD's. So the TR2 cover is unique.

The shift rods where they enter the inside of the tranny. Lots of black goo, but of note is the shift fork set screws are all safety wired.

The shift rods use springs and balls to catch detents in the rods, which locks the rods in...or out...of gear. There is a shuttle rod that prevents more than one gear engaging at one time. I haven't removed the shuttle yet. This spring shows how bad everything is glued together in my tranny...

This is of interest. The TR2 OD only engages in 4th gear, so there is only one interlock switch and no cast bosses for engagement in 2nd and 3rd like later OD's. So the TR2 cover is unique.

OP
CJD
Yoda
Offline
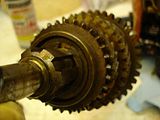
The usual order for disassembly is to remove the input shaft and bearing first. Then take the gears off the main shaft so the shaft can be pulled out the rear. That wasn't possible. I undid the large snap ring around the center bearing and then pressed the shaft fully assembled out the front. This makes assembling the shaft easier...so I think I will rebuild in this new order.
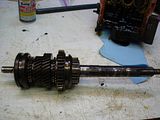
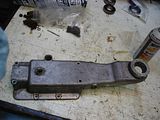
This is the only damage I have found. One dog tooth is broken off of the 3rd speed gear.
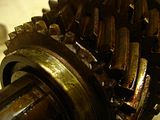
This is that nasty snap ring that holds all the gears on the main shaft. It is truly a pain to remove, and especially to reinstall. I now buy 3 so I have spares when I screw it up.

This is the only damage I have found. One dog tooth is broken off of the 3rd speed gear.

This is that nasty snap ring that holds all the gears on the main shaft. It is truly a pain to remove, and especially to reinstall. I now buy 3 so I have spares when I screw it up.

M_Pied_Lourd
Darth Vader
Offline
Hi John,
Been watching with interest. Keep up the posts please.
Cheers
Tush
Been watching with interest. Keep up the posts please.
Cheers
Tush
TR4nut
Yoda
Offline
I just want to make sure...is there no gasket on either side of the iron brake ring? Just sealant where the ring meets the case?
No gasket at all there John. I put on sealant though as it looked like an obvious leak location without it.
TR4nut
Yoda
Offline
Anyone have a trick for getting the lock pins out? They press in, but have no way to remove without drilling from what I can tell...
I've not learned the trick if there is one, I think a drill is typical. I though if you could manage to take a needle nose or some clamp to the pin you could try and tap them out but there isn't much room at all there.
HerronScott
Darth Vader
Offline
Definitely like to see your progress. I can't believe the sludge that the oil (or whatever fluid it is) turned into.
Thanks!
Scott
Thanks!
Scott
Oddly enough, the service manual states that "jointing composition should not be used". I have always used sealer between the brake ring&housing. Of course the OD still leaks somewhere.No gasket at all there John. I put on sealant though as it looked like an obvious leak location without it.
Berry
OP
CJD
Yoda
Offline
Thanks to all for the tips and suggestions! Our forum had gotten so slow on the TR2/3 side I was worried everyone left. Glad to know you're still there...
I think I dodged a bullet on the planet gears. Using heat I am confident I have loosened the rollers without having to remove the planets. Before I started with the heat, the planets just kinda' stopped short when I tried to spin them. Once I got the rollers free, they continue to spin for some time. I think I can even hear the little roller rattle now, so I'm happy with not taking them further apart.
Randy, Berry...Thanks. I looked and you guys are right. No gasket on the brake ring, and the Laycock manual specifically states to use no sealant. I don't think I could bring myself not to use sealant! I'll try the permatex 518...
OP
CJD
Yoda
Offline
I've just about gotten all the parts lined up for reassembly. There is one part about the OD operation I am still fuzzy about.
There is a "non return valve" between the oil pump and the accumulator. This allows the oil under pressure to pass from the pump to the accumulator, and it prevents leakage back to the pump. What I don't understand is that there is no valve between the pump and the sump. So, what allows the oil to enter the pump cylinder yet not get forced back out to the sump?
It seems there should be a second one way valve between the sump and the oil pump...but I don't see one.
Edit...
Studied the Buckeye article closely, and it answered my question.
https://www.buckeyetriumphs.org/technical/AOD/AOD1/AOD1.htm
It seems the pump stroke is only .15 inch. An oil inlet slit in the cylinder is .05" wide, which leaves a usable pump stroke of only .1". So, after pushing the oil out through the non return valve on the down stroke, the piston only has to draw a vacuum for .1" on the up stroke before it uncovers the inlet slit.
I pictured a much longer stroke that would require some kind of check valve for the pump inlet. It seems the stroke is so short that it cannot draw enough vacuum to lock the piston before the inlet is uncovered. Interesting...
That was the last mystery I had for the A type OD. It's really a very simple mechanism. I'll photo document the reassembly and show how it works.
Last edited:
OP
CJD
Yoda
Offline
Here is another interesting find...my OD is model 22/1374. Everything I've read says it should be the 22/1275 on TS5248. The 1374 was supposed to come about 400 numbers later. I thought briefly that it had been swapped, but but it is not completely a 1374. It has the larger, 1-3/8" actuating pistons, but still has the large 1-1/8" accumulator piston with a single spring. The 1374 was supposed to have a smaller accumulator with an inserted housing to hold it. Everything else, inside and out matches the 1275, including the valve balls and sump plug. So, I assume it's another case of Triumph's "fuzzy" changeover points.
John, I urge a bit of caution on using any sealant on the brake ring. I have one partially disassembled unit that has been on my shelf for decades. I can see the sealant around the brake ring. I tried everything except soaking the whole thing in methanol, or MEK, or ether. It will probably take a brew of all of them and have to sit for months. Those pieces are machined to an interference fit and out of the dozens I've seen I've never seen a real leak. Almost all have a stain but no wet places, maybe partly based on how light weight of an oil was being run. But if there are some gouges from previous disassemblies then yes use a dab on the bad spots. If you're still wanting to use some just go light and maybe apply a thin coat of the permatex aviation sealant with small stiff artists brush and just a brush width.