• Hi Guest!
    You can help ensure that British Car Forum (BCF) continues to provide a great place to engage in the British car hobby! If you find BCF a beneficial community, please consider supporting our efforts with a subscription.

    There are some perks with a member upgrade!
    **Upgrade Now**
    (PS: Subscribers don't see this gawd-aweful banner
Tips
Tips

TR2/3/3A Help, I am stuck, or think I'm stuck

I took last week off because it was too darned hot. I mean, like HOT X(

When it is hot you make mistakes. I am at a point right now where any mistakes I make will and can be devastating. Well, if I weld it down before checking it.

I did finally get on the lift. It really helps with the body mounting. My back still hurts from trying to shove and align the tub. I also had to help Dad get his TR back into the garage. He had started it (hard to get going) and backed it out so we could push mine around and onto the lift. It's facing the wrong way, but I don't care. His didn't want to start back up again later (he thinks the plugs are toast) so we had to push it back in, and now it sits where mine used to.
The PO, or maybe the PPO, or a combination of the two, filled in the front bolt holes on the original floor pan. There was braze in there as well as bondo. Got rid of the bondo, might have to live with the braze (its a very tiny amount next to my newly made bolt hole).
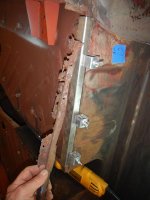
I am re-reading the above and cross-post on the other sight to make sure I have my ducks in a row. My kick panel area is nearly perfectly aligned and gets better if I clamp it down. I am planning on putting a few sheet metal screws to keep it aligned on the sill, spot weld, then grind off the heads/points after. The sill is new, but the kick panel isn't and the edge of it has gotten a little bunged up. We test fit the rockers and used a large furniture clamp to pull the rear tub forward and close up some gapping there. It's all clamped down waiting for me to get my confidence up to weld it. I do know a guy who could probably come over and do it for me if I chicken out. But I won't.

John, followed your directions to the letter, and even "dry fitted" the rocker panels. I'm rather excited to jump in and tack it in place, but won't. I want to double and triple check my measurements. I did reinstall the PS door to check my gaps. That was the last thing that I did today. I didn't even put the striker plate in though, just looking at what I have to deal with.

SP, thanks for your input. As for taking the tub back off, I thought that I would have better access to things internally with the car. The way our shop is set up, it would be quite easy to lift the tub off the frame (assuming it was all square and tight) and park it near the ceiling. If my frame, or running gear was in need of any work, I would be more inclined to do it without the body in the way. With the car on the lift today I could see how much work the PO (God rest his soul) did on it. Everything under there is clean and nice and rebuilt. Frame is shiny black and brake lines, are new. I forgot to look for the fuel line but can check again on Tuesday. Even the hubs and brakes are shiny and new (looking). We don't have an engine hoist unfortunately so the thought of installing it on the frame first has it's appeal. As far as paint is concerned, it will happen eventually, fairly soon at the rate I can go once this hurdle is crossed. Since there is little if any coating on the bottom of the tub, it's pretty important that I get to it pretty soon. Virginia has a huge amount of humidity and my new rocker panels already have some oxidization on them.

I'll get some pics up here Tuesday evening.
 
Glad you're back to work! Just to let you know that procrastination is normal...

I left my welding table with the last house we lived in. A lapse in judgement I regret! Anyway, with the new house we need to fabricate some awnings to keep the evening Texas sun out of the living room, so I used the opportunity to purchase a new TIG welder. I have not TIG welded in 30 years, so I am basically learning it all over again. I started welding on my wood work table...and caught it on fire 4 times. I then moved to the floor, but found I am too old to be getting up and down constantly. I realized I need to take a break and build a decent welding table.

The table is, at best, a day's welding. I have been tacking and aligning all week! I am working up the courage to dive in and finish it...and that's for a simple table! Anyway, I understand completely the fear to dive in too fast.
 
most welders have set a table or two on fire, me included..
 
My "table" is a plastic topped folding table with 3/4 sub-floor laid on and some 16g mild steel sheets that I mistakenly bought at Tractor Supply thinking I would use them.

I did.

Didn't set the table on fire, but I did melt a small hole where the metal wasn't...

Shhhhh....don't tell Dad, it's his table.
 
Cross posted:

I have the best memories of my Dad and his TR (rescued from the neighbor's drive porch, and the neighbor's kids) so many years ago. I'd always appreciated the sweep of the wings and the roar of that little 4 banger, but when I got to drive a "fully" restored one, I was hooked.


When my car came to me (in pieces) it was just going to be a fun project to do with Dad. He just stepped back and let me go. He'd identify a part if I couldn't, and show me where it was on his car. I let my ardor cool this past winter but did get some little stuff done and sorted the thousands (millions?) of pieces that came with my car. The trip to the Roadster Factory and the Memorial Run for Charles clinched it.


I came back energized and the only thing slowing me down (last week) was the heat. August is nigh on here and I don't think she'll be done by the first (not likely) but I will have a running engine (fingers crossed) in my frame.


Believe it or not, not counting the body stuff left to do (weld and fit) I only have the two MCs and Slave to rebuild. But of course, after paint, there is the reassembly.


But let's not get ahead of ourselves. Tomorrow is weld day. I have a plan to do things step by step, but later, if all goes well and I am getting ready to put my floor in, I still have a prop-shaft tunnel.


Mine was cut away (or rusted away with the DS floor pan) and Frank Canale made me a new one. I know the rearward part goes over the lip, but do the sides go on top of, or under the floor pans? I think on top, since the gearbox cover goes on top as well, but that's just my logic.


Ron
 
The Rear of the prop shaft tunnel goes over the flange of the rear shelf. The floor pans go on top of the bottom flanges of the prop shaft tunnel. Good luck with the welding, remember measure twice, tack once. Enjoy the day! Frank
 
This is how I found my TR floor to tunnel junction.

I had to replace the bottom edge of the tunnel and rear deck.

David

Piece I cut out.jpg
 

Attachments

  • Piece removed.jpg
    Piece removed.jpg
    53.6 KB · Views: 64
Took me a minute to figure out the orientation of the pic, but I got it.

I'm guessing my best bet would be (since I'm still frame on) prop shaft tunnel first (maybe a few sheet metal screws to hold it in place) then DS floor pan. I guess I could get away with just tack welding the rear (maybe in just one spot at first) and a clamp on the forward edge to hold it in place as I work my way forward.

Tell me if you think this isn't the best practice: Sheet metal screw through (whatever I am welding together), then weld (tack or bead) and when I'm grinding down my weld, lop off the head of the screw and perhaps a tack weld on the screw to lock it in place. Then grind off any pointy end sticking out the back side. Is that too much or inviting of problems later on?

Ron
 
The screw idea will work great, but once you have the torch all set up, it's faster to just tap a tack when you want something to stay while you look it over. It's even faster to break a small tack than to unscrew a screw if you don' t like it.

One thing...I tend to "over tack"...I put too many. That's not a good thing! One or two are ample while you take measurements, and much easier to pop loose than if you run a whole line of tacks initially.
 
John, (you know, my Dad's name is John too) I haven't yet experimented with Oxy/Acetylene, kinda scared. We have an ARC welder as well, but I use the wire welder. That one I have gotten quite used to (though I have blown out a few and also had some that didn't hold. I read your posts (many times) and tried not to let it get too hot, but you know sometimes it doesn't arc right or I see that I missed.

I'll save the screws, though I think I might need them when I weld the kick panel in place. I don't have any clamps that will reach that far so I'll get Dad to hold it in place and run a couple. No more than 4, but probably just 2 and my deepest C-clamp or vice-grip. On my out now, but have my phone to take pics (and the mobile version of this site).

I do have to drop my Jeep at the dealership (electronic gremlins and a front bearing). My 08 Liberty has 325K miles on it and I've learned a lot working on it myself, but bearings and the gremlins are just more than I can handle right now. Funny enough, it still has a warranty. My brother was the F&I Manager at the dealership when I bought the car. He sold me this Max Care Lifetime warranty (really just added it in without telling me, but did give it to me at cost) and it save my bacon a few times when i was so broke I couldn't pay attention. Anyway, let them deal with those issues. I've got a list for them.
 
Well today didn't go quite as I planned and now I'm exhausted and sore.

Dropping off the car took longer than expected and my ride back got stuck in traffic coming to get me. By then it was lunch time and fast food wasnt that fast.

It was 2pm by the time I got to the shop. Had to work on a noisy brake on our van and honestly didn't get the welder going till 330, only to find that it wasn't feeding wire. Too much weld stuck in the hole the wire comes out of. Wasn't me.

B pillar went great along the top and across the door area. Kick panel fought me, and when I removed my screws my tacks broke. Too hot so I started to clean up a bit. Saw one of the wire wheels that I repainted and thought I wonder what it would look like. I ended up test fitting it on the rear hub with adapters.

Surprisingly enough the adapter went on with the lug nuts that were on my car and the wheel went on fine by hand. I was able to put the knock off on and tighten it with bare hands, then a mallet. There were already 4 washers on the lugs when I pulled the steel wheel off.

There may have been adapters on my car before. The lugs seem to be the shorter variety, but I'm not sure.

I set the handbrake to locked and yanked and pulled looking for play. None on this one. Hope that I get lucky with the rest. Used wire wheels can be a scary proposition but the price was right (free). My ZS cd175s got me a set of adapters and knock offs (though 3 of the knock offs have crappy, if any chrome). The adapters got a quick bath in the parts washer, the a quick trip through the blast cabinet and a run on the wire brush wheel. Nice and shiny..

Back at it on thursday, where maybe I'll finish A pillar without leaving the screws in.
 
YATAH! (Japanese for Huzzah!)


Well after months of avoiding the A and B pillars/sill/floor pan, I finally buckled down and did it. I had some fits and starts since whenever I put weight on the sill, it seemed to want to turn inward on the bottom. I tried a bunch of different things and none seemed to work. Finally used a furniture clamp (long) and set it across the sills from the top and cranked down on it. Then I ran a sheet metal screw thru to hold it in place. Ran my weld from the back first checked my door gaps (still good) and did the same for the front, checking for distortions as I went. I was able to turn the heat up on the welder to get good penetration and filled the screw holes (after I removed the screws) with weld.


After I unclamped everything my welds held and I ground off the the high spots (still have to figure out how to reach into a corner) and moved on to the floor pan.


I thought that I needed to trim the rear outer edge (that runs along the rear wheel well) and did only to find that I didn't need to trim it at all. So I have a half inch gap to weld a piece of sheet back into. Not worried, even if I didn't the sill and dog leg (?) meet there and it would be covered with vinyl and foam eventually anyhow, but I'll tack the piece I cut off back in. I did move forward though and welded the sill edge to the pan and tacked the pan to the kick panel and rear shelf as well as the dog leg (wheel well area). All done, moving onto the prop-shaft tunnel. Whoops!


Prop-shaft tunnel should've been put in first in my case, but only because the PO didn't remove all of the old prop shaft and left just enough attached to the rear shelf and existing floor pan to make things a bit complicated to reinstalled. Let me tell you, whoever welded the passenger side pan to the prop-shaft tunnel meant business! There are so many spot welds I don't even know where to start, other than buying a gross of drill bits.


At first I tried just grinding the welds away, then slipping my angle grinding wheel between the pan and remnant, then ended up cutting all the way down and thru leaving just the flange for now. I also trimmed away the left-overs from the rear shelf as well. There's a bunch of spot welds there too. I'm thinking of leaving those remnants and putting my new prop-shaft tunnel over/under it. It should work, though I haven't determined how the extra (leftover) flange will affect the pans when finished. Still, MY CAR HAS A FLOOR NOW!!! I still need to weld some cage nuts into the prop-shaft tunnel and weld it in place.


I almost let myself get sidetracked several times today. Looked at those sills, gathered tools, remembered that the van needed the oil level checked (325k miles and burns a little oil), then I remembered that I only polished one of the headlights and kept forgetting to do the other, hmmm those brakes were squealing a bit, no I have to get back to my TR, been too busy with the last remnants of summer (no camp, kids home full time) and finally I get down to the garage to work and couldn't figure out my next step. Then I did. Bottaboombottabing, and Bob's your uncle. See how I did that?


John, you were so right about the spacers. Tell me, if you've got the time, if the firewall to floor-pan is a bead weld, or just spot-welded? I hear about seam sealer here, but I am unenlightened. Also, in lieu of a die-grinder, what else could I use to clean up weld where three surfaces come together (corner) namely rear part of sill/B-pillar. It's keeping my rocker-panel from slipping in right..


And on that note, I'm planning on welding in my rocker panels that are currently bare metal (you know where I'm going with this). We all know water is gonna end up in there, so....BTW, has anyone drilled a hole(s) from underneath and sprayed stuff in there (Ziebart et al)? Enquiring minds want to know.


That's me caught up. Only one day off this week, but I have a few hours tomorrow morning. Meant to shake some rattle-can primer and hit those spots I ground down (we have high humidity here).


Next day off: rear body mounts. I already started to remove one, and the sheet metal underneath got bunged up so there's that to deal with too.
 
Back
Top