• Hi Guest!
    You can help ensure that British Car Forum (BCF) continues to provide a great place to engage in the British car hobby! If you find BCF a beneficial community, please consider supporting our efforts with a subscription.

    There are some perks with a member upgrade!
    **Upgrade Now**
    (PS: Subscribers don't see this gawd-aweful banner
Tips
Tips

Header & DGV swap underway

Phew! Glad to see it's worth more than I paid for it! /bcforum/images/%%GRAEMLIN_URL%%/smile.gif And that's without the ceramic, I assume... very nice fit so far. Pics to follow soon.
 
So, the install has begun!! The headers 'look the business', as the Brits say. they seem quite well-seated on the new gasket, and access to the lower bolts is much easier than with the stock mani.

The old mani bolts all came out fairly willingly; I soaked them in Kroil a day or two ago. After much deliberation... my local Home Depot provided new 1.5" x 3/8" NF (24tpi) bolts, and I reused the stock 'ears' to install the new mani & intake.


Trial fitting...

02-06-07_1448.jpg


And the new hardware.

02-06-07_1950.jpg


I did some very, very minor filing to the ears of the manifold, just to get them perfectly lined up. Everything torqued down nicely, I don't think I'll fall prey to the dreaded intake leaks. (Famous last words?)

I have cobbled together a throttle linkage, which will serve until I order a proper kit from Redline. Work has stopped for the night, due in part to the need to pause frequently to cheer in the driveway, as the mighty Senators crushed the Anaheim Dirty Ducks by a score of 5 to 3. Go Sens Go!

More to follow tomorrow... low-pressure fuel regulator, new fuel line, Crane ignition... & maybe we'll get this thing fired up!

-Duncan
 
there was (is) a big difference in the thickness of my Pierce manifold and Pacesetter header. I had to cut washers as shims so that I could torque the whole thing down evenly. I'm still not too happy about it. I'll soot a pic here in a day or so as I gotta blow the thing apart, as I am going to drill the intake for the cranckase ventilation.
 
Re: Header & DGV swap underway

the link you posted may be of more value to the 1275cc guys, as the only breather on the engine on the 1500's is from the valve cover.

I'm not using the EGR or the air pump, however I stashed aside the air pump in case I may need it later. All they do here is sniff the pipe, no visual- 'cept they want to see a catalyst under the vehicle if it's sposed to have one.

I've seen an article a while back where some guy drilled the manifold and ran the breather line from the valve cover to the manifold, and placed a restriction in the hose. I'll look for the article later today and post the link.

From what I am seeing on my set up, about the only thing I can use the charcoal canister for is the gas tank vent line.

Are you still going to run a catalyst?
 
My DGV 1500 Setup came with a breather line from the Valve cover to the Airfilter base. I had some carberator problems. I installed an aftermarket breather (Looks like a small chrome Air filter) directly to the valve cover and closed up the whole in the air filter base. NO pvc valve. Car never ran better.
 
I also found thast wrapping the header with some high performance fiberglass wrap cut down on heat transfer to the intake manifold considerably. (Also Noticeable.)
 
Michael,

I didn't have a cat before (it had been hollowed out long before I bought Milo. But no, the headers take the place of the cat.

As far as the gas tank venting through the charcoal canister... are there two lines from the tank to the can? One for the vapour, and a return line for the gas as it condenses in the can? Or is it supposed to be drawn off and burned by the engine? Seems like more trouble than it's worth.

The older cars had gas tanks that were vented to the open air, correct? The EPA mandated charcoal canisters because of the pollution caused by evaporating gas?
 
Blkcorvair,

Does your engine bay get dirty? My limited understanding is that the valve cover is slightly pressurized, but that venting it into the engine bay was problematic due to the mist of oil suspended in the air. No?

I'm really not a fan of wrapping headers. Hot Rod or someone similar did a study a while ago that showed that it drastically shortened the life of the headers. Mine are ceramic-coated, so I'm hoping that they won't heat the engine bay tooooo much.

-Duncan
 
Re: Header & DGV swap underway

2 lines? I only have one vent line from the tank going to the canister. Theres two charcoal canisters in my 79. One is mounted in the front right of the car.

The front canister has three hoses on the top. One went to the tank and the other two came off the engine. If I remember, one of them was attached between the valve cover ventilation and the carb. I've got to go back and research this.

The other charcoal canister was in the engine compartment on the right side on the firewall. It attached to the other canister and the only thing it did was purge to atmosphere.

The older cars that did not have a vented tank, vented to the atmosphere via the fuel cap.

I was also considering dumping the breather to atmosphere with one of those little K&N filters like blkcorvair mentioned. I have seen serveral comments from people who were discouraged by venting the valve cover breather to the air cleaner so I didn't even attempt it.

On a sidenote, I set up a Paxton supercharged Mustang a few years ago and I had vented the thing to atmosphere with one of those little K&N filters. It ran a heck of a lot better than running the vent to the air filter duct, as Paxton had recommended.
 
Yes the ceramic coating is the best obviously a bit more. The header wrap is good on a sunny day car. It will trap moisture against the header and prematurely rot it if driven in heavy rains. I dont plan.

As for the breather. I have no problems as of yet and I even have an additional oil feed line tapped to the valve train, so my cover is plenty full of oil. Oil pressure sits from 50-60 psi and so far so good. I will keep you posted if it becomes problematic
 
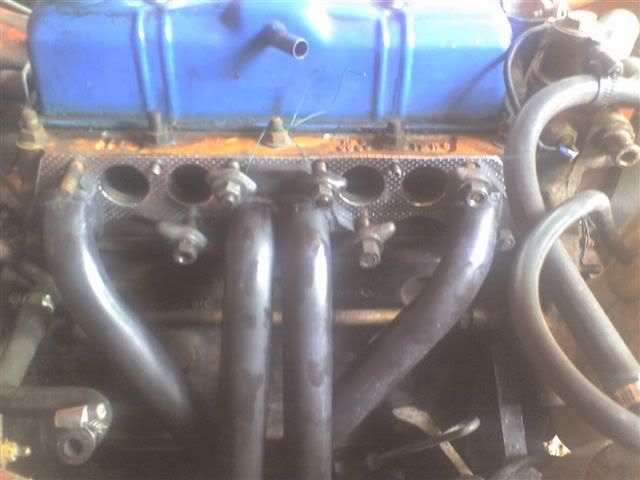
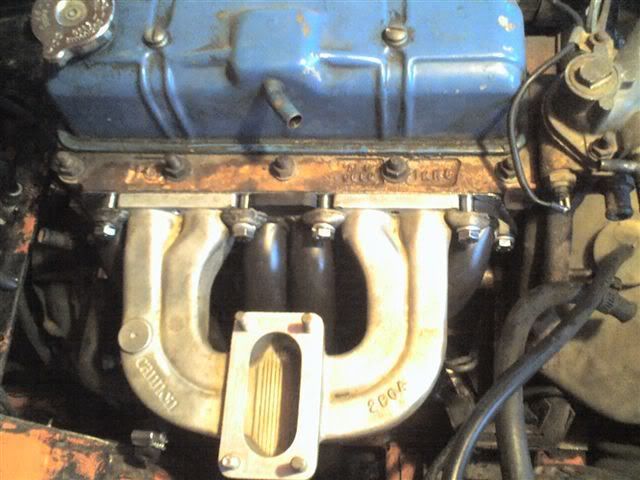
Well, the DGV & headers are in! It's almost starting to look like an engine bay again...

09-06-07_1733.jpg


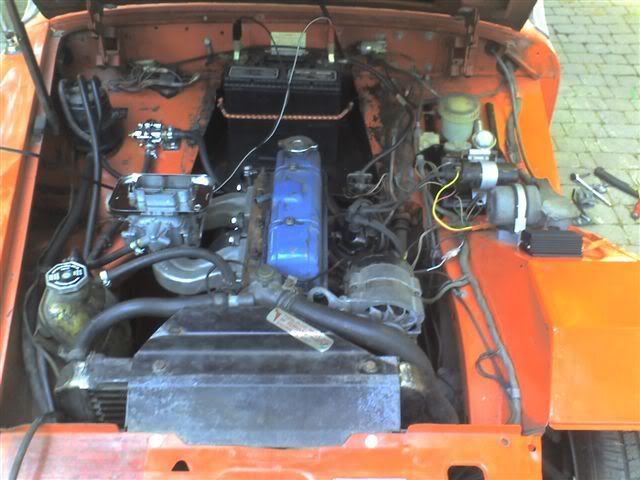
The Crane XR700 is intalled on the D/s inner fender; nice and subtle, and the LED faces out so I can still use the diagnostics. Oh! Funny, I went to Home Depot to see if I could find some stock-looking grey electrical tape to wrap the new wires. They didn't have any, but they did have this stuff, that's so close to MG Vermillion, I couldn't resist!

09-06-07_1629.jpg


The battery tray has been cleaned, chemically de-rusted, and treated to Eastwood Rust Encapsulator followed by black semigloss.

03-06-07_1805.jpg


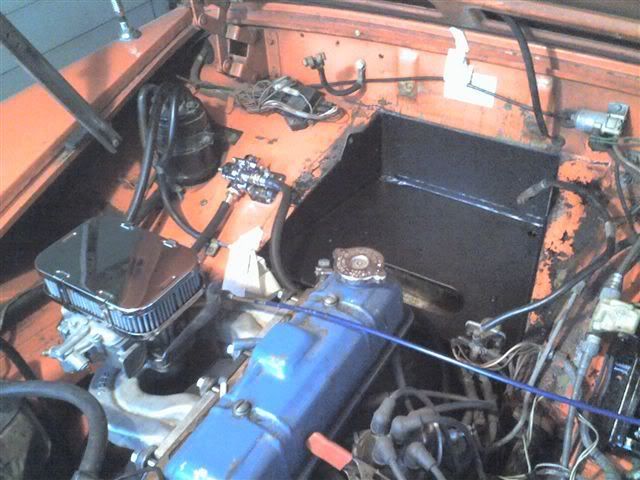
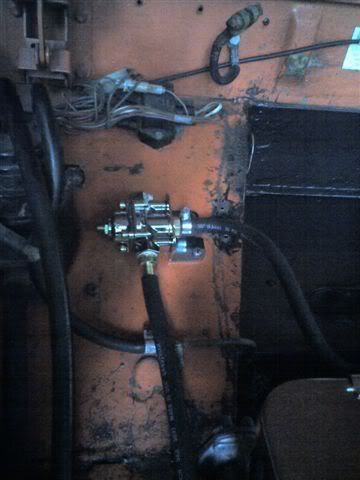
The fuel regulator, as you can see, is at the rear near the charcoal cannister. It may move a little one way or the other, but it just happened to fit in the holes left behind after I removed the heater valve.

03-06-07_1807.jpg


It's a Holley low-pressure, as recommended for the DGV.

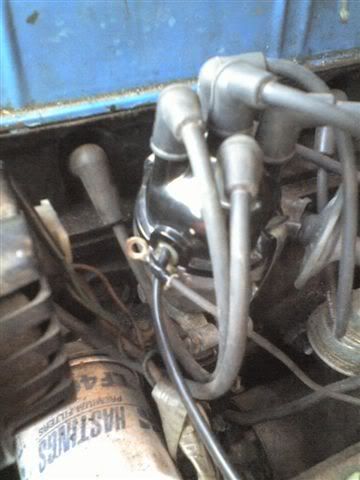
Now, the big question... what the heck do I do with the wire formerly attached to the outside of the coil? It's not mentioned in any of the Crane instructions...

09-06-07_1925.jpg


-D
 
OK, so it cranks... but that's about it. Every eight cranks or so, it lets out a great belch (backfire) through the carb.

The LED flashes in time with the cranking, so I've obviously got the optical setup working OK.

The inductive timing light picks up a signal, so I obviously have some sort of spark. (Right?)

With the timing light on #1, I can get it to read around TDC. (Seems to me that stock setting is actually 2 deg ATDC, but I'll check.)

I've got the firing order as; *counter* clockwise... 1, 3, 4, 2. (So says Hayes).

I've set the DGV's basic settings; throttle stop screw and mixture screw.

I know it's getting fuel; I can hear and see the the accel pump working, for one thing!

No joy... what's next? I'm a little dispirited.
 
Looks like you have everything in order. Firing order appears correct. Where on the out side of the coil was that ring terminal originally attached? Here's a pic of how mine is wired. Although I over-rode all the stock harness and made my own to avoid all the corks caused by previous owners trying to make repairs.

Do you have elec or ma. choke? I find full choke two pumps starts right up than back off a hair a let idle for two mins than good to go. But do have an elec pump, so can shut down if ever flooding becomes issue. Also did you set that regulator?

IMG_1495.jpg


IMG_1494.jpg
 
Re: Header & DGV swap underway

Electric choke here. Not hooked up, I have been holding the choke plate open on the top of the carb, for all testing.

Dang it... what's next, do you suppose?

- pull spark plug(s), confirm I'm seeing spark
- start from scratch, confirm TDC for #1, statically time engine
-adjust valves, check compression

?
 
Re: Header & DGV swap underway

When I set up my DGV and header, I tried setting the thing up by factory specs and it ran horrible. I fudged with it a little bit here and there and Friday evening I just started messing around with the thing by ear. I can't even tell you what the timing is right now (I'll have to check it and make sure I didn't get too carried away) but it's pretty smooth and responsive. I've got the Weber mixture one and a quarter turn out ccw from being bottomed.

But I still have a bad feeling about the seating between my Pacesetter header and that Pierce manifold.

I'm not even running a choke right now. Just been pumping the throttle and goosing it til it warms up. Kinda brings back the good ol days.

I haven't got around to the crankcase vent or hooking up the charcoal canister yet. Going to redo the throttle linkage with a new cable before I move on.
 
Famous last words, but I don't think I have any manifold leaks; it's sealed up tighter than a dolphin's arse, if you'll pardon a colourful metaphor.

Michael, I grabbed a bike (rear tire) brake wire at my local hardware store, along with a universal throttle cable stop. Ground down the one end a little to fit nicely in the pedal, moved over the hardware, tinned the end with solder so it didn't come apart, and trimmed it to length. Total expenditure: about $9.


Now, back to the engine that won't run. /bcforum/images/%%GRAEMLIN_URL%%/frown.gif If I do want to start with the basics... does anyone have an idiot-proof way of finding TDC? I figured it out last time, but it wasn't pretty...
 
I am coming in on this thread late, and have not read all of the posts, but from what I have read, it sounds like your ignition timing is 180 out. If you have your timing cover on and the timing marker is still intact, finding TDC #1 will be pretty easy. First remove your valve cover. Turn the crank by hand or, put it in 4th and roll the car toward you. As the timing mark on the pulley approaches the marks on the timing cover, #1 intake should be closing. Set your pulley at 10 before TDC and check your dizzy. If the rotor is pointing at #1 tower, your good. If it is pointing at #4 tower, you are 180 out.

Once that is all good, statically time the dizzy at 10 BTDC and give her a whirr.
 
Back
Top