
-
 Hey Guest!
British Car Forum has been supporting enthusiasts for over 25 years by providing a great place to share our love for British cars. You can support our efforts by upgrading your membership for less than the dues of most car clubs. There are some perks with a member upgrade!**Upgrade Now**
(PS: Upgraded members don't see this banner, nor will you see the Google ads that appear on the site.)

Tips
- We have a special forum called "Member Articles" where you can submit actual articles for consideration for publication. Learn More
- Don't have an Avatar? If not, your avatar will default to the 1st character in your username. Go into "Account Details" to change your Avatar.
- Some basic forum navigation info: click
 Hey - did you know if you click on the title of a thread it will take you to the first unread post since you last visited that thread?
- Hey Guest - Is your British Car Club in our Clubs database? If not, send me a PM - Basil

- Looking for a local club? Click the "Clubs" tab above and browse hundreds of clubs world-wide.
- Add Android or iPhone APP: click
- Did you know - any picture or video you add in your posts in any marque-specific forum will also get added to the Media Gallery automatically.
- A few more tips about posting and replying: click
- Hey there Guest - be sure to keep your profile page up to date with interesting info about yourself: learn more
- More tips and tricks on Posting and Replying: click
 but were afraid to ask:
  STOP!! Never post your email address in open forums. Bots can "harvest" your email! If you must share your email use a Private Message or use the
  smilie in place of the real @
- Want to mention another member in a post & get their attention? WATCH THIS

- So, you created a "Group" here at BCF and would like to invite other members to join? Watch this!
- Hey Guest - A post a day keeps Basil from visiting you in the small hours and putting a bat up your nightdress!
- Hey Guest - do you know of an upcoming British car event?
 Pretty Please - add it to our Events forum(s) and add to the calendar! >> Here's How <<
- Hey Guest - you be stylin' Change the look and feel of the forum to fit your taste. Check it out
- If you run across an inappropriate post, for example a post that breaks our rules or looks like it might be spam, you can report the post to the moderators: Learn More
- If you would like to try some different "looks" or styles for the site, scroll to the very bottom, on the left and click the Style Selector.
You are using an out of date browser. It may not display this or other websites correctly.
You should upgrade or use an alternative browser.
You should upgrade or use an alternative browser.
Hardtop Project under way
- Thread starter Brosky
- Start date
OP
Brosky
Great Pumpkin
Offline
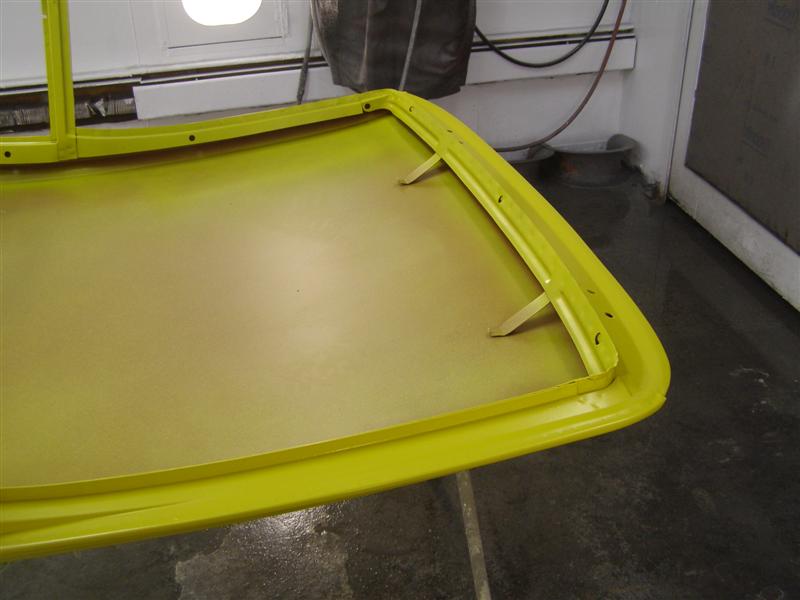
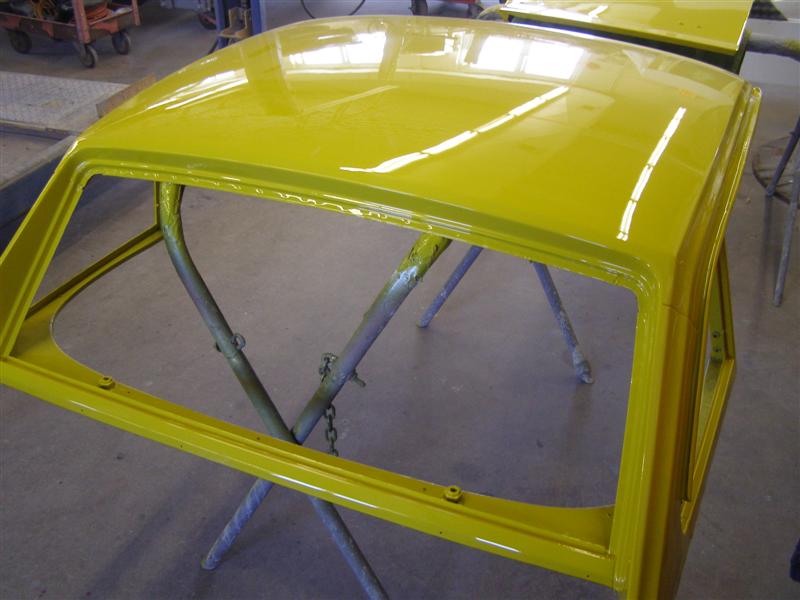
OK, let the games continue. Today was color coat day for the bottom of the hardtop as well as the deck lid. It appears that Jorge has done another superb job in getting everything to look even better than the paint that was on it from the factory.
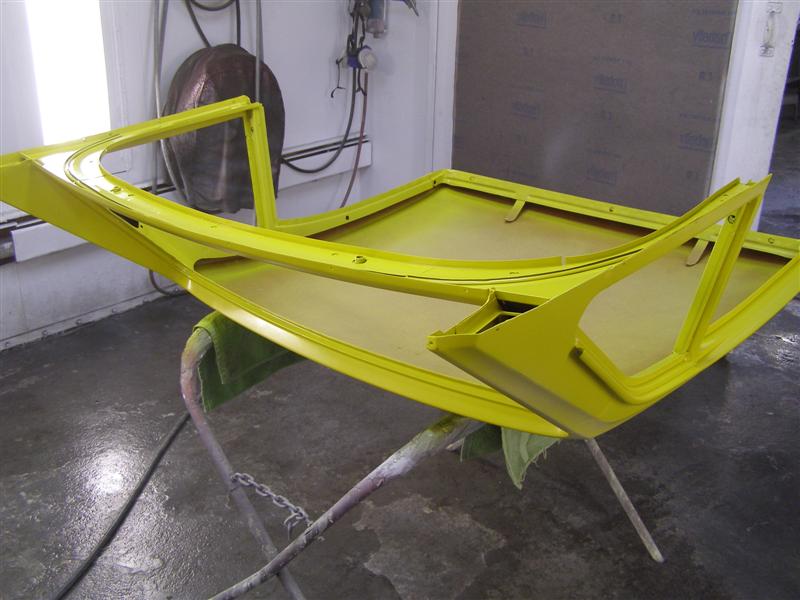
This was all getting another coat after I left, then it will bake over night and into tomorrow.
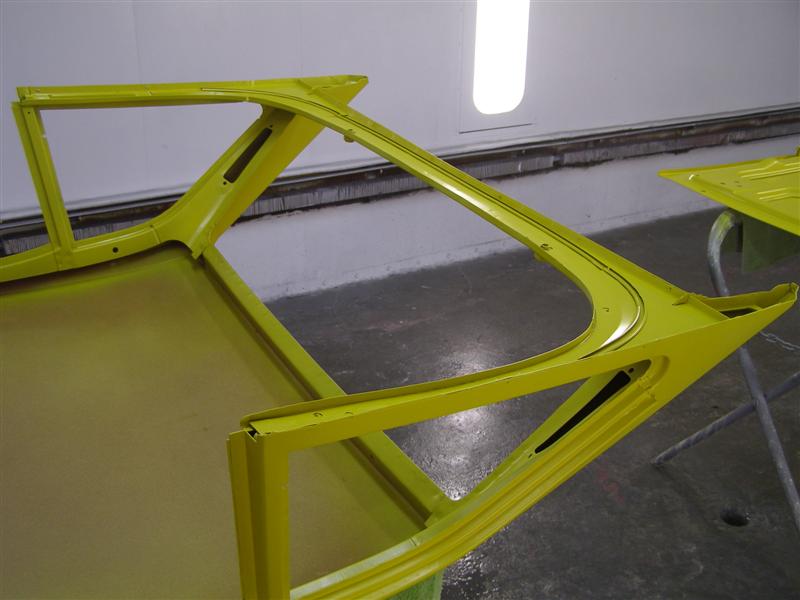
These spots on both side had very little color on them and the primer was visible all over the sides and down in the roof shell.
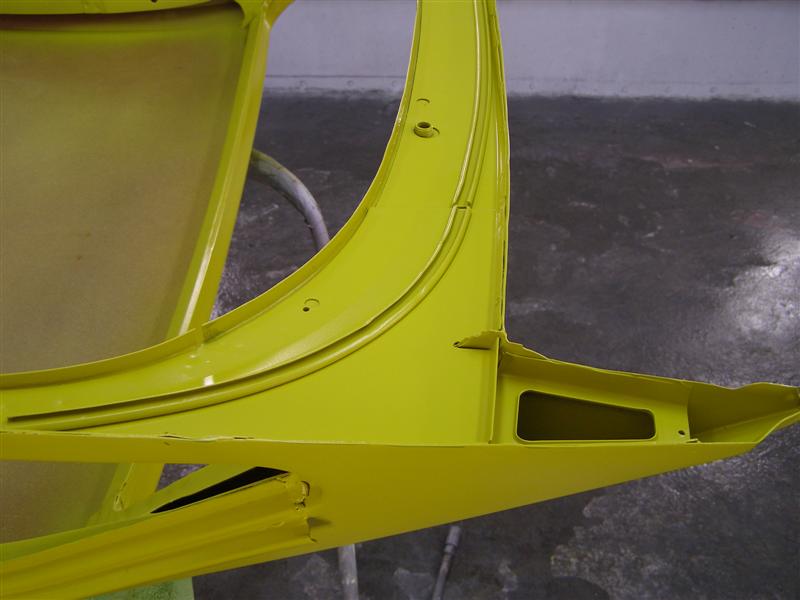
What looked like red rust in these tracks was actually the red factory primer, which practically wiped off, but it prevented the metal from having any issues.
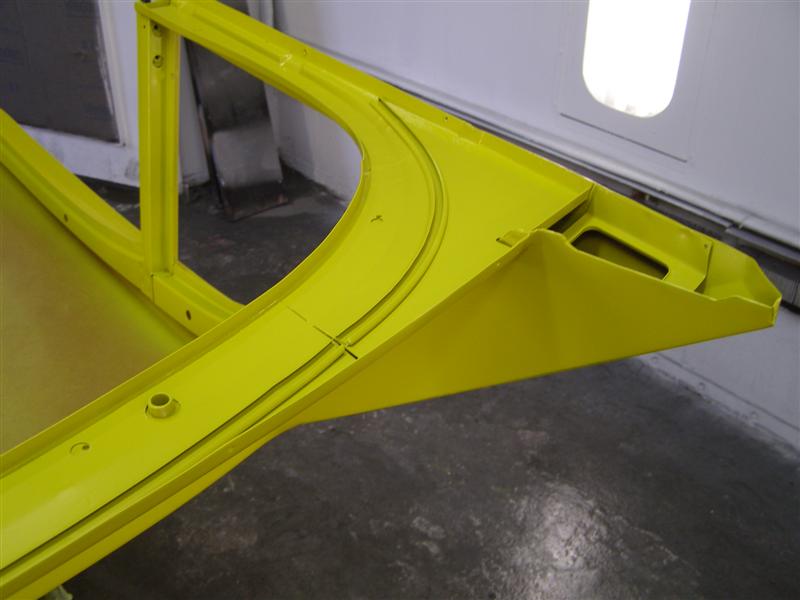
Having this sit in a dry attic for 20 plus years didn't hurt either. That sticky front weatherstrip was a pain to remove and they must have used a months allotment of glue under it. But it's now all set for a new one.

I wanted all of these window areas painted well before the glass went back in and Jorge did it right.
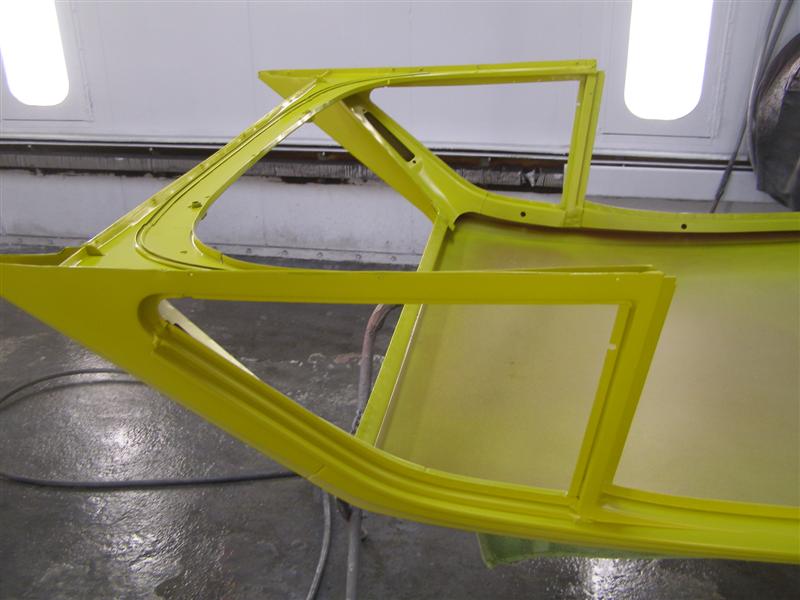
One more shot of the front before he threw me out to put the final color coat on this side.
This was all getting another coat after I left, then it will bake over night and into tomorrow.
These spots on both side had very little color on them and the primer was visible all over the sides and down in the roof shell.
What looked like red rust in these tracks was actually the red factory primer, which practically wiped off, but it prevented the metal from having any issues.
Having this sit in a dry attic for 20 plus years didn't hurt either. That sticky front weatherstrip was a pain to remove and they must have used a months allotment of glue under it. But it's now all set for a new one.
I wanted all of these window areas painted well before the glass went back in and Jorge did it right.
One more shot of the front before he threw me out to put the final color coat on this side.
OP
Brosky
Great Pumpkin
Offline
Thanks Tom, but it's easy when they start with a good top and then take their time to do it. Having a good relationship with a shop is not a bad thing and letting them use your work as fill in helps to, if you have the time to wait for it.
The color went on Weds and the clear yesterday. They came out great.
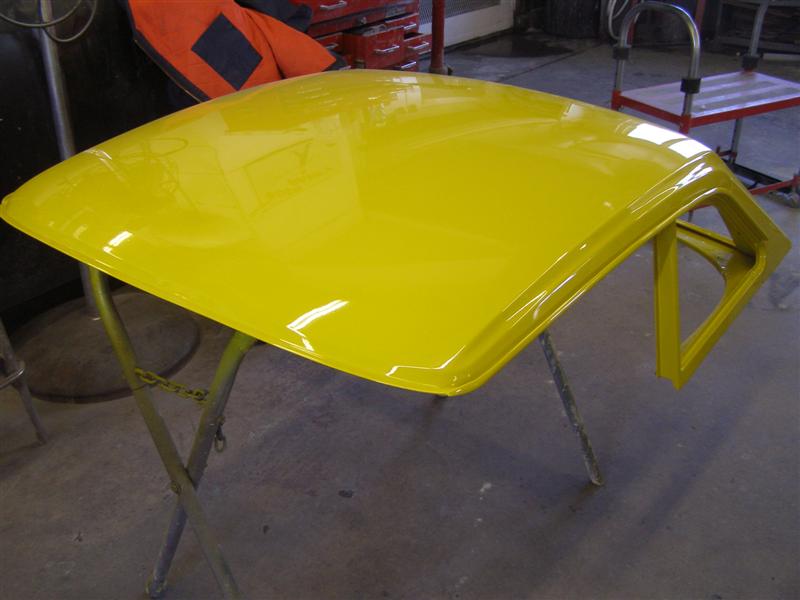
Several coats of color and two coats of clear.
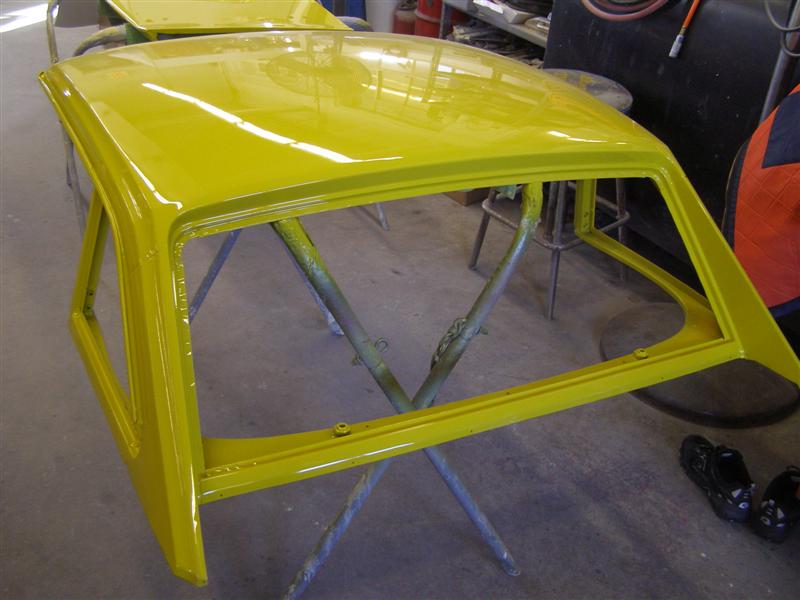
This was just what I wanted them to look like.
Sanding and buffing, then the insulation and a trip to J.T. Leddy's for a new headliner.
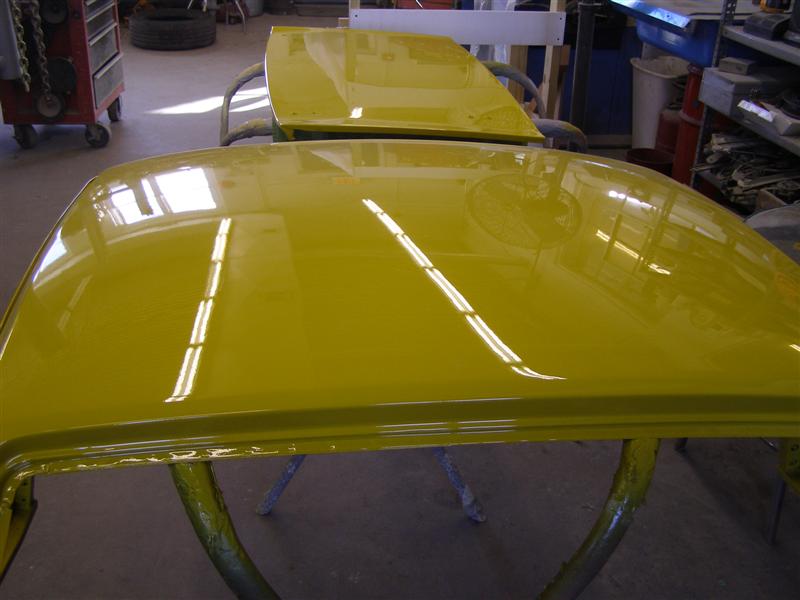
New soft carpet is going on any contact surfaces of the rack on the left.
The color went on Weds and the clear yesterday. They came out great.
Several coats of color and two coats of clear.
This was just what I wanted them to look like.
Sanding and buffing, then the insulation and a trip to J.T. Leddy's for a new headliner.
New soft carpet is going on any contact surfaces of the rack on the left.
OP
Brosky
Great Pumpkin
Offline
Keith, I'm debating about putting it on when it's done.
IF and that's a BIG if, it doesn't get bogged down too deep at the upholstery shop and I get back in early March, it may just go on for a few months. My Miata seats are there having all new Chestnut covers with the TR6 roll and pleat pattern made.
Miata Seat Conversion
That would give me the excuse to remove the soft top completely and have the frame powder coated as I've been talking about doing to two years.
The yellow trunk lid in front of the hardtop is mine too. That's another project that I have going on with this one and the new Miata seats.
Luggage Rack & Deck Lid Restoration
And Rich, we all will get together this summer for a little road trip.
A top job!
Do you have all the hardware to install it on your TR.. and the seals?
I brought a HT from a local chap who had sold his TR years before and was only then clearing out his attic! It was in great structural condition just like yours but all the window seals had perished and (at least in the UK) anything associated TR6 hardtops were impossible to get. I had to sell the car before I had chance to complete the HT and it went to the new owner.
Out of interest I brought and restored a Californian HT for my Spitfire and it made a huge difference to the car, so much so that when winter was over I left it on! Spitfire HTs look much cleaner than TR6 HTs in my opinion, they have more pleasing proportions.
Hardware:
Windscreen Top - Spacer tubes and correct length bolts (or you dent the top)
Rear Deck - Correct bolts, but to problem if too long
B Posts - Special Chrome brackets
Windscreen Seal - same as soft top (I think)
Deck Seal - special item
Britishautobody
Jedi Hopeful
Offline
Looks great! I would be happy with that. ;>)
OP
Brosky
Great Pumpkin
Offline
Alastair,
The hardtop came with everything attached and it was all in great shape, except for the front seal where it meets the windshield frame.
I was able to get all new seals and attaching hardware here in the states at the Roadster factory, along with all new moldings.
This is the story from the beginning:
Hardtop Restoration
EDIT:
And thanks for the compliment from British Auto Body. That means something coming from a professional in the business. Nice shop that you have there!!
swift6
Yoda
Offline
Brosky said:Kevin,
Thanks for the compliment. They are doing a great job.
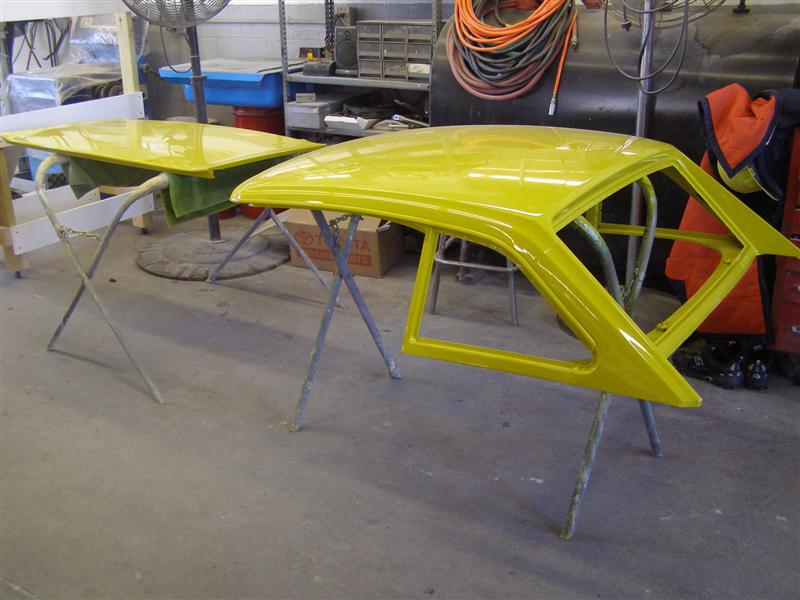
That's the stand that Shannon designed for the hardtop. It needs some padding to protect the paint in case something ever slips.
When I "designed" that rack, I used some Home Depot weather stripping, closed cell foam stuff. Very little of the rack, just the lower section, actually contacted the hardtop. The tall supports never actually touched the roof area. Still, I ran the foam all the way up just in case the top shifted or anything. The 'prototype' to the designs you used was built from stuff I had laying around. Your doing what I hoped people would do once I released the "plans" for that rack, to improve and refine the design. Looks good.
Thanks for the link. I'm impressed with all the work you've done / had done, I don't just mean the hardtop, the site is a gold mine! Thanks for taking the time to keep your site up dated... there are a good many TR6 rebuild / uprate sites that seem to have 'died'.
OP
Brosky
Great Pumpkin
Offline
Alastair,
I get a lot of emails from your side of the pond regarding my site. There are several guys who linked me to one of your popular sites/publications last fall. Nice to have an international hobby that you can share information so easily with others.
I have a lot more going on this spring. The two other links mentioned above, plus, a gear reduction starter, a second fuel pump upgrade page with an improved kit, a Goodparts heat shield for my triple ZS's, trailing arm stud replacement with Rick Patton's kit, new Goodparts CV axle assemblies, new Classic Technologies fuse panel, new tail lamp sockets with better grounds.
Good to hear from you and keep checking back, as I add new pictures every few days.
OP
Brosky
Great Pumpkin
Offline
Shannon,
The only other thing that I will do is add a 36" X 20" piece of 5/8" plywood to the bottom and a bigger set of casters than I could fit on the wood frame. I'll add a few shots when I get that done. It will allow for easier placement of bigger caster bases.
The only other thing that I will do is add a 36" X 20" piece of 5/8" plywood to the bottom and a bigger set of casters than I could fit on the wood frame. I'll add a few shots when I get that done. It will allow for easier placement of bigger caster bases.
A MUST, those used to drive me crazy, in the end I soldered individual earth wires to each bulb holder and then made a single earth connection stud in the inner wing. Never a problem again!Brosky said:new tail lamp sockets with better grounds
When we had our first dog I named him 'Lucas' as he was black and you never knew quite what bad thing he was going to do next.... kind of reminded me of the prince of darkness

swift6
Yoda
Offline
Brosky said:Shannon,
Who? :wink: