
-
 Hey Guest!
British Car Forum has been supporting enthusiasts for over 25 years by providing a great place to share our love for British cars. You can support our efforts by upgrading your membership for less than the dues of most car clubs. There are some perks with a member upgrade!**Upgrade Now**
(PS: Upgraded members don't see this banner, nor will you see the Google ads that appear on the site.)

Tips
- We have a special forum called "Member Articles" where you can submit actual articles for consideration for publication. Learn More
- Don't have an Avatar? If not, your avatar will default to the 1st character in your username. Go into "Account Details" to change your Avatar.
- Some basic forum navigation info: click
 Hey - did you know if you click on the title of a thread it will take you to the first unread post since you last visited that thread?
- Hey Guest - Is your British Car Club in our Clubs database? If not, send me a PM - Basil

- Looking for a local club? Click the "Clubs" tab above and browse hundreds of clubs world-wide.
- Add Android or iPhone APP: click
- Did you know - any picture or video you add in your posts in any marque-specific forum will also get added to the Media Gallery automatically.
- A few more tips about posting and replying: click
- Hey there Guest - be sure to keep your profile page up to date with interesting info about yourself: learn more
- More tips and tricks on Posting and Replying: click
 but were afraid to ask:
  STOP!! Never post your email address in open forums. Bots can "harvest" your email! If you must share your email use a Private Message or use the
  smilie in place of the real @
- Want to mention another member in a post & get their attention? WATCH THIS

- So, you created a "Group" here at BCF and would like to invite other members to join? Watch this!
- Hey Guest - A post a day keeps Basil from visiting you in the small hours and putting a bat up your nightdress!
- Hey Guest - do you know of an upcoming British car event?
 Pretty Please - add it to our Events forum(s) and add to the calendar! >> Here's How <<
- Hey Guest - you be stylin' Change the look and feel of the forum to fit your taste. Check it out
- If you run across an inappropriate post, for example a post that breaks our rules or looks like it might be spam, you can report the post to the moderators: Learn More
- If you would like to try some different "looks" or styles for the site, scroll to the very bottom, on the left and click the Style Selector.
You are using an out of date browser. It may not display this or other websites correctly.
You should upgrade or use an alternative browser.
You should upgrade or use an alternative browser.
H6 throttle shafts
- Thread starter TomMull
- Start date

Geo Hahn
Yoda
Offline
Not just you. I recently ordered one of those curvy overflow tubes for the H6 carb. $15 seemed pricey but I had lost one so why not?
What I got is what I would describe as a kit to make the part -- just a straight piece of pipe that I could bend and cut.
Yes, I can bend & cut but if I wanted to do that I would have just gone to Ace Hardware and got the material for much less $$.
The part BTW is pictured in the vendor's catalog and web page as being in the correct shape and size, i.e. the actual finished part.
A minor annoyance.
TR3driver
Great Pumpkin - R.I.P
Offline
That's the way SU (now Burlen) supplies the shafts. I guess that's why throttle shaft replacement is not covered in the workshop manual.
What consistently surprises me is that we can buy any parts at all for these cars. Parts availability now is actually much better than it was 40 years ago!
I wonder how much luck you'd have buying a throttle shaft for a 1956 DeSoto? By 2005, I couldn't even buy shock absorbers for my 1980 Chevy!
What consistently surprises me is that we can buy any parts at all for these cars. Parts availability now is actually much better than it was 40 years ago!
I wonder how much luck you'd have buying a throttle shaft for a 1956 DeSoto? By 2005, I couldn't even buy shock absorbers for my 1980 Chevy!
Darrell_Walker
Jedi Knight
Offline
TR3driver said:What consistently surprises me is that we can buy any parts at all for these cars. Parts availability now is actually much better than it was 40 years ago!
Yep, I got my TR in 1981, and there was still a Triumph dealer in town (Bakersfield). It was harder to get parts then, either because they were no longer made, or as often as not, the cranky old guy at the parts counter didn't want to look them up on the microfiche!

Tom Did the shaft take up the clearance in the carb bore or are you going to have to rebush the bore? are you replacing the discs as well? Some repair kits include the bushes although I'm told rebutting is only necessary in extreme cases. Drilling the hole for the lever arm pin is a tricky business. Instead of going to a machine shop I attempted this at home. Using a small vice to hold the old shaft I center punched the pin and drilled out the pin with a 7/64(final hole should be 1/8) titanium driillbit.Rounded out the lever hole on one side a bit more than I wanted. Then taking what I thought was careful measurements I punched the new shaft and drilled it out. Installed the lever...Doh!...holes didn't line up perfectly so I had to drill thru the lever hole and thru the shaft to widen it to take the pin. now the hole on one side of the lever arm is wider than necessary but the arm and shaft move as one . I applied loctite there and I'm sure it will hold. The next shaft I do I will clamp the lever arm to the shaft as a guide and carefully drill thru the shaft that way. maybe even drill a pilot hole. If you have any doubts go the machine shop route.
TR3driver
Great Pumpkin - R.I.P
Offline
If you do the drilling before trimming to length, and it doesn't come out right the first time, you can turn the shaft end for end and take another try at it. I goofed up the first one, then the second one was "close enough" (although not quite right), and the third one came out just right.karls59tr said:Doh!...holes didn't line up perfectly so I had to drill thru the lever hole and thru the shaft to widen it to take the pin.
OP
Offline
There was little play to begin with so I will use the old bushings (may even use the old shafts).karls59tr said:Tom Did the shaft take up the clearance in the carb bore or are you going to have to rebush the bore? are you replacing the discs as well? Some repair kits include the bushes although I'm told rebutting is only necessary in extreme cases.
You are right, that's why I whined about this. I plan to drill a new hole through the arm and the shaft. (or use the old shafts). Thanks for the reply. Tomkarls59tr said:Drilling the hole for the lever arm pin is a tricky business.
Don Elliott
Obi Wan
Offline
Don Elliott
Obi Wan
Offline
TR3driver
Great Pumpkin - R.I.P
Offline
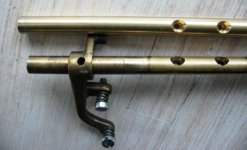
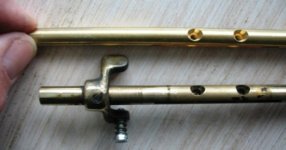
It's interesting that others experiences have been so different than mine. My carb bodies were significantly worn (especially the frontmost bore), while the shafts looked only a little worse than Don's photos above. New shafts in the old bores were still loosey-goosey.
nice pics Don. what kind of setup did you use to drill the hole for the pin? While we're on the subject,The Su repair kit I got from the UK had cheap screws to hold the discs to the spindle compared to the original. When I went to epand the slot in the screw after installing on the spindle half the screw broke off. I hate to be a whiner but it just seems that the aftermarket stuff for British cars seems flimsy or cheap when laid side by side with parts made in England 50 years ago!
Don Elliott
Obi Wan
Offline
I scribed around the rod where the hole should go, held the brass rods in the aluminium jaws (one at a time) in my bench vice and eye-balled while I drilled the small holes for the pins. I kept comparing the hole angle and position for each. If you're out a bit one way on the angle, that's no problem as you can screw down a bit more on the screw once it's all assembled. But if you mess up the angle of the drilled hole the other way, you can have the bottom flat end of the screw flush or recessed up into the brass foot and the butterfly may not be able to be set closed because the bottom face of the foot of the brass "thingy" is resting on the stop or body of the SU carb.
If that happens, all you can do is file away a bit of the bottom face of the brass foot or file away a bit of the top face of the stop on the SU carb body.
As for the two tiny screws, I can't remeber but I may have re-used the original screws. I can't remember spreading the slot to lock-wedge the screws into place.