• The Roadster Factory Recovery Fund - Friends, as you may have heard, The Roadster Factory, a respected British Car Parts business in PA, suffered a total loss in a fire on Christmas Day. Read about it, discuss or ask questions >> HERE. The Triumph Register of America is sponsoring a fund raiser to help TRF get back on their feet. If you can help, vist >> their GoFundMe page.
  • Hey there Guest!
    If you enjoy BCF and find our forum a useful resource, if you appreciate not having ads pop up all over the place and you want to ensure we can stay online - Please consider supporting with an "optional" low-cost annual subscription.
    **Upgrade Now**
    (PS: Subscribers don't see this UGLY banner)
Tips
Tips

Finally, paint on chassis

HealeyPassion

Jedi Warrior
Country flag
Offline
Well, after what seems like years ... oh wait ... it was years, the chassis is in paint and home. Trial fitting rear Bilstein shock tower brace .... for Udo Putzke's Bilstein kit.

Sharp eyes will see 4 chassis mods in the first pic ... a couple more in the 2nd pic.

Let the fun start!

Steve
 

Attachments

  • AH Chassis in paint S50 5643.jpg
    AH Chassis in paint S50 5643.jpg
    1.5 MB · Views: 133
  • AH Chassis in paint S50 5716.jpg
    AH Chassis in paint S50 5716.jpg
    1.6 MB · Views: 135
  • AH Shock Tower Brace Test Fit S50 Nov 2022 5730.jpg
    AH Shock Tower Brace Test Fit S50 Nov 2022 5730.jpg
    1.5 MB · Views: 126
  • AH Shock Tower Brace Test Fis S50 Nov 2022 5730.jpg
    AH Shock Tower Brace Test Fis S50 Nov 2022 5730.jpg
    1.5 MB · Views: 125
Last edited:

BoyRacer

Jedi Warrior
Country flag
Offline
I love a test! In photo #1, I see vents in the front inner fender, reinforced wishbone mounts, a tunnel in the driver's side inner fender and a modified pedal box. In photo #2, I see tow eyes at the rear, some sort of passenger floor addition, tabs on the chassis for maybe a belly pan and the end of the rear cross member cut off at an angle on the driver's side. There are probably more subtle mods but those were the ones that were obvious to me.
 

dougie

Luke Skywalker
Country flag
Offline
Ditto Richard....and those inner fender well vents look suspiciously familiar :unsure:
 
OP
HealeyPassion

HealeyPassion

Jedi Warrior
Country flag
Offline
Well Richard and Dougie, I'm impressed! I thought the first pic would be fairly easy for guys like you... (oh and the tunnel on the driver's side fender well is to accommodate a cold air intake).... but picking up the on the "rear crossmember" angle cut I thought wouldn't be picked up! Well done!! Bit of explanation... the passenger floor mod is a channel that will house the wiring going to the electrical compartment (see attached pic.) ... and the angle cut on the rear frame member is so the exhaust can exit behind the rear wheel, but be raised a bit to tuck in close (frame rail caused clearance issues). The only missed item is the frame rail mod (driver side rear out rigger) so the exhaust can be routed close to the frame back to the rear frame rail exit. (pic.)... last pic shows the stepped exhaust pipe to clear Bilstein rear shock.

Not much gets by you guys! (Oh, and yes, Dougie got the idea for the louvers in fender well from you....thanks!)

Steve
 

Attachments

  • 9 Wiring Channel Set Up S50 IMG_5045.jpg
    9 Wiring Channel Set Up S50 IMG_5045.jpg
    1.5 MB · Views: 110
  • 18 Test Fit Electrical Compartment S50 IMG_5450.jpg
    18 Test Fit Electrical Compartment S50 IMG_5450.jpg
    1 MB · Views: 96
  • 19 Test Fit Electrical Compartment w Al S50 IMG_5456.jpg
    19 Test Fit Electrical Compartment w Al S50 IMG_5456.jpg
    1 MB · Views: 99
  • AH Exhaust 11 12 2018 (1).jpeg
    AH Exhaust 11 12 2018 (1).jpeg
    241.8 KB · Views: 89
  • AH Exhaust 11 23 2018 (6).jpg
    AH Exhaust 11 23 2018 (6).jpg
    582.9 KB · Views: 92
  • IMG_0456.JPG
    IMG_0456.JPG
    90.2 KB · Views: 91
Country flag
Offline
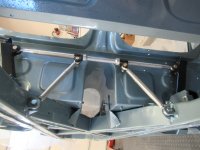
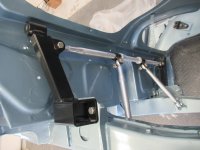
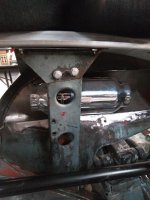
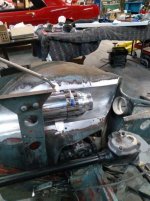
The rear shock tower brace is impressive engineering. Presumably, it will solve the recurring problem--if you drive your car enough, you'll have it--of the rear shock bolts working themselves loose. IMO, putting just a couple bolts in shear to secure the rear shocks--with no bracing--in an application with major shear forces is one of worst engineering faux pas on our cars. I've solved the front shock bolts working loose problem on my cars, but I just spent a couple hours replacing the standard split lock washers on both my Healeys' rear shocks with Nord Lock washers, secured with blue threadlocker. If that doesn't work I'm out of ideas for a permanent fix, and will just have to remember to re-torque those bolts every year or so, a job made more onerous due to the difficulty of getting a socket on the bolts and nuts (my BN2 has two 6V batteries and the trays make it impossible to get anything but an open end wrench on the nuts, and the cutouts for the bolt heads are borderline too small).
 

BoyRacer

Jedi Warrior
Country flag
Offline
I just saw another mod in photo #1. You have a speaker box in the driver's side footwell.
 

BoyRacer

Jedi Warrior
Country flag
Offline
Regarding Bob's post about the difficulty of getting a socket on the rear shock mounting bolts: My solution is to use socket head bolts (allen head).
 
OP
HealeyPassion

HealeyPassion

Jedi Warrior
Country flag
Offline
I just saw another mod in photo #1. You have a speaker box in the driver's side footwell.
Good catch Richard. Yes, footwell speaker boxes were added to both sides...required cutting out some of the reinforcement structure to install ... which was welded back into place once boxes attached. Boxes are thick aluminum and, of course, chassis is steel so had to pop-rivet into place... used a permanent sealer to ensure watertight.
 

Attachments

  • AH Footwell Speaker Boxes S50 1689.jpg
    AH Footwell Speaker Boxes S50 1689.jpg
    1.7 MB · Views: 79
  • AH Footwell Speaker Boxes S50 1695.jpg
    AH Footwell Speaker Boxes S50 1695.jpg
    1.6 MB · Views: 78
  • AH Footwell Speaker Boxes 5643.JPG
    AH Footwell Speaker Boxes 5643.JPG
    254.8 KB · Views: 92

red57

Jedi Knight
Country flag
Offline
Looks very nice Steve. I gotta say Richard has the best eyes of all of us. I knew about the exhaust system from your help with mine last year but what really caught my eye is that cold air intake - I would like learn more of that. Congrats on this milestone.
 

dougie

Luke Skywalker
Country flag
Offline
Speakers, speakers...! The only sound I wanted to hear is the roar of motor. ;)
 
OP
HealeyPassion

HealeyPassion

Jedi Warrior
Country flag
Offline
Speakers, speakers...! The only sound I wanted to hear is the roar of motor. ;)
Yes I know, but sometimes when touring my lovely navigator, companion of 50+ years, mother-of-my-children, (need I go on) ... tires of just the engine sound ... yeah hard to imagine.
 
OP
HealeyPassion

HealeyPassion

Jedi Warrior
Country flag
Offline
Looks very nice Steve. I gotta say Richard has the best eyes of all of us. I knew about the exhaust system from your help with mine last year but what really caught my eye is that cold air intake - I would like learn more of that. Congrats on this milestone.
Cold air intake -- as you know, engines run better with cool air than hot under hood air, and while my cold-air intake is feeding an EFI ... this approach could also be used to feed the SU's. It would just take a bit of imagination to build a box in place of the air-filters on the SU's. In these pictures you see a Cold Air cannister that also houses the air-filter. The air-filter is capable of supplying sufficient air for 250 HP, so should be plenty large enough.... made by Spectre Performance. An inlet hole was placed beside the fresh-air inlet, which gives acces to air in front of the radiator. I checked wheel/fender well clearances during fabrication and don't expect any issues. The air inlet hose to the cabin fresh air has been reduced from 4" to 3" which then clears the cold-air cannister/filter .... which I feel won't be noticed.
 

Attachments

  • EFI Cold Air Channel Small (2).jpg
    EFI Cold Air Channel Small (2).jpg
    116.1 KB · Views: 90
  • EFI Cold Air Channel Small (6).jpg
    EFI Cold Air Channel Small (6).jpg
    89.1 KB · Views: 81
  • EFI Cold Air Channel Small (7).jpg
    EFI Cold Air Channel Small (7).jpg
    59.8 KB · Views: 94

BobHaskell

Jedi Warrior
Silver
Country flag
Offline
Regarding Bob's post about the difficulty of getting a socket on the rear shock mounting bolts: My solution is to use socket head bolts (allen head).
Richard,
No concern with the smaller head of the socket head screws? Clamp load distributed over a smaller area? Thick, hardened washers?
 

BoyRacer

Jedi Warrior
Country flag
Offline
Yes, hardened steel washers under the socket head bolts for mounting the rear shocks.
 
OP
HealeyPassion

HealeyPassion

Jedi Warrior
Country flag
Offline
I have to ask, will you be installing rack and pinion steering?

I won't be installing a rack & pinion --- but I have rebuilt the steering box with a DWM constant clearance worm gear (CSTG303). The original steering worm gears were cut on 2-axis machines which was why they have a dead spot in the middle (or at least it is supposed to end up in the middle). With today's 5-axis machinery they can cut a constant clearance worm which eliminates the dead spot and is very close to R&P feel. I used it on my last build and was very satisfied with the improved feel.
 

Legal Bill

Jedi Knight
Country flag
Offline
I won't be installing a rack & pinion --- but I have rebuilt the steering box with a DWM constant clearance worm gear (CSTG303). The original steering worm gears were cut on 2-axis machines which was why they have a dead spot in the middle (or at least it is supposed to end up in the middle). With today's 5-axis machinery they can cut a constant clearance worm which eliminates the dead spot and is very close to R&P feel. I used it on my last build and was very satisfied with the improved feel.
Thanks for that information. I have thought about doing the same on my car, but the process of removing the box is such a pain, I questioned if new gear was worth the effort.
 
Similar threads
Thread starter Title Forum Replies Date
Bayless A Sprite gets some paint finally Spridgets 2
G MG touch up paint supplier finally! Spridgets 14
tony barnhill FINALLY Out of the Paint Booth!! Spridgets 32
mctriumph TR2/3/3A Finally painted the 63 3b Triumph 14
J TR2/3/3A TR3A Finally on the Road! Triumph 6
AngliaGT Finally - A (Mostly) True craigslist Ad Other Cars 0
Grantura_MKI Pre-War Finally arrived. MG 7
J Finally getting (re) started on the Bugeye Spridgets 27
Lou E Finally a Bugeye of my very own Spridgets 41
AngliaGT RB Midget - Finally tracked it Down! Spotted 3
EricJNewman MGB Weird Brake issue finally solved. MG 1
Rob Glasgow Finally Found It (Original License Plate Number) Austin Healey 3
J Shroud Painting ["Finally done with these"] Austin Healey 3
Rhodyspit75 Finally on the road Spridgets 7
AngliaGT MGB FINALLY Got the Engine Out MG 5
Gliderman8 TR6 It finally HAPPENED... Hood cable broke but HAPPY ending. Triumph 44
Tr3aguy TR2/3/3A Tr3 frame work finally Triumph 93
Jim_Stevens TR2/3/3A Finally- the color coat! Triumph 12
Basil I finally joined Jaguar 4
J General TR Finally on the road Triumph 1
Bayless More Sprite progress finally Spridgets 23
SherpaPilot TR6 Stromberg War, Finally Success Triumph 2
Bayless Progress finally begins Spridgets 5
tinman58 General TR Finally almost Triumph 7
J TR2/3/3A Finally getting started Triumph 20
Elva164 Finally did another onboard video! Racing 4
J It is driveable! Finally. Morris 8 Other British Cars 8
M Finally Joining the Bugeye club! Spridgets 20
simon1966 Rain cleared up so finally got out. Austin Healey 31
tomshobby TR6 Finally finished my custom steering wheel. Triumph 12
B The Prince of Darkness on the dash board finally conquered Austin Healey 10
vickxxx T-Series Finally MG 3
Sarastro TR4/4A My TR4A finally arrived! Triumph 11
B Scuttle shake finally sorted Austin Healey 23
B Finally - BJ7 painted Austin Healey 3
Jer when something doesnt make sense... and you finally figure out why ! Spridgets 4
Basil Back to the EType finally Jaguar 5
Marvin Gruber Three rebuilt BJ8 engine- FINALLY! Austin Healey 17
J TR2/3/3A Finally started 17 year old rebuilt motor! Triumph 3
drooartz Finally found one Spridgets 8
L Are 100's finally eclipsing the 6 cylinder cars Austin Healey 6
trrdster2000 GT6 Finally got a photo of some of our work on the Spit 6 Triumph 2
T TR2/3/3A Finally found and fitted paper carb air filters on my TR3 Triumph 28
Steve P. Finally found a RWA Midget Spridgets 1
CJD TR2/3/3A TR4 Gearbox in the TR3...Finally! Triumph 3
R GT6 Finally Finishing Triumph 19
Sherlock It's driving season finally! Spotted 5
J Finally a fix for the SU pump Austin Healey 5
F MGB Finally got my 78 MGB on the road MG 5
F Spitfire Finally Mobile! Now Grind/Rubbing from Clutch, Gearbox Or? Triumph 5

Similar threads

Top