Hey Guest!

 Hey - did you know if you click on the title of a thread it will take you to the first unread post since you last visited that thread?
 but were afraid to ask:
  STOP!! Never post your email address in open forums. Bots can "harvest" your email! If you must share your email use a Private Message or use the
  smilie in place of the real @
 Pretty Please - add it to our Events forum(s) and add to the calendar! >>
pkmh
Jedi Warrior
Offline
Hello all,
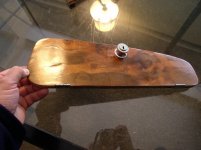
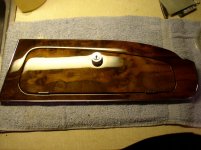
The time came for me to undertake the task of refurbishing my existing walnut wood veneer dash. I first tried using nothing more than rubbing on some old Scott's Liquid Gold furniture oil and be done with it. It gave off a nice smell and a more dark, patina finish. One remaining problem I had was the quality of my veneer pattern looked like patch work having different textural graining in spots, smooth in others. It just looked like piece meal assembly of walnut wood. The oil did not hide the differences in texture. I felt my first Healey had a better specimen of wood veneer an overall pattern which was more appealing to my eyes. I have to say some patterns of wood just look more appealing than others. But I guess that is the nature of this species of wood.
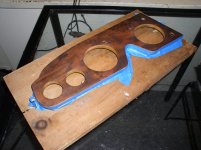
I decided to go with applying a clear epoxy resin finish as I did on my first Healey. But this time, got brave and "cut" down the resin using various grades of sandpaper, then buffing with various cutting grading compounds with an orbiter buffer. My first Healey also had an epoxy resin finish applied, but I never attempted to cut down the finish for the proposes of reducing the "easing" effect of the edges. Resin, when poured, goes on very thick. If you leave as is, all edges appear heavily eased (rounded).
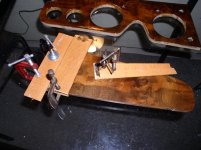
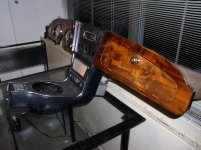
Naturally, I had to first re-glue and press down all the checked and raised veneer areas. Then, very lightly sand the veneer for smoothing and preparing the surface before applying the resin. The one photo you see where the piece is situated on a wood plank with masking tape was to keep it as level as possible to prevent pooling of the resin. To accomplish this, I custom made carriage bolts to anchoring the sides of the veneer and propped up from underneath spacers (pennies did just fine).
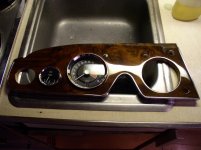
From beginning to end, it took a lot of hours, both by hand and by machine. I finished by using wax with the orbiter. Here are some photos. Anyone else ever worked with this stuff and what more can be said about this? But I will have you know, I am quite pleased with the results. Not perfect, but much better than what I had to start with. and hopefully, I will never have to worry about doing this again.
Enjoy.
Paul
The time came for me to undertake the task of refurbishing my existing walnut wood veneer dash. I first tried using nothing more than rubbing on some old Scott's Liquid Gold furniture oil and be done with it. It gave off a nice smell and a more dark, patina finish. One remaining problem I had was the quality of my veneer pattern looked like patch work having different textural graining in spots, smooth in others. It just looked like piece meal assembly of walnut wood. The oil did not hide the differences in texture. I felt my first Healey had a better specimen of wood veneer an overall pattern which was more appealing to my eyes. I have to say some patterns of wood just look more appealing than others. But I guess that is the nature of this species of wood.
I decided to go with applying a clear epoxy resin finish as I did on my first Healey. But this time, got brave and "cut" down the resin using various grades of sandpaper, then buffing with various cutting grading compounds with an orbiter buffer. My first Healey also had an epoxy resin finish applied, but I never attempted to cut down the finish for the proposes of reducing the "easing" effect of the edges. Resin, when poured, goes on very thick. If you leave as is, all edges appear heavily eased (rounded).
Naturally, I had to first re-glue and press down all the checked and raised veneer areas. Then, very lightly sand the veneer for smoothing and preparing the surface before applying the resin. The one photo you see where the piece is situated on a wood plank with masking tape was to keep it as level as possible to prevent pooling of the resin. To accomplish this, I custom made carriage bolts to anchoring the sides of the veneer and propped up from underneath spacers (pennies did just fine).
From beginning to end, it took a lot of hours, both by hand and by machine. I finished by using wax with the orbiter. Here are some photos. Anyone else ever worked with this stuff and what more can be said about this? But I will have you know, I am quite pleased with the results. Not perfect, but much better than what I had to start with. and hopefully, I will never have to worry about doing this again.
Enjoy.
Paul
Attachments
-
 Austin Healey 42842 Glove Box Door a.jpg191.7 KB · Views: 310
 -
 Austin Healey 42842 Glove Box Door in prgress.jpg192.1 KB · Views: 313
 -
 Austin Healey Dash 42842a.jpg191.3 KB · Views: 308
 -
 005.jpg184.7 KB · Views: 308
 -
 Austin Healey Dash Glove Box Door Refurbished.jpg195.7 KB · Views: 341
 -
 Austin Healey Dash with Console Refurbishment.jpg192.9 KB · Views: 322