• Hi Guest!
    You can help ensure that British Car Forum (BCF) continues to provide a great place to engage in the British car hobby! If you find BCF a beneficial community, please consider supporting our efforts with a subscription.

    There are some perks with a member upgrade!
    **Upgrade Now**
    (PS: Subscribers don't see this gawd-aweful banner
Tips
Tips

Epoxy Resin Dash Refurbishment

pkmh

Jedi Warrior
Country flag
Offline
Hello all,

The time came for me to undertake the task of refurbishing my existing walnut wood veneer dash. I first tried using nothing more than rubbing on some old Scott's Liquid Gold furniture oil and be done with it. It gave off a nice smell and a more dark, patina finish. One remaining problem I had was the quality of my veneer pattern looked like patch work having different textural graining in spots, smooth in others. It just looked like piece meal assembly of walnut wood. The oil did not hide the differences in texture. I felt my first Healey had a better specimen of wood veneer an overall pattern which was more appealing to my eyes. I have to say some patterns of wood just look more appealing than others. But I guess that is the nature of this species of wood.

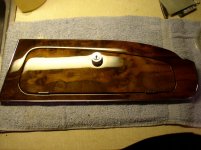
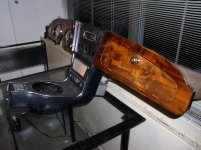
I decided to go with applying a clear epoxy resin finish as I did on my first Healey. But this time, got brave and "cut" down the resin using various grades of sandpaper, then buffing with various cutting grading compounds with an orbiter buffer. My first Healey also had an epoxy resin finish applied, but I never attempted to cut down the finish for the proposes of reducing the "easing" effect of the edges. Resin, when poured, goes on very thick. If you leave as is, all edges appear heavily eased (rounded).

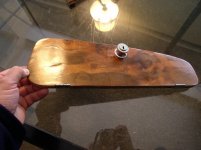
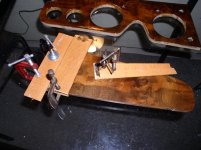
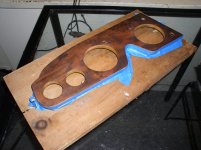
Naturally, I had to first re-glue and press down all the checked and raised veneer areas. Then, very lightly sand the veneer for smoothing and preparing the surface before applying the resin. The one photo you see where the piece is situated on a wood plank with masking tape was to keep it as level as possible to prevent pooling of the resin. To accomplish this, I custom made carriage bolts to anchoring the sides of the veneer and propped up from underneath spacers (pennies did just fine).

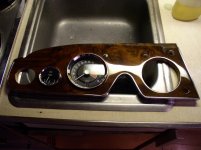
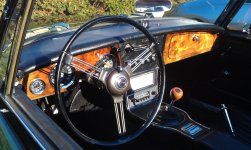
From beginning to end, it took a lot of hours, both by hand and by machine. I finished by using wax with the orbiter. Here are some photos. Anyone else ever worked with this stuff and what more can be said about this? But I will have you know, I am quite pleased with the results. Not perfect, but much better than what I had to start with. and hopefully, I will never have to worry about doing this again.

Enjoy.

Paul
 

Attachments

  • Austin Healey 42842 Glove Box Door a.jpg
    Austin Healey 42842 Glove Box Door a.jpg
    191.7 KB · Views: 264
  • Austin Healey 42842 Glove Box Door in prgress.jpg
    Austin Healey 42842 Glove Box Door in prgress.jpg
    192.1 KB · Views: 262
  • Austin Healey Dash 42842a.jpg
    Austin Healey Dash 42842a.jpg
    191.3 KB · Views: 259
  • 005.jpg
    005.jpg
    184.7 KB · Views: 262
  • Austin Healey Dash Glove Box Door Refurbished.jpg
    Austin Healey Dash Glove Box Door Refurbished.jpg
    195.7 KB · Views: 289
  • Austin Healey Dash with Console Refurbishment.jpg
    Austin Healey Dash with Console Refurbishment.jpg
    192.9 KB · Views: 283
Good job!
 
Quite a nice job.

I have to say some patterns of wood just look more appealing than others. But I guess that is the nature of this species of wood.

I agree, honestly I'm not a big fan of walnut.

Resin, when poured, goes on very thick. If you leave as is, all edges appear heavily eased (rounded).

When I did my dash, I taped all the edges so the tape projected above the dash. Even the gauge and turn signal holes. The resin clings to the tape and makes a high spot around the holes. Easy to hit with a sander to make everything flat. Then plastic polish on a buffing wheel.

Anyone else ever worked with this stuff and what more can be said about this?
I used a surface leveling polyester resin. I don't think it exists any more. It was branded from a local plastics store that was torn down so a metro rail could come into town.:grumpy:
 
Nice job. You did not say what brand you used. I was going to try some marine clear epoxy, mix and pour type. I have seen it used on cars and it looks nice, but I don't know what all was done to make it look nice.
Jerry
 
Thanks all for the compliments.

Greg, I did learn about taping above the holes, especially around the smaller ones, but only after I poured. Even doing this a second go around was a trial and error process. Example, using the masking tape over the finished surfaces to be protected when touching up the sides actually created a wavy reaction to the finished surface. Something in the glue has an adverse effect when in contact with the resin. Just re-sanded and buffed out again. Doing this a third time would be a charm, I'm sure. I experimented a little using tape around the hinges to the glove box door, so I now have a better understanding of that. Thanks for that insight. Much appreciated.

Marv, Thanks for the offer(s) about doing more. You can PM me if you are really serious. But for now, I accept as a compliment so thanks again for that.
 
Jerry, The brand name I used to cover the wood was a clear coat epoxy resin and was by "Parks". Bought it at a local Home Depot store. I am sure you can get it a number of different ways, but I believe as long as the "activator" and "resin" is mixed as a 50/50 ratio, then I tend to think the brands out there are basically the same, as I have investigated. HOWEVER, they make mention about UV ray protection, or lack of. I had used this brand on my first Healey during the summer months till it got destroyed in the hurricane in late October. Never experienced any issues, but haven't had it on for years to know better. If they make a brand that has UV protection, then I would see no harm in getting that, if they make it.
 
I've used epoxy a lot on sailing boats. The only problem is that after a year or so in the sun (UV exposure) the resin starts to go milky. This can be prevented by applying a coat of polyester varnish which is apparently a UV barrier.
 
Hi Paul,

WOW, really great job. Your skill and patience really shows. I’ve seen new replacements but they can’t hold a candle to what you’ve produced.

All the best,
Ray (64BJ8P1)
 
Alex, Thanks for the tip about using polyester varnish. from what I've read so far, it contains solvents and once you apply to the resin finish, it becomes irreversible. Thickness of application, from one source, says it goes on in microns. Does one know how the finish is left on the resin? Can this be built up and then buffed out the same fashion as the resin? I would also be curious to know when the finish you mentioned became milky. Could potential exposure to salt water or excessive moisture also be a culprit to having a milky finish? I had mine for over five months on my first Healey and never had any issues. I also would periodically rub a wax on it for appearance and protection (protection, maybe?). So I am curious to learn when the milky appearance occurred on the one you know about. Mine is garaged and I hardly drive it on very hot days, for other reasons as well, unless I have to attend a car show. But I have driven it many times in the sun. Never an issue (then anyway).

I would like to know if their are simpler applications for UV protection that can be applied. Say, something as simple as coating the surface with baby oil, furniture oil or just a wax that would suffice against possible UV rays. If the car sits outside in the sun, then I can understand this would be a problem. I also feel that if I completely immersed the wood on all sides with this resin, maybe that too, would helps seal out moisture. I am just guessing other possible scenarios for I respect Murphy's Law. Time will tell one way or another.
 
Hi Paul,

WOW, really great job. Your skill and patience really shows. I’ve seen new replacements but they can’t hold a candle to what you’ve produced.

All the best,
Ray (64BJ8P1)

Thanks Ray. Much appreciated! Now time will tell how well this holds up and if it holds up like the last one I did, I will be pleased.
 
I think I will read the label and look for UV and Hurricane protection.

Jerry

"Hurricane Protection?" That's a good one! When my first got destroyed the dash held up, other than growing wider by and inch.
 

Attachments

  • 018.jpg
    018.jpg
    202.3 KB · Views: 119
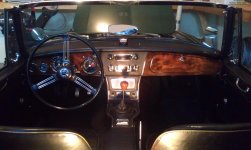
Just a follow up. The dash has been back in for a while. Had a shorting issue causing one fuse to blow and I think involved the tach in some way which is now resolved (hopefully permanent!). Well, everything is working as it was before. The steering wheel is next and will be saved for the next posting (some ideas on how to handle refurbishing that).Austin Healey Dash Refurbished Installed 3.jpgAustin Healey Interior Dash 3.21.14-1.jpg
 
Awesome job , looks great . The part I appreciate most is "you restored it" you didnt pick up the phone or get on the net and just order a new one and assemble it .
Thats the true difference between restoration and car in a box so called restorations .
Again Beautiful job hats off to you .
I did both of mine for my 67 and 64 and theres probably around a weeks work in labour all the hrs in prep and sanding and buffing and resanding and buffing till your arms are ready to fall off .
 
PKMH,
I found your epoxy in Home Depot. How many boxes did you use for your dash? Did you tape around the edges and holes to let the epoxy puddle better or is that what you meant when it reacted with the glue? I could not tell if you tried and declared it a failure or if it worked but required some sanding out?


Jerry
 
Awesome job , looks great . The part I appreciate most is "you restored it" you didnt pick up the phone or get on the net and just order a new one and assemble it .
Thats the true difference between restoration and car in a box so called restorations .
Again Beautiful job hats off to you .
I did both of mine for my 67 and 64 and theres probably around a weeks work in labour all the hrs in prep and sanding and buffing and resanding and buffing till your arms are ready to fall off .

Thank you. No joke about that and I have to say you were faster than I was. But I have to figure that while the dash is out, might as well restore everything else too, like the white lettering to the heater control bakelite, removed and cleaned all the glass bezels, install new choke cable, clean out the Smith heater box, clean and oil the cable controls, repair the directional signals, refurbish my glove box interior, rewrapping the vinyl wrap, straighten the radio speaker and radio window repair, brushing out the water temperature coil, even refurbish the foam to my arm rest (kind of connected, don't you think?)...you know, everything else that is in the way (which really means the whole **** car!). Then throwing my back out when trying to resolve an electrical short issue I had. But all is good and I feel better!

Paul
 
Last edited:
Back
Top