• Hi Guest!
    You can help ensure that British Car Forum (BCF) continues to provide a great place to engage in the British car hobby! If you find BCF a beneficial community, please consider supporting our efforts with a subscription.

    There are some perks with a member upgrade!
    **Upgrade Now**
    (PS: Subscribers don't see this gawd-aweful banner
Tips
Tips

Engine stand rotisserie plans

Austin1226

Freshman Member
Offline
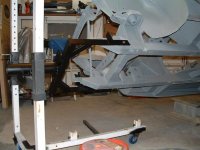
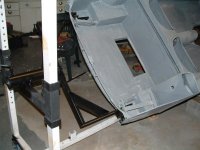
Hello has anyone built or seen plans for a car rotisserie built using engine stands I would like the, type with jacks built into them . Have seen pictures but no plans thanks for any help. Doug
 
One might have to make a few modification to the engine stands as they are not really high enough or all that heavy. Building one from scratch is not difficult. I built a rotisserie about ten years ago for a Chevy, which was quite a bit heavier than a Healey. Overbuilt, with thicker wall tubing and heavy duty coasters, this thing likely could handle a tank. It came in handy for the 100-6 too. When used for the heavier car, I connected a full length square tube that extended into the front legs of the two ends. For the lighter Healey, that didn't seem necessary.

IMG_9041.jpg
 
My diy rotisserie looks similar to blueskies. Instead of engine stands I found a scrapped Olympic weight lifting H frame. It was handy in that I could raise or lower the whole unit. I welded on caster wheels so I could move it around. With the wheels in place, each end does need to be connected for stability. I also drilled holes for threaded pins in the top of the pipe where the fork passes through. Those pins made sure that the car stayed where I put it. Balance is key. You don't want a top heavy rig. If you have the forks from the stands to the bumper mounts correct then you should be able to spin the unit with just one person. Using a 2nd person is still suggested, for safety. I pulled the car off the rotisserie to put in the drive train. Painting, brake/gas lines, wiring, etc... was a walk in the park using the rotisserie.
 
"Blueskies",

Do you have any close-up pictures of the attachment plates/points on the 100-6 that you could share? Also, what is the center-line height of the pivots? I will be starting my 100-6 soon. Thanks. Jim
 
"Blueskies",

Do you have any close-up pictures of the attachment plates/points on the 100-6 that you could share? Also, what is the center-line height of the pivots? I will be starting my 100-6 soon. Thanks. Jim

Sorry, the car is no longer on the rotisserie and I did not take many pics. It likely was higher than needed for the 100-6; the car is not as wide as a full size Impala. As someone already said, balance is important. One end of the pivot does have a bolt to tighten, to hold the car from turning. That too is important.
 
OK, and thanks for the reply. It looks like you borrowed some through-holes for the front suspension to mount the front, and maybe the rear bumper brackets for the rear stand? Jim
 
Jim, Yes, I just used the existing holes on the Healey structure. As far as height goes, you never know when you might want to work on a car that is a little wider than a Healey, so a little extra height won't hurt. The extra height also is nice for working, at least when the car is on its side.
 
Thanks! I hope the car just need sills and floors. Having the work at a reasonable working height is a luxury I've never had before. I can no longer work for any length of time while on my side or back - somehow I've suddenly turned into my dad (or maybe granddad!). Jim
 
Andrea, Were did you get that gas pedal. It's looks awesome! Richard
 
I found my pics with a new Jule frame. You can see the bumper mounts. Note that the car was a little top heavy with that setup. It worked OK with two people spinning it and then bolts to hold it. It felt very safe. You can see the bolts in the far left of both pics. Wheels under it came in handy to.
 

Attachments

  • Front.jpg
    Front.jpg
    65 KB · Views: 184
  • Rear.jpg
    Rear.jpg
    59.4 KB · Views: 180
Back
Top