• Hi Guest!
    If you appreciate British Car Forum and our 25 years of supporting British car enthusiasts with technical and anicdotal information, collected from our thousands of great members, please support us with a low-cost subscription. You can become a supporting member for less than the dues of most car clubs.

    There are some perks with a member upgrade!
    **Upgrade Now**
    (PS: Subscribers don't see this gawd-aweful banner
Tips
Tips

TR2/3/3A Door Check Strap TR3

Russ Austin

Jedi Warrior
Country flag
Offline
I was opening my door and a gust of wind came up and broke the eyelet where the check strap attaches to the A post. Do I need to fabricate a piece to attach to the A post, I cannot locate one in any of the big three catalogs. Any ideas!
 
Remove the door , then remove the 4 screws that secure the plate to the "A" post. Take it out and look at it. It seems to me as if you have a broken cotter pin that needs replacing. Then put it all back together again.
 
Thanks Don, it wasn't the cotter pin!
PICT0110_resize_resize.jpg
 
Russ,

I have the same problem on my driver's side doors I was thinking of welding a washer on it but atill want a better method.
 
Hey Peter, I thought of the same thing. I even tried useing JB weld with a washer, didn't work! It needs to be welded in place.
 
Give the folks at TRF a call tomorrow. I vaguely recall hearing that they had that piece reproduced.

If you do try to weld it, I would definitely suggest two washers, one on each side. Trim it up a little with a grinder and paint to match, no one will notice.
 
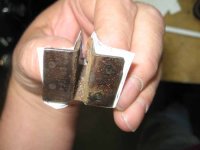
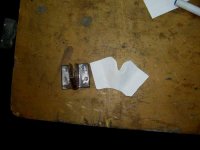
Had the same problem with mine. I made a new piece. I drilled the spot welds holding in the old one. Do it carefully, as you want it as much as possible to be in one piece, as this will be the template for the new one. To tell you the truth, I don't remember if I drilled from the door side or the fender side. I'll look when I get home tonight. I should be able to tell. Anyway, bend that pulled out section back into place as best you can. After it's out, wrap a piece of paper over the top over the broken piece and cut and trim it so it fits perfectly. This will be the template for the new piece. Now you can trace it onto a piece of metal the same thickness that you can get a Home Depot etc. I cut out the new piece SLIGHTY larger so I could make any minor adjustments after it was bent inot shape. The bending is the trickiest part, but not impossible. I started with the middle bend. I used a small drill bit to wrap it around so it wouldn't crease. I had to do some minor trimming to get it into the hole, but it worked out pretty good. When I get home tonight, I'll take some pics of the old and new.
 
Spoke to Dave at TRF and he confirmed this will need to be fabricated. So I'm going to give it a shot.
 
Here's a couple of pics of what I did. I made a qiuck template this evening just to show you the process.

First pic: Shows the paper around the broken piece. Leave it a little larger. After you fold the new metal piece, you can trim things down to fit and square thing up.

Second pic: Shows the piece of paper flattened out. This is what you will mark out on the new piece of metal. I now remember that I used one of those flat blank plates that go on a four inch electrical box. They are just about the right thickness. Make the middle fold first. I used a drill bit (measure from the old piece) so it wouldn't kink. Then fold the legs. Your basic shape will now be there. A little dremel work, and everything should look like the original. Drill the holes last.

Third pic: finished piece welded in. BTW, I drill the original out from the door side. You will need access from the fender (wing) side to remove and re-install the new piece. Should be able to get there by removing the mud guard piece.
 

Attachments

  • 11899.jpg
    11899.jpg
    24.1 KB · Views: 212
  • 11900.jpg
    11900.jpg
    24.6 KB · Views: 193
  • 11901.jpg
    11901.jpg
    29.8 KB · Views: 193
Art, That looks great. Did you plug-weld the new bracket from the door side? Then repaint the post after welding the new bracket on?

Since I don't want to repaint right now, I'm going to try another approach first. I am going to slide in a thick piece of copper between the halves of the bracket then add some new metal with my MIG and close the loop. If it works, I'll post pics but don't hold your breath as mine have been broken for years and I haven't been motivated to fix it yet.
 
PeterK said:
Art, That looks great. Did you plug-weld the new bracket from the door side? Then repaint the post after welding the new bracket on?

Actually, the repair was part of a whole body restoration. The bracket goes in from the fender side, and then I did plug weld from the door side.
 
Back
Top