• Hi Guest!
    You can help ensure that British Car Forum (BCF) continues to provide a great place to engage in the British car hobby! If you find BCF a beneficial community, please consider supporting our efforts with a subscription.

    There are some perks with a member upgrade!
    **Upgrade Now**
    (PS: Subscribers don't see this gawd-aweful banner
Tips
Tips

MGB Diving in: time to pull the parts car engine

drooartz

Moderator
Staff member
Gold
Country flag
Offline
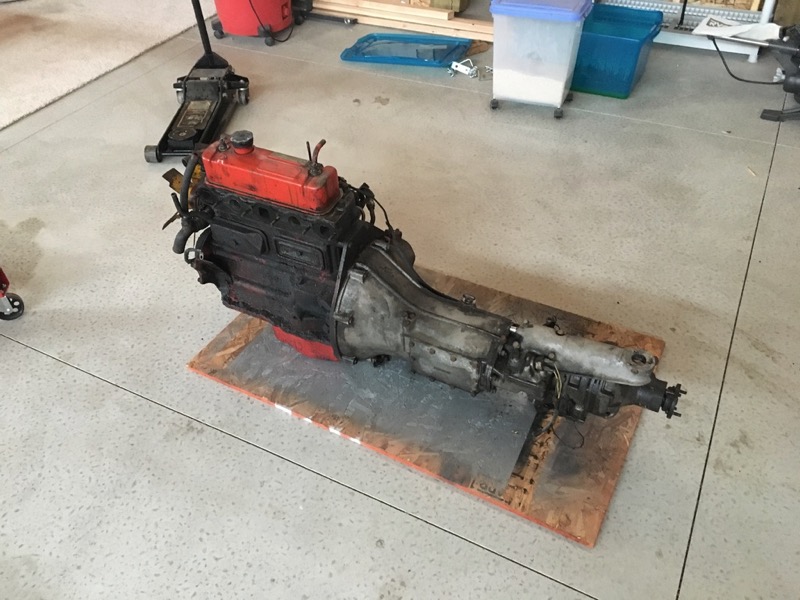
Found some motivation today -- after a nice drive with my local car club, the folks who sold me the parts car swung by to pull a few things off the car that they needed. When I bought it, I let them know that they could have whatever they needed (if I didn't need it). I don't want to store a bunch of extra stuff, I'm only interested in the parts I can use on my B... and of course the engine and transmission (why I bought the car in the first place). Good running engine and an OD transmission to drop into my car to get it back on the road while I rebuild the original engine.

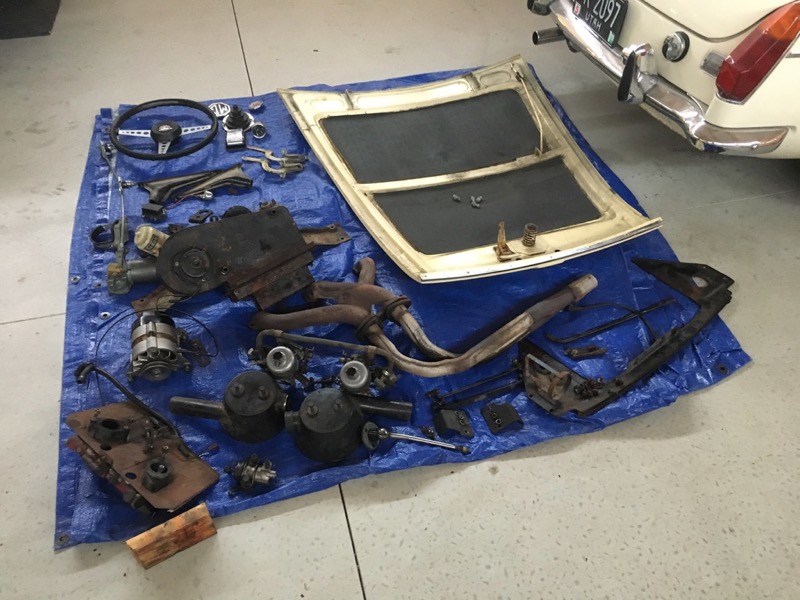
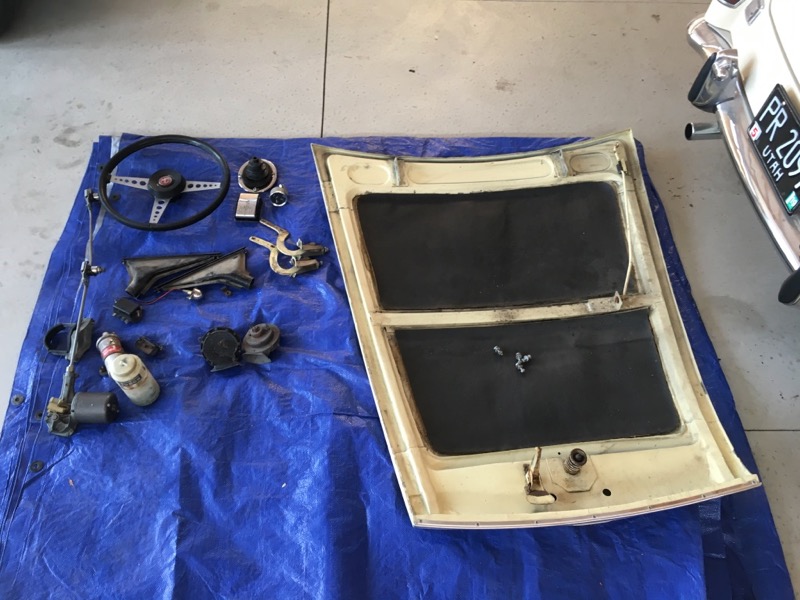
This visit got me motivated, and I started pulling parts I wanted. Main was the aluminum bonnet (my car does have one as well), a nice spare to have on hand. Otherwise I'm just pulling a few bits and pieces that might prove useful down the road.

I've not pulled an MGB engine before. Anything I need to be thinking of, dealing with?

Side note -- this car was known as Rustyass by the previous owner. As we worked on it, little piles of rust dust appeared beneath the car. We all had a good laugh. :D

rustyass3.jpg


rustyass4.jpg
 
Pretty straightforward - pull engine and transmission together after removing the radiator, both manifolds, starter, alternator, and distributor. Oh, and the shift lever as well. The nuts on the motor mounts can be a little tricky to access, but otherwise it's not a big deal. There's plenty of clearance to yank the whole assembly.

Have fun!
 
Drew,
I use an HF engine hoist and it can be difficult to get close enough to the front of the car to fully reach the center of the engine and the tires can get in the way as well. I ended up with the car on jackstands with the front ones as far back as I could get them without upsetting the balance and the a$$ end of the car elevated. Other than that it’s just disconnect all the lines, mounts, shift lever, etc. and jack that sucker up and out. Make sure the lift is on a smooth surface or it can be difficult to roll once loaded.
Good luck, Rut
 
Oh yeah, as Rut said, put the rear end higher for an easier exit angle. Kinda sounds counter-productive, but it does help.
 
It is an OD. What's missing (I know I need to make sure I've pulled the wires)?
 
Speedo angle drive and the rear crossmember will be in the way of the tail shaft flange. I us a bottle jack sideways so as the OD clears it falls over. Best to pull out the tunnel top cover to see better.
 
Got everything pulled today. Thanks for all the tips, they helped. In the end the only thing that held me up was forgetting to pull the shift lever out before I started to try and pull the engine. Was wondering what could possibly be holding things up... :grin::crazy:

So the plan now is to separate the engine and transmission and throw in a new clutch. I know my old trans (also OD) is good I will likely reuse mine for now. This one will get rebuilt at some point for a spare. Will probably reuse my carbs and distributor as well, as they've both been rebuilt in the last few years.

I grabbed a few things off the car that I could use as spares for mine, including the aluminum bonnet, wiper motor and boxes, heater box, and a few other random bits. The shell now goes to a friend who will strip the rest of the car down for what he wants for spares. I'm trying to only grab what I can use on my car, as I don't need to be a packrat with things that don't fit my stuff -- I've got enough junk as it is.

rustyassdone1.jpg


rustyassdone2.jpg
 
Good job!
 
Now, with luck, the motivation will continue. Mine stopped with house issues, but, finally getting going again. Only 3 yrs behind.
 
Best to start these jobs in the cabin while you are still clean.
Would resurface the flywheel, replace the rear seal and check the throw out fork bushings, etc.
 
Drew,

Now that you're an expert on engine removal,why don't
you come by,& show me how it's done?
 
If we lived closer together I'd be right over.

Of course engine removal is pretty simple. Functional engine installation is an entirely different thing. :smile:
 
I'm excited -- this gets my MGB back on the road so I can enjoy it while I do the real rebuild on the original engine. Also gives me a spare OD trans to keep on the shelf just in case.
 
:highly_amused:
 
Is there a checklist somewhere on what all to do to
remove/replace the engine on a '67 B/GT?
 
I can't say whether there is any checklist. But if you've never pulled an engine, drain the oil and the radiator. Then get your digital camera and take lots of photos, especially of the wiring connections. Label all wires. Get the assortment of freezer bags with the labels you can write on. Label and bag all parts as they come off, trying to keep them in some semblance of order as you box them up. Start with one side and progress as far as you can (I often start at the front with the radiator). Then move to a second side and progress as far as you can. Then move to the third side and progress as far as you can. Then repeat as necessary. I have an MGA and pull the engine and transmission separately. Get a floor jack under the car to support the engine or transmission as necessary.

Barney has some MGA advice that will probably give you some ideas. start here and scroll through the next few pages. https://mgaguru.com/mgtech/engine/be105.htm
 
I didn't use any sort of checklist pulling this engine, as I have another to pull from my car so I'll pay more attention then. :smile:

When I did the engine in my Morris, I was careful to write down each thing I did in order (and took pics where necessary). That engine was out almost a year. Following that list of items backwards to reinstall was trivial to do. I'll do similar with the B - write down *every* thing I do, and take pics (or make drawings) where there's any question at all.

Freezer bags are a great tip - bags and some sharpies to keep the parts together and labeled.

Lastly, a big lesson from my previous exploits is to move slowly and think out the next move. Disassembly is addictive and you can get deep in with out much thought. Taking time between each step to make notes and take pics makes the reassembly as simple as "the reverse of disassembly." :grin:
 
Last edited:
My order: Unhook battery, carbs and fuel line, engine wiring, radiator and fan, exhaust, clutch lines, driveshaft. Inside: seats, tunnel, shifter. Hoist, clamp on engine and tranny mounts and out.
 
Back
Top