• Hi Guest!
    You can help ensure that British Car Forum (BCF) continues to provide a great place to engage in the British car hobby! If you find BCF a beneficial community, please consider supporting our efforts with a subscription.

    There are some perks with a member upgrade!
    **Upgrade Now**
    (PS: Subscribers don't see this gawd-aweful banner
Tips
Tips

TR2/3/3A Differential Rebuild - Gear Markings

Joel M

Senior Member
Country flag
Offline
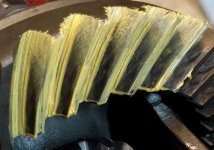
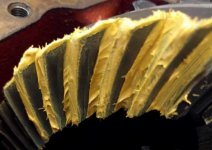
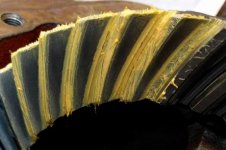
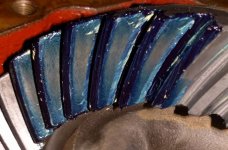
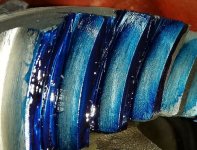
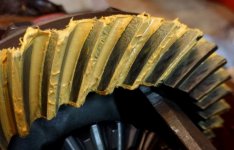
I'm currently rebuilding the differential on my 3A. Never done one of these, and would appreciate some help interpreting the gear markings. This is the first cut with original shims and exact Timken replacement bearings except for the pinion head (used a 3188 instead of a 3188s). Pinion pre-load and backlash were in spec at 18 in-lbs and 5-mils respectively.

Drive
Drive Gear Marking.JPG
Drive Gear Marking 2.JPG

Coast
Coast Gear Marking.JPG
Coast Gear Marking 2.JPG
 
Your pattern looks great! A used gear will always look different than the patterns you see in the books as they are setting up new gears. I also had some figuring when rebuilding my TR4 diff as one of the pinion bearings changed and the new spacer is a different length, just a adjustment in the preload shims to get it correct and you are good to go.

A pattern like you show with backlash in spec is perfect.
 
Thanks Dave, that's good to hear! I wasn't excited about the prospect of adjusting shims umpteen times to get it right. I didn't consider that a used gear marking would look different than a new one. My main concern was that the drive side looked more towards the toe compared to the coast side which appears well centered.
 
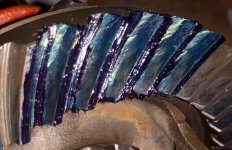
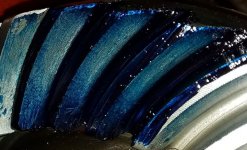
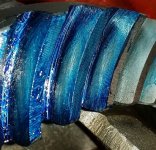
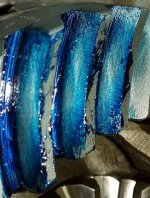
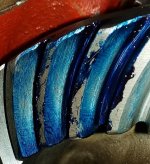
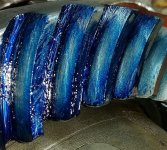
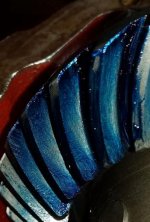
I actually have some Prussian Blue lying around. I just used the yellow stuff because I thought it might stand out better. Here are the blue gear markings:

Drive
Drive Gear Marking Blue.JPG

Coast
Coast Gear Marking Blue.JPG
 
I hate to be the dissenting opinion, but I read that the ring is too close to the pinion. The pattern is right up to the inside edge on drive and outside edge in coast. It should pattern about the same place on the tooth in drive and coast. If it were my set I’d shim the pumpkin about .002” away from the pinion.
 
Examine the coast side it is centered face to flank and toe to heel, the drive side is centered face to flank and although it is closer to the toe, when loaded the contact will spread across the tooth. A used gear will not have a proper drive pattern due to the loaded wear the tooth has received.

This is the manual I trust and have used setting up offroad vehicles.

https://www.yukongear.com/downloads/manuals/yukon_general_installation_instructions.pdf
 
When I read that, I still get that the ring needs to move away from the pinion. I agree the pattern will move under load, but it should never go right to the very edge of a tooth, as it appears to be. There is a bit of interpretation...like I said, “if it were mine”, I would work the pattern over. But, you can always try it and hope it doesn’t whine. If it does whine it will destroy the ring and pinion in short order.
 
If it does whine it will destroy the ring and pinion in short order.

This is not always true. "A singing axle is a happy axle." (I used to work at an axle factory.) Many gearsets will live long and productive lives with whine. That being said, if an axle wasn't making noise and suddenly starts to, it's probably toast.
 
Truck axle factory? I've had a lot of 1 ton and larger trucks whine straight out of the factory...including big RV's. I've only had one car that whined, and it was toast when I bought it. A new (used) gearset cleared it right up. I take that back...some of my "extreme" gearsets, like 4.90's and 5.20's whined. We could only hear those when coming back down from 1/4 mile runs, though. Never ran one on the street. Most car drivers won't tolerate a whiny rear end.

Wait...thought of one more. We had a first year Aviator. At the 6 month point I told the dealer that I could hear a subtle axle whine at 30 and 60mph. Being 4wd I asked if it was normal...they replaced the rear end without my even asking for them to! I never heard it again on that car.

On a couple different diffs that I was having trouble getting the pattern right...I set up a nice little work area in the living room in front of TV and then spent most of a week shimming and checking...until I was happy with the pattern. Then I got married. The wife won't let me bring the diffs in the living room any more. Real bummer.
 
So I guess I have two options: 1) leave as is, or 2) move the pinion back a few mils to lift the drive side gear marking. If I move the pinion back, do I introduce risk due to being off the previous wear location if the box had been running as currently shown? Just a guess, but it seems like it might be better to match the pattern in which the gear has already experienced wear. I ask because I rebuilt using identical replacement bearings and shims, so I think I should have virtually identical factory setup.
 
I agree with your logic, Joel. It is best to run a used set of gears exactly as it was running. But, If you replaced the bearings, then you cannot be sure what the original pattern was, unless you checked it prior to dis-assembly. Bearings are precise assemblies, but tolerances can combine or subtract. The bearing on the back side of the ring takes most of the load, so it will tend to wear faster than the gear side, allowing the pumpkin to move that direction. All little things that may (or may not) result in the position change when the bearings are replaced.
 
I decided to go ahead and install a new ring and pinion due to the mileage/wear on the old set. So I'm back again, asking for advice on gear markings. Since the original drive pattern favored the toe, and was located at the edge, I placed an additional 2-mils of shim (0.023 to 0.025) under the head cup.

1st Marking - 25mil
1Drive_25mil_20180702sn.jpg 1Coast_25mil_20180702sn.jpg

2nd Marking - 25mil
2Drive_25mil_20180702sn.jpg 2Coast_25mil_20180702sn.jpg

The drive seemed to still favor the toe as the coast did the heel. So I followed with an additional 3-mils of shim to 0.028.

1st Marking - 28mil
1Drive_28mil_20180703sn.jpg 1Coast_28mil_20180703sn.jpg

2nd Marking - 28mil
2Drive_28mil_20180703sn.jpg 2Coast_28mil_20180703sn.jpg

Not sure, but I'm thinking the 28-mil markings might be too close to the root, with better heel to toe location for both drive and coast.

I should mention the runout on the carrier was 2.5-mils (within spec of <3mils), and the gear lash varied from 4-6.5 mils (after adjusting carrier shims) depending upon the tooth being measured. I know that is 0.5 mils out of spec on several teeth for lash, but I'm not sure what I can do about it other than try to have the carrier turned. There are no burrs on the ring gear, and I have not checked it on a surface plate for warpage - although visually it seems to be a quality gear (Bastuck).

I would appreciate any advice for the next step on this rear axle setup.

Joel
 
I would be happy with a pattern as in the 28 mil pics. As you said, you don’t really have an adjustment for the lash, so I would accept the .0005” out there. I think you’re there! The pattern will tend to move away from the root under load, so I wouldn’t”t worry about that with a new gear set.
 
Thanks for the advice John! All I have to do now is fit bearings/seals on the hubs and assemble to finish up the rear axle. Looking forward to tackling the suspension and front brakes.

Joel
 
Back
Top