
-
 Hey Guest!
British Car Forum has been supporting enthusiasts for over 25 years by providing a great place to share our love for British cars. You can support our efforts by upgrading your membership for less than the dues of most car clubs. There are some perks with a member upgrade!**Upgrade Now**
(PS: Upgraded members don't see this banner, nor will you see the Google ads that appear on the site.)

Tips
- We have a special forum called "Member Articles" where you can submit actual articles for consideration for publication. Learn More
- Don't have an Avatar? If not, your avatar will default to the 1st character in your username. Go into "Account Details" to change your Avatar.
- Some basic forum navigation info: click
 Hey - did you know if you click on the title of a thread it will take you to the first unread post since you last visited that thread?
- Hey Guest - Is your British Car Club in our Clubs database? If not, send me a PM - Basil

- Looking for a local club? Click the "Clubs" tab above and browse hundreds of clubs world-wide.
- Add Android or iPhone APP: click
- Did you know - any picture or video you add in your posts in any marque-specific forum will also get added to the Media Gallery automatically.
- A few more tips about posting and replying: click
- Hey there Guest - be sure to keep your profile page up to date with interesting info about yourself: learn more
- More tips and tricks on Posting and Replying: click
 but were afraid to ask:
  STOP!! Never post your email address in open forums. Bots can "harvest" your email! If you must share your email use a Private Message or use the
  smilie in place of the real @
- Want to mention another member in a post & get their attention? WATCH THIS

- So, you created a "Group" here at BCF and would like to invite other members to join? Watch this!
- Hey Guest - A post a day keeps Basil from visiting you in the small hours and putting a bat up your nightdress!
- Hey Guest - do you know of an upcoming British car event?
 Pretty Please - add it to our Events forum(s) and add to the calendar! >> Here's How <<
- Hey Guest - you be stylin' Change the look and feel of the forum to fit your taste. Check it out
- If you run across an inappropriate post, for example a post that breaks our rules or looks like it might be spam, you can report the post to the moderators: Learn More
- If you would like to try some different "looks" or styles for the site, scroll to the very bottom, on the left and click the Style Selector.
You are using an out of date browser. It may not display this or other websites correctly.
You should upgrade or use an alternative browser.
You should upgrade or use an alternative browser.
Differential and rear suspension
- Thread starter neilert
- Start date

GregW
Yoda
Offline
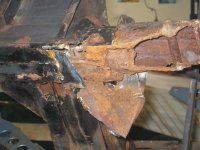
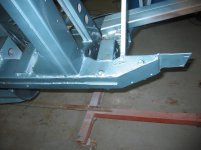
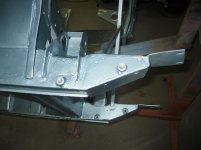
Well Neil, I haven't tackled your specific situation, so this is just my opinion. I'd cut the frame rails midway through the outriggers (the green line in the diagram). That might give the best support from the crucifix, plus the outrigger would give support also (see the blue blobs for the welded areas). As for rear frame pieces, I didn't see any in the Kilmartin catalog. If your interested in originality, the toughest part is the seam that runs along the bottom. For the prices I see, I'd make my own rail and not worry about the seam.
GregW said:the toughest part is the seam that runs along the bottom. For the prices I see, I'd make my own rail and not worry about the seam.
I think I will make my own. There isn't a steel tube with the correct section dimension to start with is there? Would you brake a 16 GA sheet into a 3 sided channel, then weld in the tapered top portion, or just continuous weld the 4 sides of the tapered tube?
vette said:In you case, because there appears to be serve rust damage as well as accident damage and possibly poor previous work, I would suggest that you take all mechanicals and attached panels off the car then sand blast of some sort of media blast the frame and what not to see what you really have.
Vette, Yes- The more I look on the frame, the more I find, but the major problems seem isolated to the outriggers and rear portion of the frame, which I will replace. I want to structurally fix the obvious, inhibit future rust, and drive the car often. Maybe someday when my children are older I'll install the Kilmartin frame rather than patch the original.
Since you will have the frame open, I would suggest inserting a stiffener into each side of the frame, and plug welding at appropriate intervals. The stiffener can be angle iron, which of course is heavy, but remember, you've lost structural integrity in the entire frame. This stiffener will also reinforce the joint of the new work you are doing.
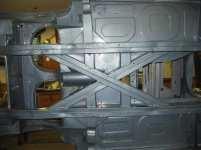
That's just the usual improper jacking damage. I looked at all those places as I was fixing the frame. They could be pulled out, but I didn't deem it worth the effort. Posting those pictures is like posing naked, I know, but what the heck? Before painting, I did have the chassis, with body panels on and engine and running gear attached, put on a frame machine and had all adjustments made to align everything. Then I disassembled everything and had the chassis painted. Finally I reassembled everything and had the whole car fitted and painted.
big6 said:Don't waste your time with the old rusty frame. Buy a Jule frame...
The Jule frame looks very good, but I'm still going to attempt repairs. For me this is partly why I don't purchased restored cars, and learn a bit on each project. I read their website articles this evening, and there is a lot of valuable information about the chassis characteristics.
B
BUNDYRUM
Guest
Guest
Offline
Hello Neil, It looks as though you're really getting into this project and seem to be going about it very well. With all the great help you're getting from the people here and your willingness to give it a go it's going to turn out just fine. I'd be very careful about how you use the LPS3. Make sure you wear a respirator and do it in a very well ventilated space. If you get this stuff on your skin it will be absorbed and ultimately end up in your liver and after that nothing much can be done. We used to use LPS3 in the aircraft maintenance business but it has been replaced with another chemical spray that is worse for you but does a better job of preventing corrosion.
Good luck,
bundyrum
Good luck,
bundyrum
BUNDYRUM said:I'd be very careful about how you use the LPS3. Make sure you wear a respirator and do it in a very well ventilated space.
bundyrum
Thanks for the heads up on LPS safety. I'll use the LPS with caution.
neilert said:GregW wrote:
I recently used some de-ruster from Blue Lightning. On surface rust, it almost washes the rust away. They also have a rust inhibitor that will keep rust from coming back for maybe 6 months to a year (they claim). Until you can paint.
The owner from Blue Lightning called today and he spent 20 minutes with me advising about how to use their products, and other available products. I haven't even used the product yet, but I'm already impressed. I'll report back how everything works. Thanks again Greg for the reference- I had never heard of the company.
